Tony Posted December 17, 2014 Share Posted December 17, 2014 Phew! Good it's the base colour then, I'll start on post 24 when I get up or some time thereafter. Link to comment Share on other sites More sharing options...
Tony Posted December 22, 2014 Share Posted December 22, 2014 Well, I followed the instructions but for two reasons I don’t think I got the colour right. Reason No. 1 – I don’t have an early brown MKII to use as a guide, so was going from memory and No. 2 – I was concentrating so hard on keeping my tongue in my mouth while painting that I completely forgot there were six colours to mix and it was only after I got to the rust colour stage in the thread, that I realised I hadn’t added any burnt sienna whatsoever. None the less, Steve’s instructions were so good and easy to follow that I'm happy with my first attempt and decided to leave the helmet in its present state. If I restore another I’ll concentrate on painting and not what my tongue is doing. One question I have Steve is that I’m unsure if I used enough lacquer. Where I live now the garage isn’t part of the house, it’s detached and damp when it rains, after leaving the helmet in there overnight the paint bubbled up in a few places, after drying out indoors all went back to normal. So, I was wondering if the cause was not enough lacquer or perhaps the paint wasn’t quite dry enough before applying the next coat? I’m not confident enough to apply anything extra to the helmet so below are pics of my attempt, before and after, of a simple repaint restoration. Any criticism is welcome, sort of Tony Link to comment Share on other sites More sharing options...
Spasm Posted December 22, 2014 Author Share Posted December 22, 2014 Impressed or what. Well done Tony. Looks good to me, you'll get used to how the colours interact and how to change the tones to get the final result you want. Not using enough lacquer will not cause anything to bubble up. All I can think of is that the paint was not quite dry before you lacquered, this will seal in the moisture and cause the paint to lift as the water evaporates. Acrylic paint is basically a resin or plastic once dried. It sticks to the lower wet or dry coat by drying around millions of weenie bits that stick up into the new coat. The bubbling has caused these to separate and therefore will now not be as stuck together as they should be. If kept dry and stable there shouldn't be a problem but I wouldn't be surprised if, given time, you loose those sections. However, lacquer is pretty strong so you may never see any problem as the final coats of lacquer will hold the layers in place. Dampness in the air causes the lacquer to go misty, lacquering in the rain causes what looks like white spots (which is really annoying) but doesn't cause any lifting. Putting on thick coats of lacquer can cause 'orange peel' (which needs rubbing down to make smooth). Your lacquering looks good. Don't get too heavy handed with the lacquer, you're not painting a car or bike tank for the glossy finish. You can put on as many coats of lacquer as you want just keep them thin like you have. Nice one. Bloody excellent for a first one, you should've seen my first one Link to comment Share on other sites More sharing options...
Tony Posted December 22, 2014 Share Posted December 22, 2014 Thanks heaps! I'll wait and see if the area where it bubbled up lifts again, hopefully it won't. Actually I might put another coat of lacquer over the top. Link to comment Share on other sites More sharing options...
Laurence Strong Posted December 25, 2014 Share Posted December 25, 2014 Sweet. This is the part I have been waiting for. Tony it's looking good to me. Merry Christmas Larry Link to comment Share on other sites More sharing options...
Spasm Posted December 27, 2014 Author Share Posted December 27, 2014 Sorry I haven't been getting on with this. I've been diverted by a couple of other things, this being one of them. Made by Montagu Odd, who hand made cricket bats for one of the greats.... Not really militaristic but it does give an idea of how to build up a portrait Link to comment Share on other sites More sharing options...
Robin Lumsden Posted December 27, 2014 Share Posted December 27, 2014 (edited) Steve has just completed this M18 helmet showing the shield of my Arms ............... fantastic work.Love the 'distressed' condition !! I'll let the pix speak for themselves, but by way of brief explanation the shield has been painted, after the style of contemporary Munich heraldic meister Otto Hupp, on the left side of the helmet only, in the manner used by several Freikorps formations (e.g. the Grenzschutz Ost shown also), 1919-20.Many thanks again, Steve !! :) Edited December 27, 2014 by Robin Lumsden Link to comment Share on other sites More sharing options...
Tony Posted December 28, 2014 Share Posted December 28, 2014 (edited) Yeah he's pretty nifty with a pot of paint is our Steve. Tony Oh thanks Larry. Edited December 28, 2014 by Tony Link to comment Share on other sites More sharing options...
Spasm Posted December 28, 2014 Author Share Posted December 28, 2014 I obviously need a new camera or to improve my knowledge on what buttons to press, the helmet is a lot better in the flesh. Thanks Gents, nifty with pots is what I'm trying for. Enjoy the helmet Robin. Here's the antique cricket bat (I've no idea how old it is, does anyone have any knowledge on these?) and the continuing portrait. WC Grace, who was a Doctor and a Surgeon, and one of the greatest English cricket players ever. He achieved the double (1000 runs and 100 wickets in one season) 8 times in his cricket career. He played football for the Wanderers and could throw a cricket ball a distance of 122 yards. He was born here in Bristol which is where he was a GP. His never seemed to get around to invoicing his poorer patients and regularly visited the local workhouses on his rounds. Sounds like a great bloke. Back to the Dunkirk helmet. Link to comment Share on other sites More sharing options...
Tony Posted December 28, 2014 Share Posted December 28, 2014 Here's the antique cricket bat (I've no idea how old it is, does anyone have any knowledge on these?) and the continuing portrait. I find Kiwi's know their stuff, my old boss, who plays every weekend did explain it me but ......... Not so sure if girlie Kiwi's know their stuff though. Link to comment Share on other sites More sharing options...
Spasm Posted December 28, 2014 Author Share Posted December 28, 2014 I've consulted the Admin Staff. Her knowledge on cricket bats is absolutely rubbish. She's good on crochet though. Link to comment Share on other sites More sharing options...
Spasm Posted December 29, 2014 Author Share Posted December 29, 2014 Right, back to the Dunkirk helmet... You've had a good session on Google and have found loads of pictures that will go on the helmet. Obviously you own the rights to all the pictures and have permission to use them...ahem. Get them all to the right scale by mucking around with the settings on your printer and print them all out. You may need several reams of paper and a few dozen ink cartridges to get everything right. Then choose which ones you'd like on the helmet, cut them out and temporarily stick them onto the helmet to get the look you want. Pick something to start with, here I've gone for the newspaper headings. Hold the picture onto the helmet and draw round it with pencil. Take the picture away and stick masking tape around the drawn border. You'll notice that the lines you've drawn don't look straight. This is because you're drawing onto the 3D curves of the helmet, so you'll need to position the masking tape to ensure the corners look square and the edges look straight. This takes a bit of fettling until it all looks ok. Mask off the rest of the helmet. Don't stick the masking tape down too well or it'll be a bugger to get off, you're just looking to stop any overspray onto the rest of the helmet. Use too much masking tape or you'll get overspray. As you've got a lacquered helmet any overspray can be fairly easily removed but it's best not to get any in the first place. Here I'm using some Citadel Skull White, a hobbyist's rattle can spray that is a bit more expensive but it dries really quickly and is meant for grown up kids to paint their Space Marines. So it's easy to use and can be sprayed thinly. You don't need a thick white, just a light coating to give your painting a base to work from. You could always just paint this base with white acrylic brushed on but it takes ages to cover the brown and ends up with brush marks that will show when you're laying washes on top. Pull off the masking tape and hey presto, all ready to get into making it look like an old newspaper. Link to comment Share on other sites More sharing options...
Spasm Posted December 29, 2014 Author Share Posted December 29, 2014 The edges of the now sharp white base need to be made a bit fuzzy. Use a drop of water and your nicked scourer. This can also be used for any overspray. Wipe clean. Take the newspaper headlines and give it a good dose of pencil on the back - I've a big thick 6B to do this quickly. Lay and tape on over the white and trace with a ballpoint pen. You can see where you've been so you don't forget which bit you've already traced between sips of tea. Make sure the paper doesn't move as you'll need to hold it as you draw around the 'bends' in the helmet. Ta-da a rough copy of the headlines. Position and tape the next piece and trace again. Once all traced then get your brushes and paint out and fill in the outlines. Painting by numbers, time consuming but pretty easy. Don't worry too much about the weenie details as we're going to make this look old and a bit ragged so the details won't be too clear when finished. Link to comment Share on other sites More sharing options...
Robin Lumsden Posted December 29, 2014 Share Posted December 29, 2014 I'm dumbstruck at the amount of work that has to go into this. Link to comment Share on other sites More sharing options...
Spasm Posted December 30, 2014 Author Share Posted December 30, 2014 Tighten up the newspapers and give them a wash or six and some shadows Move onto the other side and do as above to get another couple of pictures on. Then onto the back and paint directly over the brown base for another picture. All painting by numbers and saving with a coat of lacquer and then applying washes to sneak up on what you want. I'll save ya'll from the rest of the process as they are all much the same until I get onto the medal, laters..... Link to comment Share on other sites More sharing options...
Spasm Posted December 30, 2014 Author Share Posted December 30, 2014 Robin - all in all it takes about a week including the restoration and all the split thumbs from the sanding. Lots of music and a pleasant way to pass the time while thinking about the next project. Now, I've got a side of a WD petrol/water can, a couple of WW2 German Ammo boxes, a British WW1 sniper plate, half a dozen relic German helmets, half a dozen WW1 British helmets, quite a few WW1 and WW2 British water bottles and I still haven't got those bits of Afghan Apaches from work yet - must have a chat with those REME guys again. I'm short of WW1 German helmets, anyone have any relics they want to part with? Link to comment Share on other sites More sharing options...
Tony Posted December 30, 2014 Share Posted December 30, 2014 Ah so you're the one buying them all up. Link to comment Share on other sites More sharing options...
TacHel Posted December 30, 2014 Share Posted December 30, 2014 Looks great! As usual... Link to comment Share on other sites More sharing options...
Robin Lumsden Posted December 30, 2014 Share Posted December 30, 2014 Some additional pix of mine ..............The attention to detail here is mindblowing.Steve ............... you're a bl00dy genius !!And your close-up eyesight must be phenomenal. ;) Link to comment Share on other sites More sharing options...
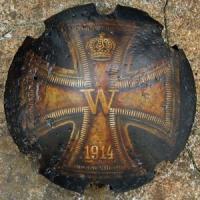
Spasm Posted January 2, 2015 Author Share Posted January 2, 2015 (edited) Tony - what would I do if I ran out? Frank - Robin - thank you very much. Glad you like the helmet. I still think it's better in the hand than in the pictures. I must try to figure that out, probably need to make a light box or use the 'big' camera. So, continuing to completion of our Dunkirk one. Paint on a few badges and flags representing the 'little ships' and a veteran's badge. Then the medal Don't be tempted into putting the colours on, just use white - as in airbrushing bonnets, motorcycle tanks etc. - you need to cover the base colour and paint on the details. Medal ribbons are pretty difficult but I paint on weenie stripes to represent the silk of the ribbon. Easy to then colour and shade to make it look like a ribbon. The medal is built up using yellow ochre as a wash and then darkening down into the details. The Burnt Sienna, Burnt Umber, Yellow Ochre and Black can be mixed and used as washes to make any 'bronze'. Silver medals are much more difficult but give a wash of Burnt Umber before getting into the details with Black washes works quite well. Edited January 2, 2015 by Spasm Link to comment Share on other sites More sharing options...
Spasm Posted January 2, 2015 Author Share Posted January 2, 2015 (edited) Almost done (you'll be glad to hear). Add some lettering trying to get the style correct for the age. Make sure you've centred the writing on the helmet or it just makes the whole thing look off. The lettering will draw the eye first so it has to look right. You can spend hours and hours on lettering as it's quite difficult. Have a look on t'tinternet at differing fonts to help. Put your signature on the underside of the rim, with a date, get another final coat of lacquer on and we're all done. Phew. Onto the next one - an ARP with St Paul's aglow. I've got a few bits that go together with this one. A gas mask and bag, a wooden warning rattle thing, an ARP precautions handbook, a full tin of Anti gas No2 Ointment, an ARP whistle on a lanyard, ARP badge and tunic buttons - all from the same person, The helmet is scratched H Hall under the rim. Thank you. Over. Edited January 2, 2015 by Spasm Link to comment Share on other sites More sharing options...
Tony Posted January 3, 2015 Share Posted January 3, 2015 I might give adding pictures a go one day but I don't think there's much chance of turning out anything near to what you can do, it must take a lot of practice. Besides, you've got all the relic helmets Tony Link to comment Share on other sites More sharing options...
TacHel Posted January 4, 2015 Share Posted January 4, 2015 Another beautiful job! Well done! Link to comment Share on other sites More sharing options...
TemplarDeusVult Posted August 26, 2016 Share Posted August 26, 2016 This thread is simply amazing. Wondering if you've ever made a video on how to do this work for those of us with learning disorders? Its very hard for some of to learn from reading. One way or another I cannot thank you enough for sharing your gift of art. Link to comment Share on other sites More sharing options...
Spasm Posted August 26, 2016 Author Share Posted August 26, 2016 (edited) Keven Welcome to GMIC, nice to see you here. Thanks very much for that, high praise indeed. I've never really thought of doing a video - I normally run away from cameras. But you never know youtube can't be that hard, can it? If you are ever over this side of the pond, or I come over there, we can sort some live lessons, I'll bring me paints and brushes. Feeling a bit humble now, thanks. Steve Edited August 26, 2016 by Spasm Link to comment Share on other sites More sharing options...


Recommended Posts
Create an account or sign in to comment
You need to be a member in order to leave a comment
Create an account
Sign up for a new account in our community. It's easy!
Register a new accountSign in
Already have an account? Sign in here.
Sign In Now