

azyeoman
-
Posts
1,770 -
Joined
-
Last visited
-
Days Won
2
Content Type
Profiles
Forums
Blogs
Gallery
Events
Store
Posts posted by azyeoman
-
-
A very beautiful set. Congratulations!
0 -
It’s great and it’s good to know that others will enjoy them as much as I have and hopefully find new information on the medal recipients and the events they were involved in.
0 -
Although I'm auctioning my PoW collection via Morton & Eden (See above post), I am NOT auctioning my collection of 2nd Anglo-Boer War PoW medals and groups.
I have recently acquired one of the most desirable medals for the 2nd Boer War, and not only does it finish my quest for acquiring one of each of the clasps for the war, but it also is to a PoW. Of course it's a QSA with a Defence of Mafeking clasp. The research, with the help of some fellows at the Anglo-Boer War Forum is most interesting and brings more to life the man behind the medal. I hope you'll find it as interesting as I do.
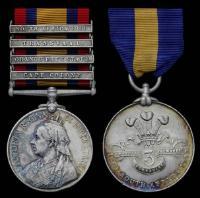
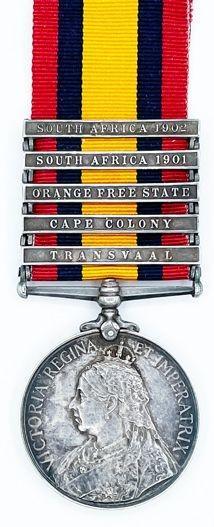
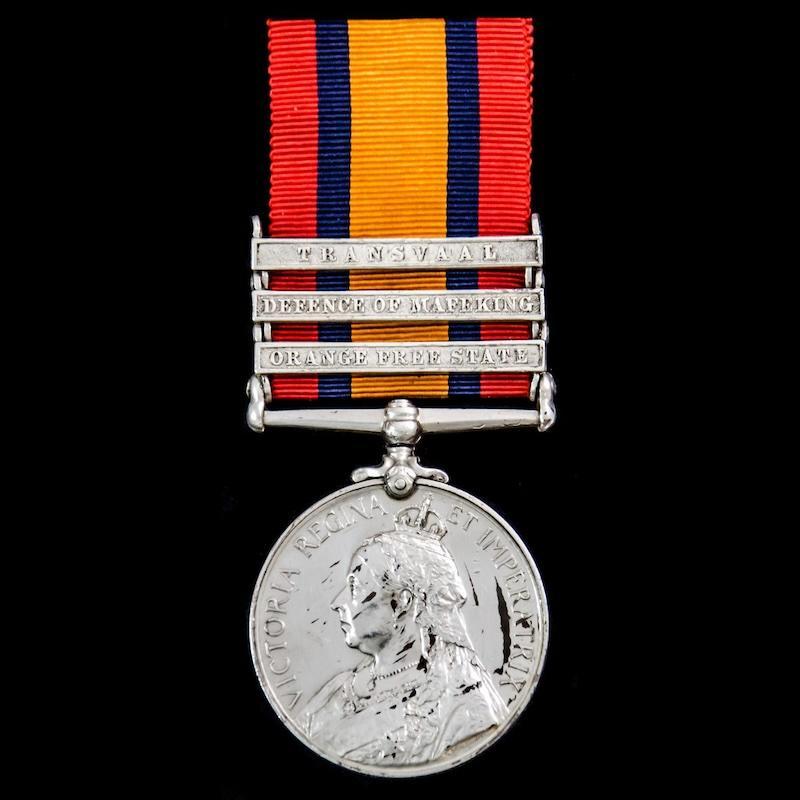
This QSA is a superb Defense of Mafeking Prisoner of War Queen’s South Africa Medal 1899-1902, 3 Clasps: Orange Free State, Defence of Mafeking, Transvaal awarded to Trooper A.F. Wood, Protectorate Regiment Frontier Force who is confirmed as having taken part in the defense of Mafeking which lasted from 13th October 1899 through to 17th May 1900 as well as on operations in the Transvaal and Orange Free State, he was taken Prisoner of War after going out into the open to tend and guard his wounded brother, Trooper A J Wood, Protectorate Regiment, he would later be released on 26th December 1899.
Queen’s South Africa Medal 1899-1902, 3 Clasps: Orange Free State, Defence of Mafeking, Transvaal; (102 TPR. A.F. WOOD. PROTECT: REGT F.F.)
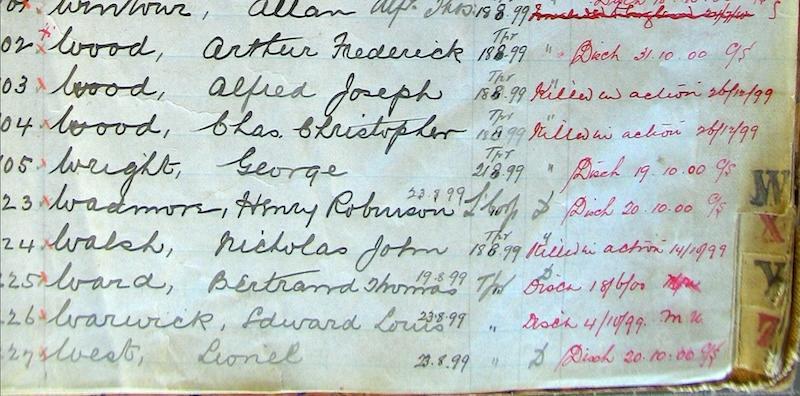
A.F. Wood saw service as a Trooper (No. 102) with the Protectorate Regiment – Frontier Force and is confirmed as having taken part in the defense of Mafeking which lasted from 13th October 1899 through to 17th May 1900 as well as on operations in the Transvaal and Orange Free State. He joined the regiment on 18/08/1899 and was discharged on 31/10/1900. His brother, 103 Trooper A.J. Wood (Alfred Joseph) joined on the same day and was KIA on 26/12/1899 in the attack on Game Tree Hill. Arthur Frederick Wood was captured trying to guard and help his wounded brother, and was later released on 26 December 1899.
Arthur Frederick Wood was born in Bethnal Green, London on 5 July 1871. He was the son of Thomas C and Hannah A Wood. He was the older brother of Alfred Wood. They both enlisted in the PRFF on 18 August 1899 and were posted to C Squadron. He as age 29. Nationality: English. Trade: Chemist. NOK: Mother, 29 Trelawney Road, Hackney, London. He was taken prisone on 26 December 1899; the day his brother (Alfred Joseph Wood) was killed. 'Two brothers named Wood ran away from home to seek glory on the field. They were both in the fight. One of them was wounded: the other returned when the fight was over and stood guard over him until arrested by the Boers and dragged away from his injured brother, who subsequently died.' (Neilly, Chapter 12). Served PTC 12 June to 11 October 1900. Discharged 31 October 1900. Character very good. Address after discharge: c/o P J Peterson & Co, Barrack Street, Cape Town. He married to Lilian Isabel Parrett on 25 March 1903 in Wynberg. He worked as a commercial traveler based at 'Mafeking', 20 Abinger Road, Pokesdown, Bournemouth, c 1911. In 1921 he was still living at "Mafeking" and working as a "Commercial Traveler for Tea Merchants". The Tea Merchants in question being R R MacLeod of 42 Upper Thames St, London. The family moved back to England between 1905 & 1910 based on the ages of his children as the eldest was born In SA and the youngest in England. He was a tea dealer in Christchurch, Hampshire in 1939. His death was registered in the Christchurch district in the first quarter of 1960 when he was aged 88.
Charles Christopher Wood was killed on 26 December 1899 but he was NOT the brother of Arthur. Arthur's brother was Alfred Joseph Wood.
Alfred Joseph Wood was born in Bethnal Green in 1878. He was the son of Thomas C and Hannah A Wood. He was the younger brother of Arthur Frederick Wood. They both ran away from home and enlisted in the PRFF 18 August 1899. They were posted to C Squadron. Alfred was age 22. Nationality: English. Trade: Bookkeeper. NOK: Mother, 29 Trelawney Road, Hackney, London. Killed in action, 26 December 1899. He was shot through the body and died in the Mafeking Hospital after four hours.The action at Game Tree Hill, 26th December 1899. "Two squadrons Protectorate Regiment, supported by armored train and Bechuanaland Rifles, were ordered to attack enemy's works from left flank under Major Godley, while three guns and a maxim prepared the way from the right front of the work. On pressing home, the attack a heavy fire killed or wounded most of the officers and leading troops. These succeeded in gaming the parapet, but the work was found to have been strongly roofed in and so closed as to be impregnable". The British losses were this time very serious. Captain R J Vernon, Captain H C Sandford, Lieutenant H P Paton, and 21 non-commissioned officers and men were killed, Captain FitzClarence and 22 men wounded, and 3 missing. Colonel Baden-Powell said "If blame for this reverse falls on any one it should fall on myself, as everybody concerned did their part of the work thoroughly well and exactly in accordance with the orders I had issued. Both officers and men worked with splendid courage and spirit".
Wood A F Trooper Prisoner. Mafeking siege, 26 December 1899
Source: South African Field Force Casualty Roll
Wood Arthur Frederick 102 Trooper Source: Nominal roll in WO127 Protectorate Regiment
 0
0 -
Chris Dixon in Bridlington, UK is excellent. He’s been repairing medals for decades and is a real professional.
0 -
Morton & Eden will be auctioning the majority of these PoW medals, groups, badges and ephemera on 29 February 2024. The catalogue is online now and you can see all the lots via the Morton & Eden website. It’s an opportunity to add some excellent PoW medals to your collections. All the best, and good luck!
Here's the link: https://www.mortonandeden.com/wp-content/uploads/2019/01/125web.pdf
0 -
Those are great photos Nick. Thanks for posting them. I presume those are War time photos as most of the subjects look pretty grim.
0 -
Thank you so very much for the link with so much info and wonderful photos. The quality of the obidome is exquisite and it’s good to see all the variations and branches. Do you know of any photos of women wearing them? Are there photos of the various assemblies and meetings? Thanks again!
0 -
25 minutes ago, TracA said:
azyeoman,
You're absolutely correct. I have a Patriotic Women's Association obidome waiting in the wings, I should just go ahead and purchase it. 😃
Tracy
 0
0 -
51 minutes ago, TracA said:
Very nice pieces, Azyeoman. For a while I've wanted to take the plunge on Patriotic Women's Association obidome but gosh darn it I already have to many collecting threads and don't need more.
All the best,
Tracy
The enameling is so wonderful that I couldn’t resist. And doesn’t every Japanese collection need to have obidomes? lol. 🙂
0 -
Here's the latest acquistions for this tiny collection.
They are in In the Name of a Living God by Paul Murphy and Steven Ackley. (page 61)
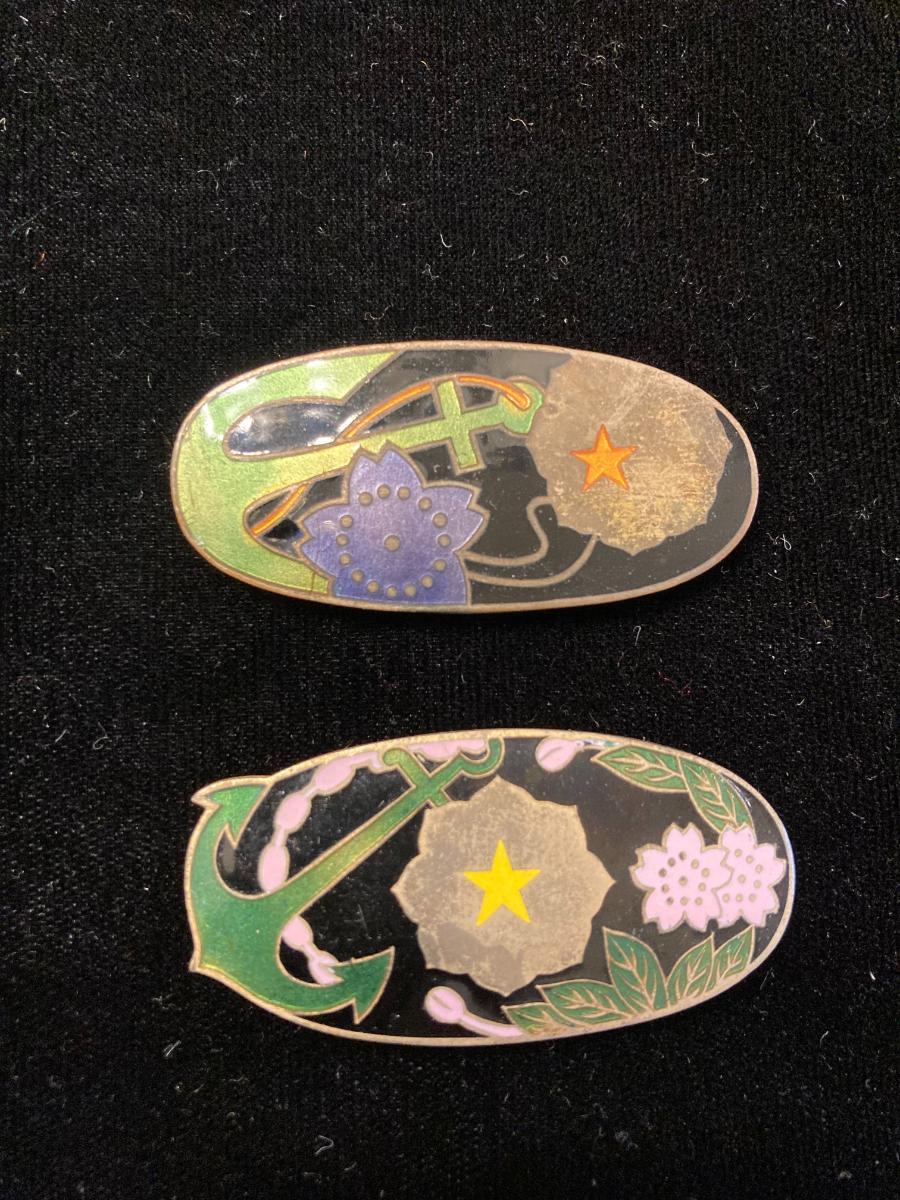
The are commemorative awards of the Patriotic Women's Association and in this case are Obi Dome badges.
The top one is "made from coinage metal and enamel and was issued to commemorate the 35th General Assembly of the society, which took place in 1936. The design is based on a deconstruction of the various elements of the society membership badge such as the anchor, star and cherry blossom. The quality of the manufacture is very high. Each delegate attending the 35th General Assembly received this badge..." It is reasonably scarce. (0.89" high by 1.9" wide)
The bottom one is another Obi Dome badge celebrating the 3rd General Assembly of the Hiroshoma Branch. It too is of the same high quality manufacture and is made from coinage metal and enamel.
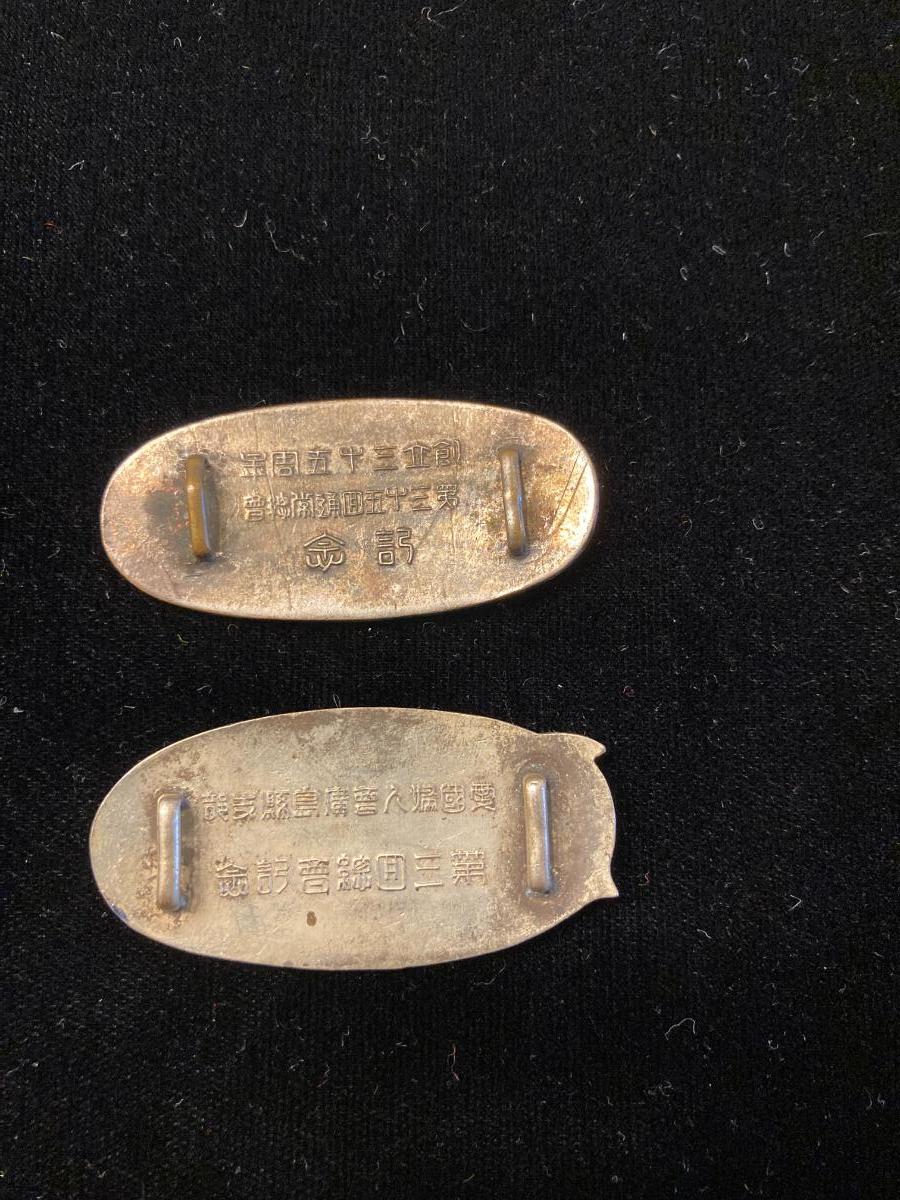
The reverses are shown with the kanji inscriptions. I do not have the exact translations of either one and would appreciate it if anyone can help with that. Thanks very much in advance.
John

 0
0 -
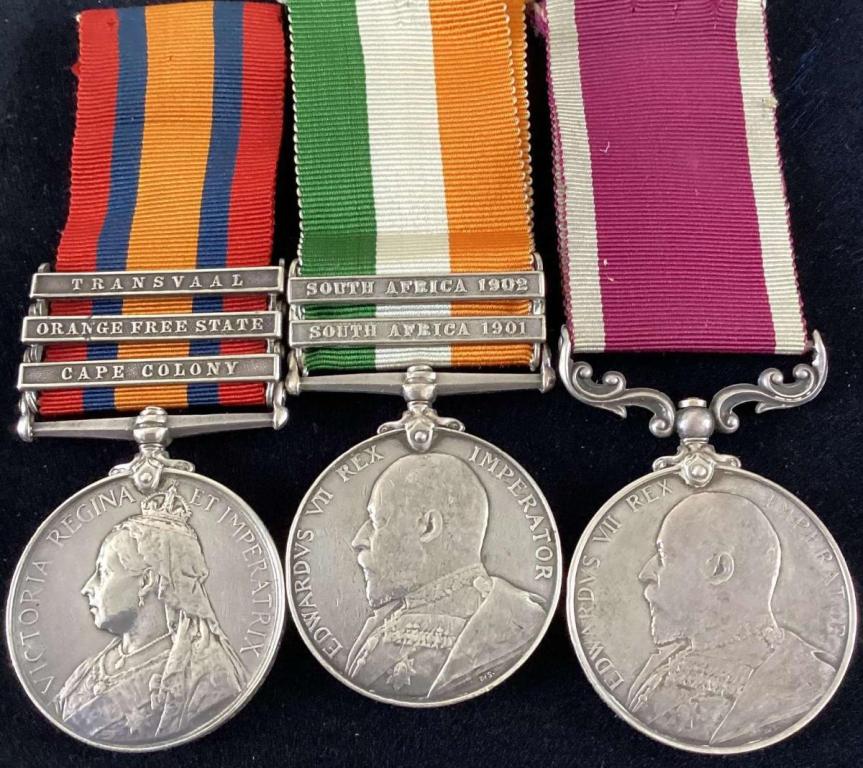
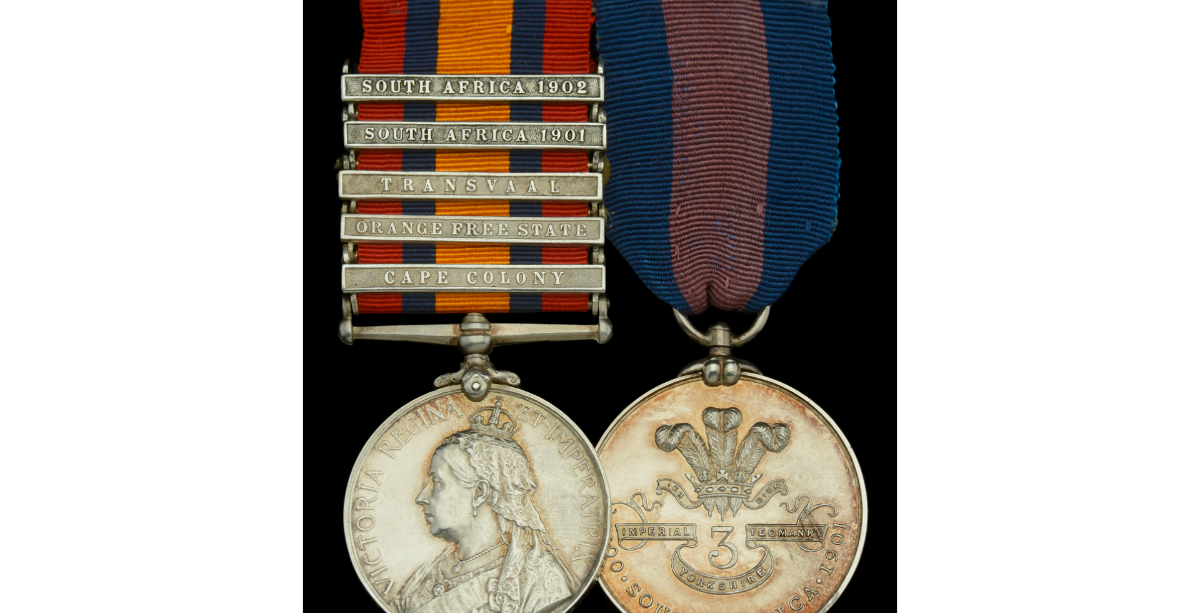
Am exceptionally fine Boer War ‘Casualty’ pair awarded to Private A. MacKay, Imperial Yeomanry, who was captured at Zwartskopjefontein on 20 April 1900, released, and then witnessed extensive action at De La Reys Farm in December 1900 - which he documented in a fascinating letter to his nephew soon thereafter.
Queen’s South Africa 1899-1902, 5 clasps, Cape Colony, Orange Free State, Transvaal, South Africa 1901, South Africa 1902, unofficial rivets (and glue) between state and date clasps (535 Pte. A. MacKay, 9th. Coy. 3rd. Imp: Yeo:); Yorkshire Tribute Medal 1900-1901(Type 1), 3rd Battalion, South Africa 1900-1901 (535 A. Mackay) mounted for wear, good very fine (2)
Andrew MacKay was born in Skipton, Yorkshire, in 1866. A draper employed by the firm Baxter & MacKay, he attested at Sheffield for the Imperial Yeomanry on 8 January 1900 and served in South Africa from 28 January 1900 to 9 June 1901. Serving with the 9th (Yorkshire Hussars) Company, 3rd Battalion, Imperial Yeomanry, MacKay was captured by the Boers on 20 April 1900. His Army Service Record adds that he was wounded on 21 April 1900, with a contemporary newspaper report stating: ‘he was shot through the arm’. Sent to hospital in Waterval, MacKay was one of three thousand prisoners released on 6 June 1900 by a squadron of the 2nd Dragoons (Royal Scots Greys) commanded by Captain F. S. Maude.Recovered from his wound, MacKay returned to the fight as part of a column tasked with reinforcing Colonel Money at Ottoshoop. A copied letter dated 12 December 1900, from the recipient to his nephew, George, describes what happened:
‘We were the advance guard and that day I was Orderly for Captain Wombwell who was leading us. We didn’t get very far before we were into action and had to retire as the fire was too hot for us and we had no cover... Eventually we moved them out [from a very strong entrenched position on a high Kopje] but they cleared out into another Kopje about a mile in front of us and gave us a right royal salute from their Mausers. We got our guns, Pom Poms and Maxims into action which cleared them out over two hours shelling and rifle fire. They must have lost heavy as our Gunners had got the range to a few yards...Next day we started at 4 a.m. and had not proceeded far before we were in action again and fought all the way within a couple of miles from here. We managed to kill General Lerner that day which I think will have a great effect on the Boers. 16 came in today and gave up their arms. The Boers fought well and came right out into the open, it is the first time that I have seen them do it but I think they are hungry and intended having the convoy but we kept them at bay.’
Proceeding to Litchenburg, MacKay faced peril once again - but not in consequence of bullet or shell, rather the burrowing habits of the native fauna. Tasked with an opportunist pursuit of the ‘wily Boer’, he was fortunate not to come to harm:
‘We got the order to gallop and we kept it up for about ten miles, many a poor fellow come a cropper as the ground was so very uneven and full of holes made by a small animal about the size of a squirrel (meerkat) but they burrow a hole much larger than a rabbit. I was one of the lucky ones as I managed to keep my horse on his feet but I have had many a nasty fall out here. When we got within 2 miles of the Laager, we could see them flying all over the veldt so we had to use the spurs to try and cut them off. When we got within about a thousand of them they gave us a right royal salute from their mausers...’
Returned to England with his Squadron, MacKay re-enlisted with the 120th Company, Imperial Yeomanry, and returned to South Africa from 8 February 1902 to 10 July 1902. He later married and lived in Skipton, and it was here in his home town that he died in June 1926 after purposefully drinking a mug of tea laced with prussic acid.
 1
1 -
I suspect there will be a surge in interest in these medals and documents due to Ridley Scott’s new historically inaccurate film, “Napoleon”.
0 -
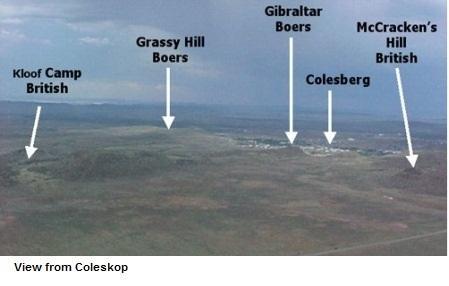
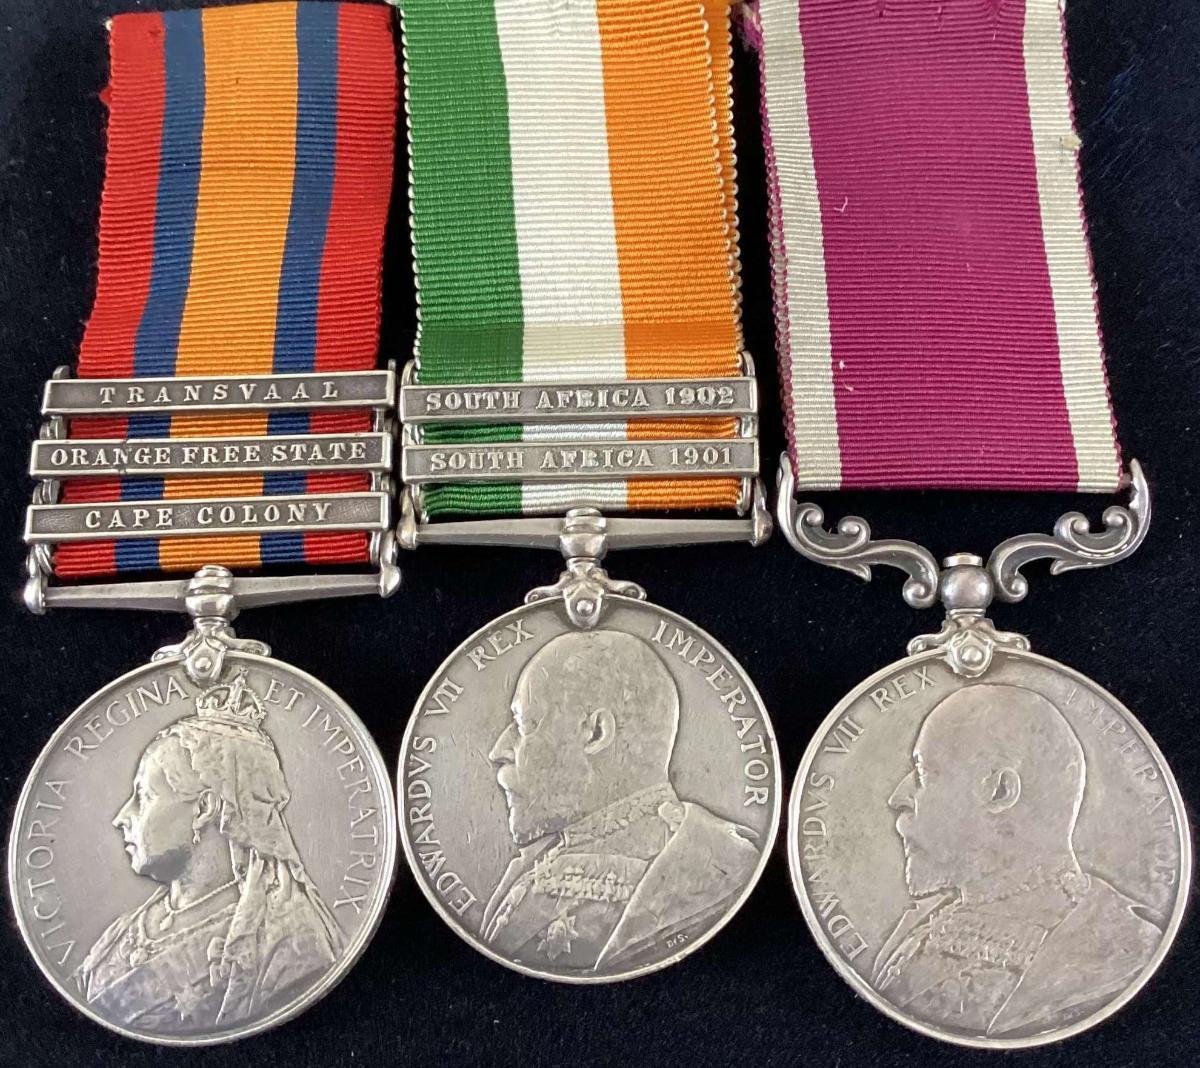
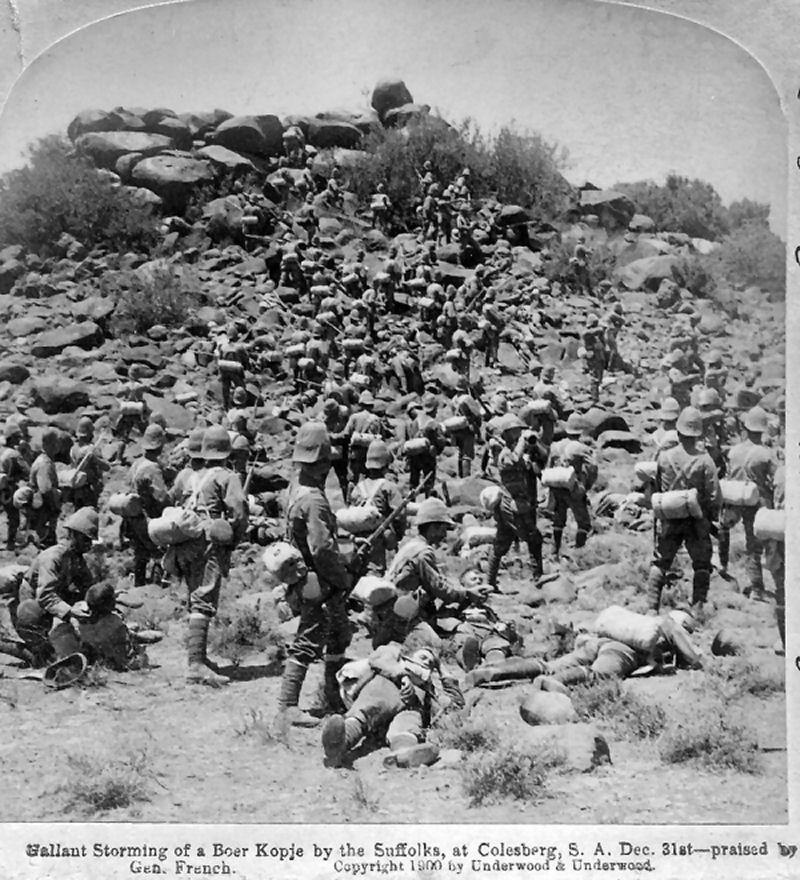
Another Boer War PoW group to a sergeant and later colour sergeant of the 1st Bn. Suffolk Regiment for the night attack at Colesberg on 6 January 1900.
QSA: CC, OFS, TR – 3361 Sjt. H. Britton, 1 Suffolk Regt.
KSA: SA01, SA02 – 3361 Sjt. H. Britton, 1 Suffolk Regt.
LSGC EVII – 3361 C Sjt. H. Britton, Suffolk Regt.
PoW Colesberg 06/01/1901Three: Colour Sergeant H. Britton, 1st Battalion, Suffolk Regiment, who was taken prisoner of war at Colesberg, 6 January 1900
Queen’s South Africa 1899-1902, 3 clasps, Cape Colony, Orange Free State, Transvaal (3361 Sgt H. Britton, 1st Suffolk Regt); King’s South Africa 1901-02, 2 clasps, South Africa 1901, South Africa 1902 (3361 Serjt: H. Britton. Suffolk Regt); Army L.S. & G.C., E.VII.R. (3361 C. Sjt: H. Britton. Suffolk Regt)
Harry James Britton was born in Sudbury, Suffolk, and attested for the Suffolk Regiment at Colchester in October 1892. He advanced to Corporal in December 1895, and to Sergeant in November 1899. Britton served with the 1st Battalion in South Africa from November 1899 to September 1902, and was taken prisoner of war at Colesberg on 6 January 1900. He rejoined his Battalion on 30 September later that same year, and advanced to Colour Sergeant in May 1904 (awarded L.S. & G.C. in 1911). Britton was discharged in October 1913, after 21 years’ service with the Colors. He re-enlisted in the 5th Battalion, Suffolk Regiment on 1 June 1915, only to be invalided out of service as medically unfit on 2 October 1916.Britton H 3361 Colour Sergeant Prisoner. Colesberg, 6 January 1900
1st Battalion.
Source: South African Field Force Casualty RollThe 1st Battalion, Suffolk Regiment sailed on the Scot in November 1899, and arrived at the Cape on the 28th of that month. They were sent to assist General French in the Colesberg district. After the battalion had been about a month in the colony they entered on an enterprise which was to prove most disastrous. In the early morning of the 1st January the Berkshires had successfully assaulted a hill forming part of the Colesberg defences. On the 4th the Boers had been driven from other hills, but there was still another hill—Grassey or Suffolk Hill—on the north-west portion of the defenses which General French considered to be the key to the position.
On the 5th it was carefully reconnoitered, and the possibility of its capture was discussed with Colonel Watson. General French says: "I gave him a free hand to rush the position at night if he saw a favorable chance, but he was to inform me and all the troops in his neighborhood of his intention to do so. I heard no more, but left Rensburg at 2 am and reached the Colesberg position shortly before dawn. At dawn we heard sharp musketry-fire in the direction of Grassey Hill. I directed Colonel Eustace to get his guns into position to assist the attack which I thought Colonel Watson must be making. The artillery got into action at once against the Grassey Hill defenses, but in a few minutes I received news that nearly 300 men of the Suffolk Regiment had returned to camp, having received an order from 'some one' to retire". General French "considered that Colonel Watson and his four companies would have attained success had the majority of his men not been seized with panic and retired". The colonel and other 3 officers and 25 men were killed, and 1 officer and 23 men were wounded; 5 officers and over 100 men were taken prisoners. Night attacks are proverbially dangerous. Here the enemy had been found on the alert, and a murderous fire had been poured into the troops before they could get in with the bayonet or take cover.
Courts of inquiry were held, the evidence before which is printed in the proceedings of the War Commission. Captain Brett said that their orders were to charge without firing. They advanced up the hill, but were met by a heavy fire; the enemy appeared to be quite close. After a short interval the colonel gave the order to retire; confusion arose owing to the darkness and roughness of the ground. The colonel then ordered him to take the crest of the hill, where it seems the leading company still held its ground. Witness advanced as ordered, but appears to have done so with only a portion of his company. He was then wounded, and lay unconscious. On recovering he found himself among a number of killed and wounded. Shells from the British guns then commenced to fall among them. Eventually Captain Brett surrendered. The courts exonerated the officers and men, and it is noted that "no evidence, however, appears to have been given before any court of inquiry showing the circumstances of the panic in the rear of the force", as referred to by Lieutenant General French.
This affair was a very unfortunate beginning to the battalion's campaigning career, and it was a long time before it was again permitted to go into the fighting line—but the time did come.
After some service in the Orange River Colony the battalion moved to the Transvaal. In the beginning of July 1900 they were with General French, whose force was distributed about thirty miles south-east of Pretoria, and shortly advanced eastwards, occupying Middelburg on the 26th.
In August Lord Roberts made another great stride towards Koomati Poort. At Wonderfontein the Suffolks were placed under Mahon, the reliever of Mafeking, and with that officer joined French at Carolina on 6th September. Before that general could reach Barberton he had to cross mountains of great height, and one of the feats of the war was the taking of the guns and transport over these mountains. The infantry had to haul wagons up the one side and to hold on behind at the other side until the soles were knocked off their boots.
On 2nd and 3rd October French left Barberton for Machadodorp, and started thence for Heidelberg with three brigades of cavalry, three batteries of Horse Artillery, and one-half of the Suffolks. Almost every day the force was opposed, and there was much stiff fighting.
In the beginning of November Smith-Dorrien operated near Belfast, where there was a strong force of Boers.
Part of the Suffolks were with him, and on the 6th drove the enemy from a strong position.
Nine officers and 12 non-commissioned officers and men were mentioned in Lord Roberts' final dispatches.
In November 1900 the Suffolks were railed down to the Bethulie-Aliwal North district to assist General Knox in the pursuit of De Wet, and also in keeping the enemy out of Cape Colony, and when the pressure there had relaxed they were sent north again. In the first quarter of 1901 part of the battalion accompanied Smith-Dorrien from Belfast district to Piet Retief and then northwards again. The battalion was later taken to assist in the erecting and garrisoning of blockhouses in the Western Transvaal (Letter from Lieutenant Brooke, published in 'The Oxfordshire Light Infantry in South Africa'. He said: "Here on the left flank we had a desperate hot fight ... Two hundred of them got within 70 yards of one of our guns, and would have captured it but for a magnificent man in the Suffolk Mounted Infantry who was escorting the gun with only six men. He held his ground, gave the order to fix bayonets, then looking round saw a maxim strapped on the back of a mule. He got up, calmly walked back, and brought the maxim into action, driving off the Boers at once". Major Taylor in his official report specially mentioned the Suffolk Mounted Infantry).
It is satisfactory that after its unfortunate start the battalion purchased its redemption by consistently good work during a period of nearly two years.
The Mounted Infantry of the battalion saw much stiff fighting, and were in the brilliant action at Bothaville, 6th November 1900. (See Oxford Light Infantry.)
In Lord Kitchener's final despatch 3 officers and 5 non-commissioned officers and men were mentioned.
Background and an account of the battle from Sir Arthur Conan Doyle, The Great Boer War, London, Smith, Elder and Co, 1902
Arundel was weakly held, and French advanced up to it, and established his camp there towards the end of December, within ten kilometres of the Boer lines at Rensburg, to the south of Colesberg. His mission - with his present forces - was to prevent the further advance of the Boers into Cape Colony, but he was not strong enough yet to make a serious attempt to drive them out.
Before the move to Arundel on 13 December his detachment had increased in size, and consisted largely of mounted men, so that it attained a mobility very unusual for a British force. On 13 December there was an attempt upon the part of the Boers to advance south, which was easily held by the British Cavalry and Horse Artillery. The country over which French was operating is dotted with those singular kopjes which the Boer loves - kopjes which are often so grotesque in shape that one feels as if they must be due to some error of refraction when one looks at them. But, on the other hand, between these hills there lie wide stretches of the green or russet savanna, the noblest field that a horseman or a horse gunner could wish. The riflemen clung to the hills, French's troopers circled warily upon the plain, gradually contracting the Boer position by threatening to cut off this or that outlying kopje, and so the Boers was slowly herded into Colesberg. The small but mobile British force covered a very large area, and hardly a day passed that one or other part of it did not come in contact with the Boers. With one regiment of infantry (the Berkshires) to hold the center, his hard-riding Australians and New Zealanders, with the Scots Greys, the Inniskillings, and the Carabineers, formed an elastic but impenetrable screen to cover the Boer advance into the Cape Colony. They were aided by two batteries, 0 and R, of Horse Artillery. Every day General French rode out and made a close personal examination of the Boers' position, while his scouts and outposts were instructed to maintain the closest possible touch.
On 30 December the Boers abandoned Rensburg, which had been their advanced post, and concentrated at Colesberg, upon which French moved his force up and seized Rensburg. The very next day, December 31st, he began a vigorous and long-continued series of operations. At five o'clock on Sunday evening he moved out of Rensburg camp, with R and half of 0 batteries RHA, the 10th Hussars, the Inniskillings, and the Berkshires, to take up a position on the west of Colesberg. At the same time Colonel Porter, with the half-battery of 0, his own regiment (the Carabineers), and the New Zealand Mounted Rifles, left camp at two on the Monday morning and took a position on the Boers' left flank. The Berkshires under Major McCracken seized hill, driving a Boer picket off it, and the Horse enfiladed the Boers' right flank, and after a risk artillery duel succeeded in silencing his guns. Next morning (2 January 1900), however, it was found that the Boers, strongly reinforced, were back near their old positions, and French had to be content to hold them and to wait for more troops.These were not long in coming, for the Suffolk Regiment had arrived, followed by the Composite Regiment (chosen from the Household Cavalry) and the 4th Battery RFA. The Boers, however, had also been reinforced, and showed great energy in their effort to break the cordon which was being drawn round them. Upon the 4th a determined effort was made by about a thousand of them under General Shoemann to turn the left flank of the British, and at dawn it was actually found that they had eluded the vigilance of the outposts and had established themselves upon a hill to the rear of the position. They were shelled off of it, however, by the guns of 0 Battery, and in their retreat across the plain they were pursued by the 10th Hussars and by one squadron of the Inniskillings, who cut off some of the fugitives. At the same time, De Lisle with his mounted infantry carried the position which they had originally held. In this successful and well-managed action, the Boer loss was ninety, and we took in addition twenty-one prisoners. Our own casualties amounted only to six killed, including Major Harvey of the 10th, and to fifteen wounded.
Encouraged by this success an attempt was made by the Suffolk Regiment to carry a hill which formed the key of the Boers' position. The town of Colesberg lies in a basin surrounded by a ring of kopjes, and the possession by us of any one of them would have made the place untenable. The plan has been ascribed to Colonel Watson of the Suffolks, but it is time that some protest should be raised against this devolution of responsibility upon subordinates in the event of failure. When success has crowned our arms, we have been delighted to honor our general; but when our efforts end in failure our attention is called to Colonel Watson, Colonel Long, or Colonel Thorneycroft. It is fairer to state that in this instance General French ordered Colonel Watson to make a night attack upon the hill.
The result was disastrous. At midnight four companies in canvas shoes or in their stocking feet set forth upon their venture, and just before dawn they found themselves upon the slope of the hill. They were in a formation of quarter column with files extended to two paces; H Company was leading. When half-way up a warm fire was opened upon them in the darkness. Colonel Watson gave the order to retire, intending, as it is believed, that the men should get under the shelter of the dead ground which they had just quitted, but his death immediately afterwards left matters in a confused condition. The night was black, the ground broken, a hail of bullets whizzing through the ranks. Companies got mixed in the darkness and contradictory orders were issued. The leading company held its ground, though each of the officers, Brett, Carey, and Butler, was struck down. The other companies had retired, however, and the dawn found this fringe of men, most of them wounded, lying under the very rifles of the Boers. Even then they held out for some time, but they could neither advance, retire, or stay where they were without losing lives to no purpose, so the survivors were compelled to surrender. There is better evidence here than at Magersfontein that the Boers were warned and ready. Every one of the officers engaged, from the Colonel to the boy subaltern, was killed, wounded, or taken. Eleven officers and one hundred and fifty men were our losses in this unfortunate but not discreditable affair, which proves once more how much accuracy and how much secrecy is necessary for a successful night attack. Four companies of the regiment were sent down to Port Elizabeth to re-officer, and the arrival of the 1st Essex enabled French to fill the gap which had been made in his force.
 1
1 -
What a fascinating story! As always, great research to accompany another fine addition to your collection! I’ve never seen a “Late Arrivals Badge” so close before; that’s a rare badge.
1 -
Thank you for sharing this well researched and emotive story for a very rare PoW medal. What a fortunate acquisition for your exceptional and advanced PoW collection! I look forward to your next post!
Cheers, John1 -
On 28/08/2022 at 10:57, azyeoman said:
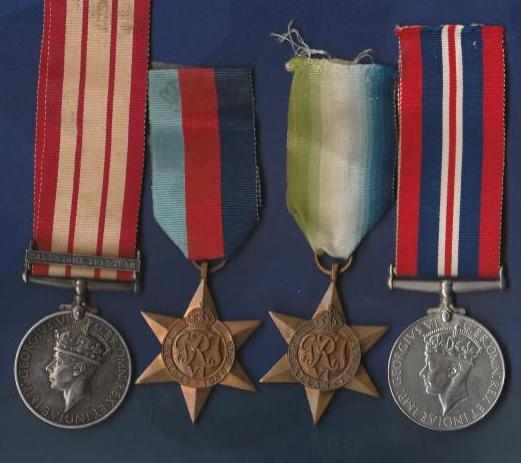
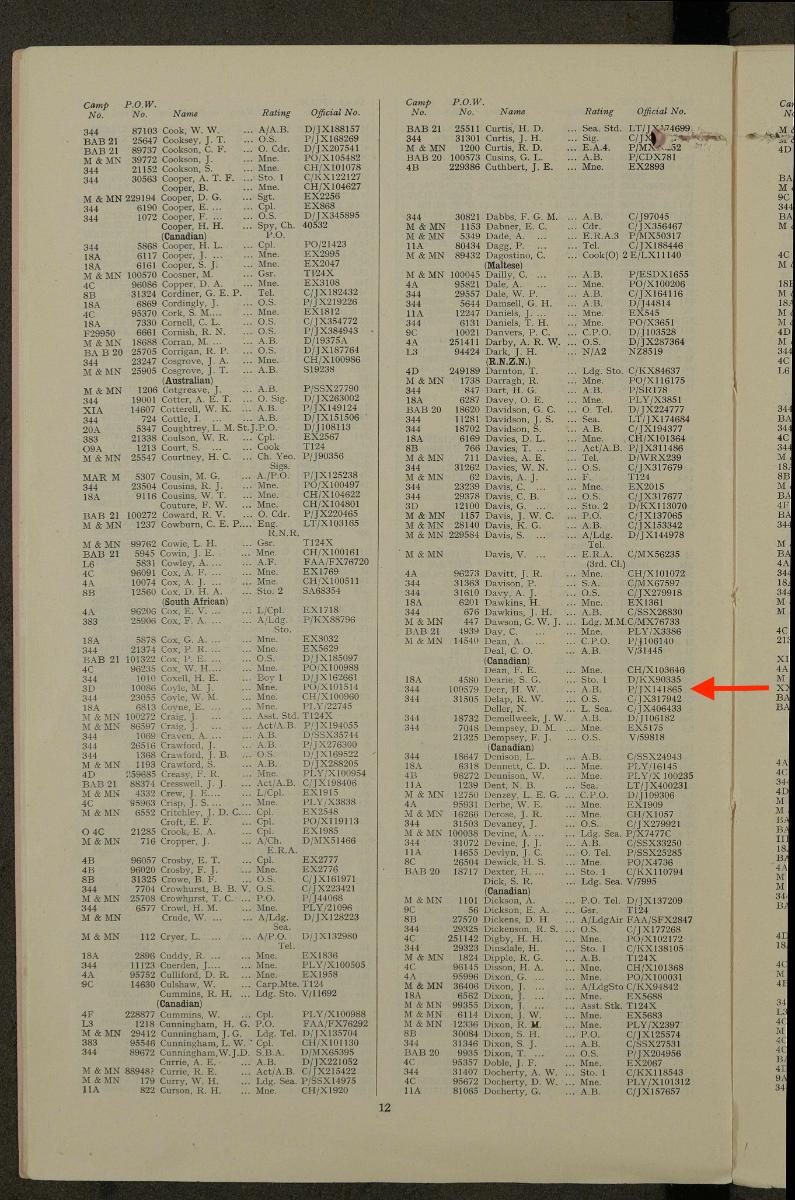
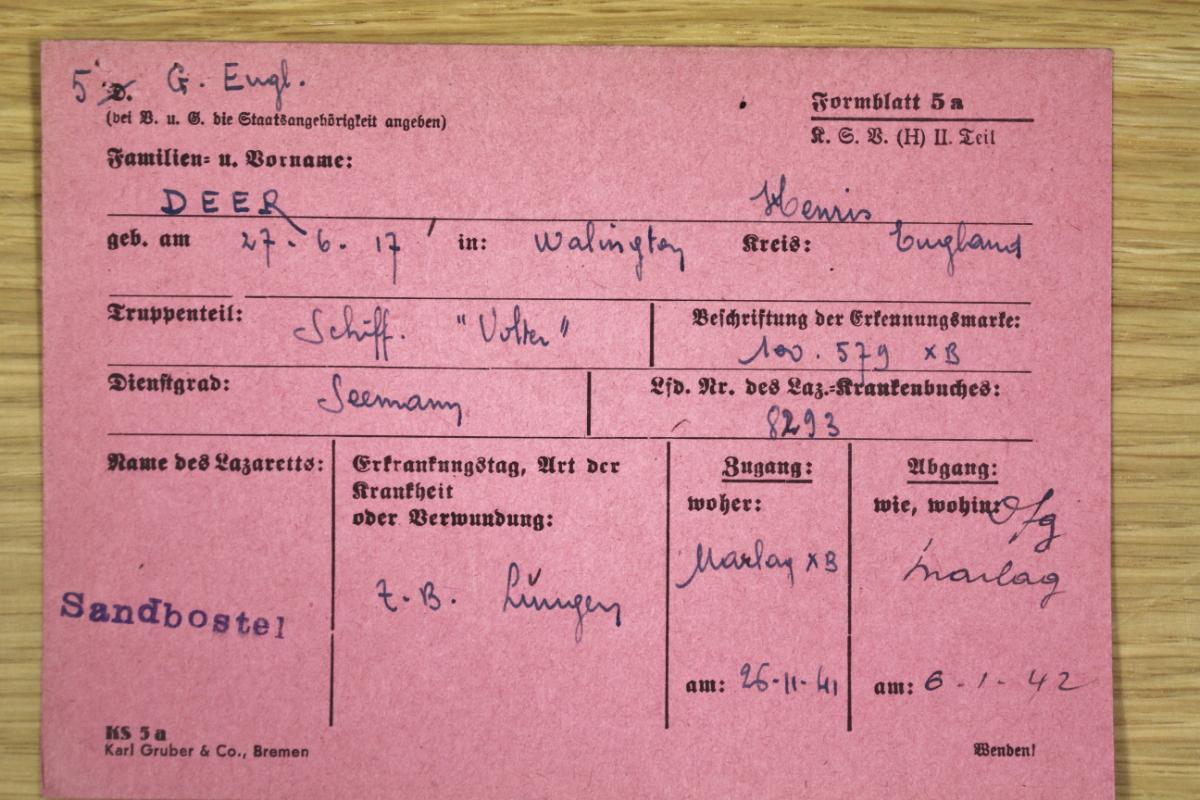
Royal Navy groups are not common and this is a most interesting one to JX141865 AB H.W. Deer, RN
NGS with Palestine 1936-39 Palestine Clasp
1939 Star
Atlantic Star
War Medal
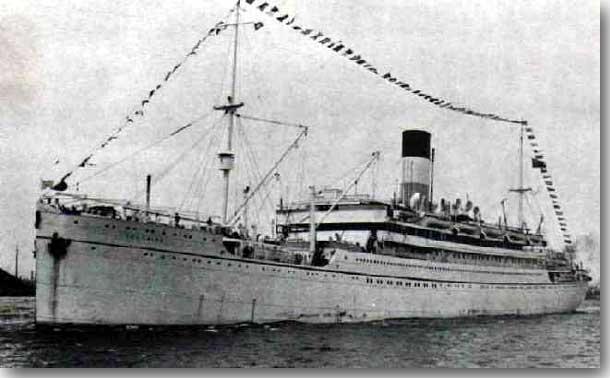
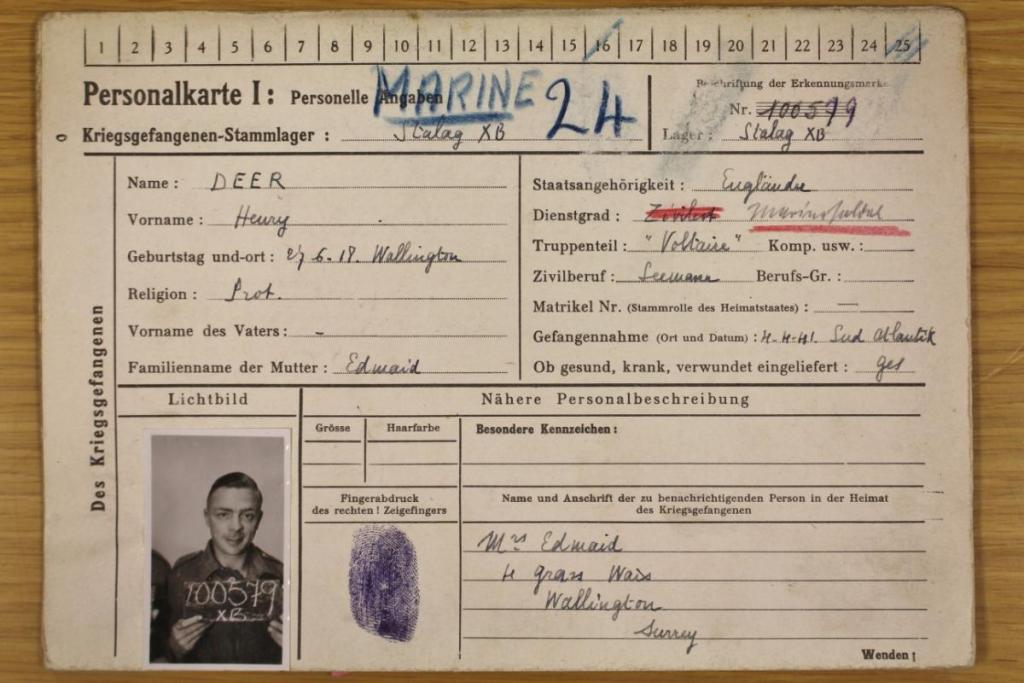
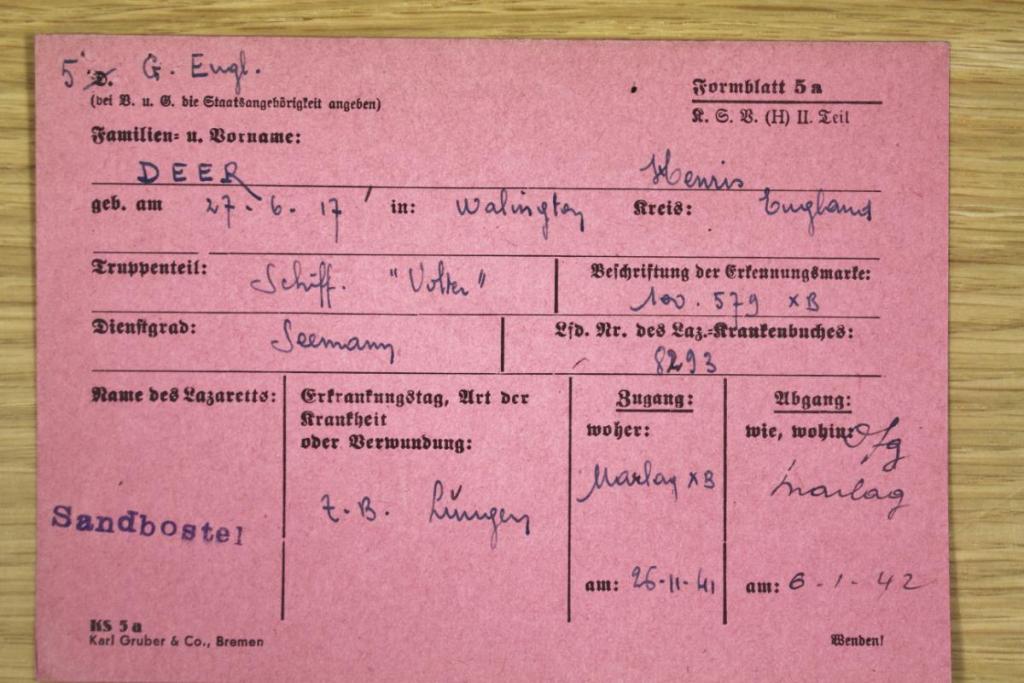
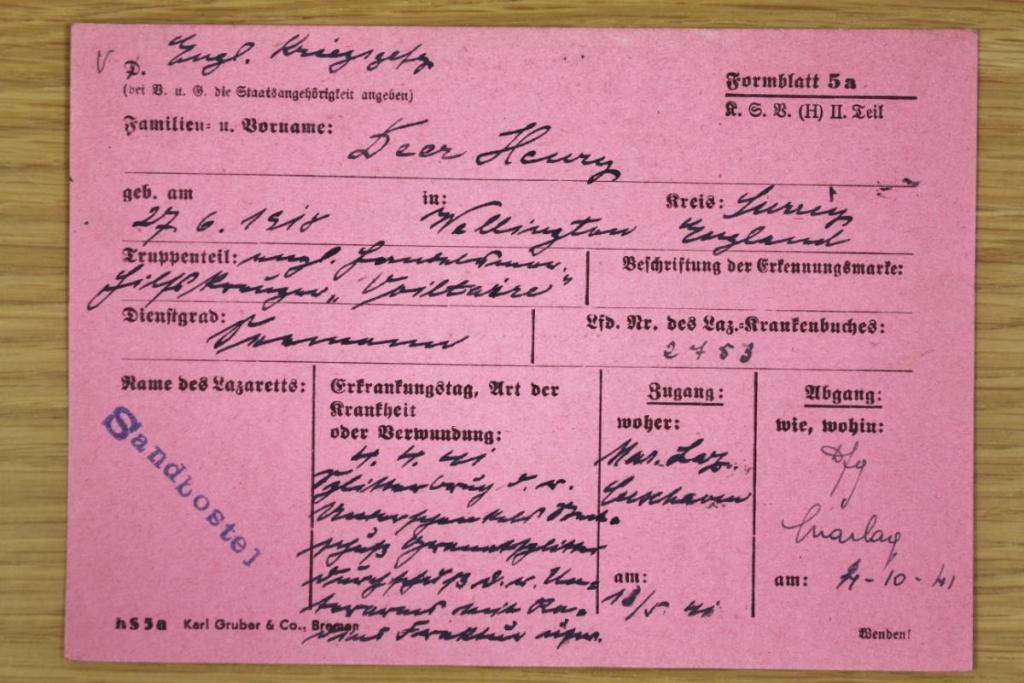
Deer was serving on board HMS Voltaire, which was sunk by the Kriegsmarine auxiliary cruiser Thor on 4 April 1941.
The Action of 4 April 1941 was a naval battle fought during the Atlantic Campaign of the Second World War. A German commerce raider encountered a British auxiliary cruiser and sank her with heavy losses after an hour of fighting. Background The Kriegsmarine auxiliary cruiser Thor was raiding in the mid Atlantic in early 1941. On that cruise, the Germans engaged two other British merchant ships in surface battles but they ended indecisively. So when Thor encountered HMS Voltaire, her crew were already battle tested and anxious to sink an enemy combatant. Thor was 122 m (400 ft 3 in) long and weighed 9,200 long tons (9,300 t), she was armed with six 150 mm (5.9 in), two 37 mm (1.46 in) and four 20 mm (0.79 in) naval guns along with four 533 mm (21.0 in) torpedo tubes. The raider also carried an Arado Ar 196A-1 floatplane for reconnaissance and had a complement of 349 officers and crewmen. HMS Voltaire was larger than the raider—displacing 13,245 long tons (13,458 t)—but with a smaller crew of 269 men and officers. She had eight 152 mm (6.0 in) and two 76 mm (2.99 in) naval guns, including at least one anti-aircraft mount. Thor was returning to Germany when she found Voltaire heading to Freetown about 900 mi (780 nmi; 1,400 km) southwest of the Cape Verde Islands Action It was about 06:15 on 4 April when crewmen of Thor spotted smoke on the horizon. Captain Otto Kaehler assumed the vessel to be a coal burning ship so he altered course into the direction of the smoke. When the Germans were able to make visual contact with HMS Voltaire, they suspected she was a neutral ocean liner as she did not attempt to escape. The British—under Captain J.A. Blackburn—sighted the approaching Germans coming head on, so they fired a burst of anti-aircraft fire as signal for identification. A signal from Thor was not returned, but the British soon discovered the identity of the approaching ship at about 06:45, when it replaced the flag of Greece with a German naval ensign and fired a shot across Voltaire's bow. The British responded by manning their guns and firing a broadside with their mixed armament, but to no avail; they were outgunned and outranged. After only four minutes of dueling at around 9,000 m (9,800 yd) away, the Germans began striking Voltaire with their 150 mm (5.9 in) guns. The first shots entered the radio room and the generator room of Voltaire, heavily damaging the vessel, knocking out communications and steering gear and putting her into a list. Heavy fires also broke out and nearly covered the entire deck of the British ship. Despite the fire the Royal Navy gunners continued fighting for nearly an hour. For the next several minutes, the two sides fired; only one British shot managed to hit Thor, and it caused no casualties, the shot tearing off some radio equipment attached to the main mast. By 07:15, only two of the British 152 mm (6.0 in) guns were in action, while Thor circled around Voltaire, firing rapidly. At 08:00, the German's 150 mm (5.9 in) guns overheated so Captain Kaehler decided on a torpedo attack to end the engagement. But just as Thor was lining up to fire a spread, a white flag was observed aboard Voltaire and so the firing ceased. Captain Blackburn—having lost 72 men killed in action—gave the order to abandon ship and for the next five hours the Germans rescued 197 survivors, two of whom died later on and the rest became prisoners of war. Koehler also recorded that half of the rescued sailors were wounded. After the battle, Thor continued on to Germany to refit for a second raiding voyage. She had fired 724 rounds in a 55 minute battle, more than 50 percent of her ammunition
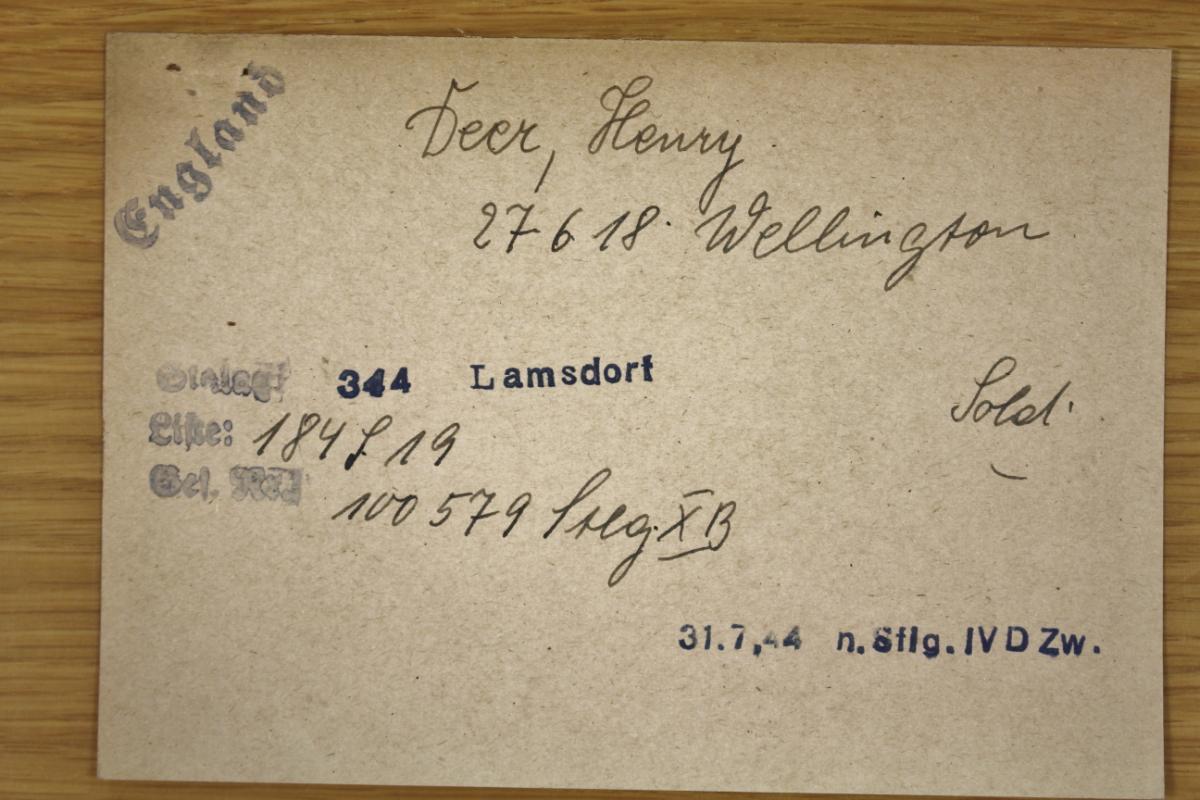
Most of the PoWs were sent to Marlag und Milag Nord, but some such as AB Deer ended up in Stalag VIII-B (Lamsdorf), later numbered Stalag 344. The hospital facilities at Stalag VIII-B were among the best in all Stalags. The so-called Lazarett was set up on a separate site with eleven concrete buildings. Six of them were self-contained wards, each with space for about 100 patients. The others served as treatment blocks with operating theaters, X-ray and laboratory facilities, as well as kitchens, a morgue, and accommodations for the medical staff.
The lazarett was headed by a German officer with the title Oberst Arzt ("Colonel Doctor"), but the staff was made up entirely of prisoners. They included general physicians and surgeons, even a neurosurgeon, psychiatrist, anesthesiologist and radiologist.
In January 1945, as the Soviet armies resumed their offensive and advanced into Germany, many of the prisoners were marched westward in groups of 200 to 300 on Death Marches. Some died from the bitter cold and exhaustion. The lucky ones got far enough to the west to be liberated by the American army. The unlucky ones got liberated by the Soviets, who instead of turning them over quickly to the western allies, held them as virtual hostages for several more months. Many of them were finally repatriated towards the end of 1945 through the port of Odessa on the Black Sea.
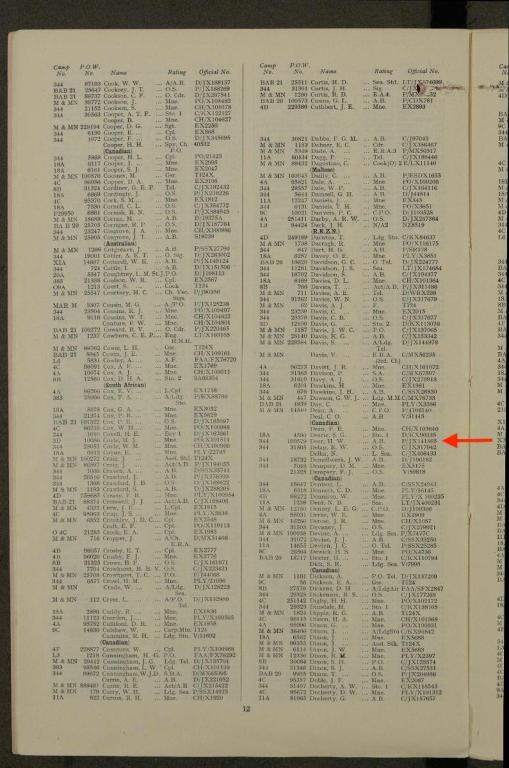
Here are some original German files for Deer who was incarcerated in Lamdorf. One card is particularly nice as it has his photograph and as such puts a face to a name. I thank Rob P', another PoW collector, very much for his help in finding these and forwarding them on to me.


 1
1 -
A very nice addition to your collection. I only have two double PoW recipients’ medals. One for the 2nd Anglo-Boer War when he was captured and released both times, and a second one to a Merchant Navy man captured twice in the Norway campaign. He escaped the first time, but was captured again trying to take a ship out and on to the UK. All these PoWs have thrilling tales. I look forward to your next addition.
1 -
-
There is a nominal roll for the crew that served on the RMS Republic online. http://www.rms-republic.com/crew.html
But in order to make a nominal roll for those who were awarded the CQD Medal in 1909 it is necessary to find the crew lists for Baltic and Florida too. Does anyone know where those may be found if indeed they are available. Thanks in advance for your kind help and assistance.
0 -
A new QSA to a trooper from the South African Constabulary for a very late action in the war.
Queens South Africa Medal to Trooper Kewell South African Constabulary
Officially named to: 608 TPR. E.J. KEWELL S.A.C. Five clasps for Transvaal, Cape Colony, Orange Free State, South Africa 1901 and 1902.
Edward James Kewell was taken Prisoner of War on February 23rd 1902 at Bothaville, Orange Free State.
 0
0 -
Wonderful research and write up on Carrade’s captivity in
Colditz.
1 -
Love those Spinks labels!
1 -
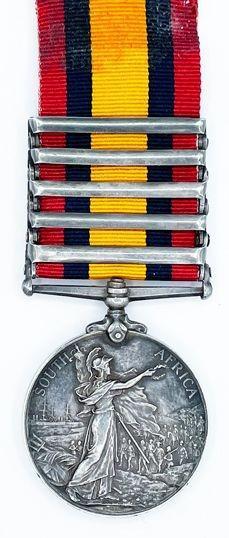
A fine 19th Hussars WIA and PoW pair.
QSA with Defence of Ladysmith, Orange Free State, Lanig's Nek and Belfast clasps.
KSA with SA01 and SA02 clasps.
Officially named to: 3893 Pte. R Childs, 19th Hrs.
Childs was dangerously wounded at Lombard's Kop on 30/10/99, and later taken PoW at Helvetia on 29/12/1900.
Robert Childs was a labourer who was born in Chelmsford, Essex in 1873. He enlisted in Canterbury on 14/11/1892. He was 5'7" and weighed 129 lbs. He had dark brown hair and brown eyes. He was C of E. He served from 1892 to 1909. Home 1892 to 1894; India 1894 to 1899; S. Africa 1899 to 1902; Home 1902 to 1903 and then Army Reserve from 1903 to 1904.
Information from the Anglo Boer War Site.
Surname Forename/inits Regimental no Rank Notes
Childs R 3893 Private Wounded at Farquhar's Farm. 30 Oct 1899.
Source: Natal Field Force Casualty Roll, page 15 line 9
Childs R 3893 Private QSA (4). Wounded, Farquhar's Farm, 30 Oct 99. Prisoner, Helvetia, 29 Dec 00. Released.
Source: QSA medal rolls
Childs R 3893 Private Prisoner. Helvetia, 29 December 1900
Released
Source: South African Field Force Casualty Roll
Childs R 3893 Private QSA (4) DoL OFS LN Belf
Provisional list of recipients
Source: Ladysmith Siege Account and Medal Roll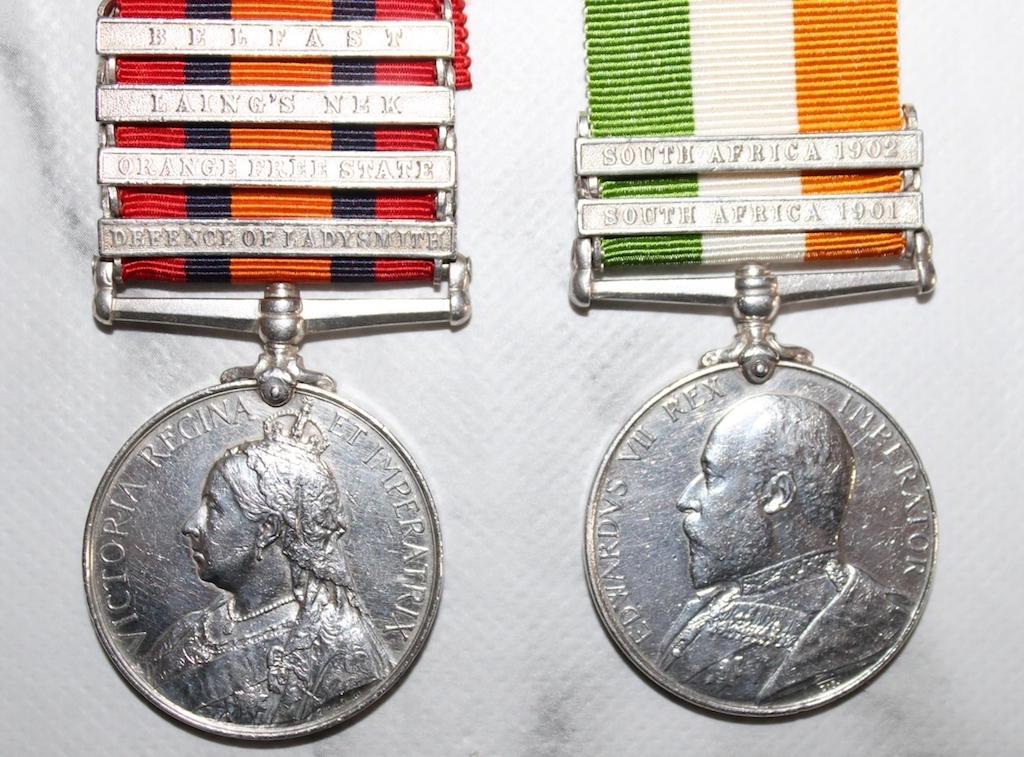 1
1 -
16 hours ago, TracA said:
Azyeoman,
Thanks. If you intended to insert a URL to the thread, then for some reason the URL didn't come through.
All the best,
Tracy
See if this works. : ) Cheers, jl
Here's something else that's recently arrived.
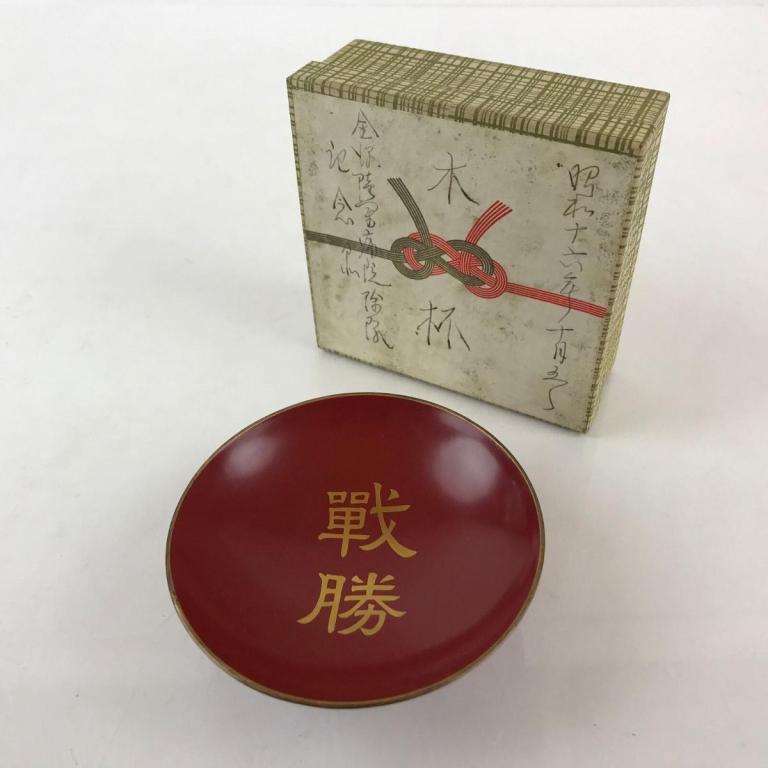
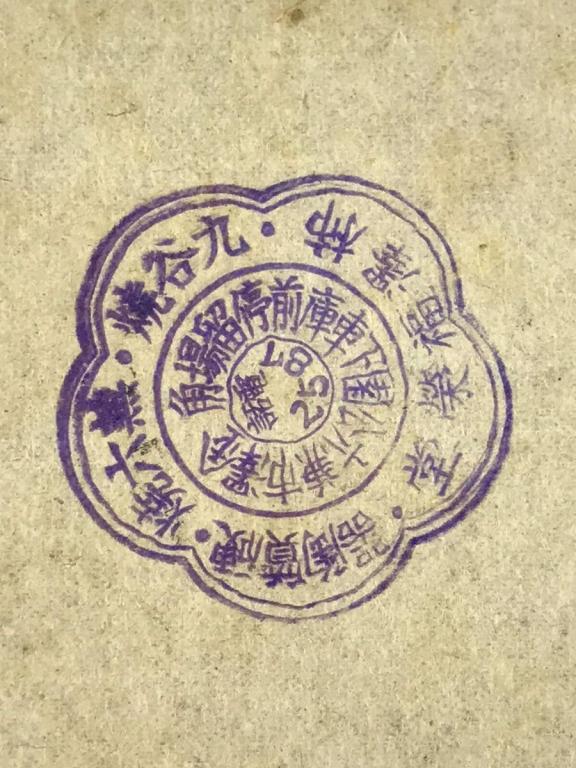
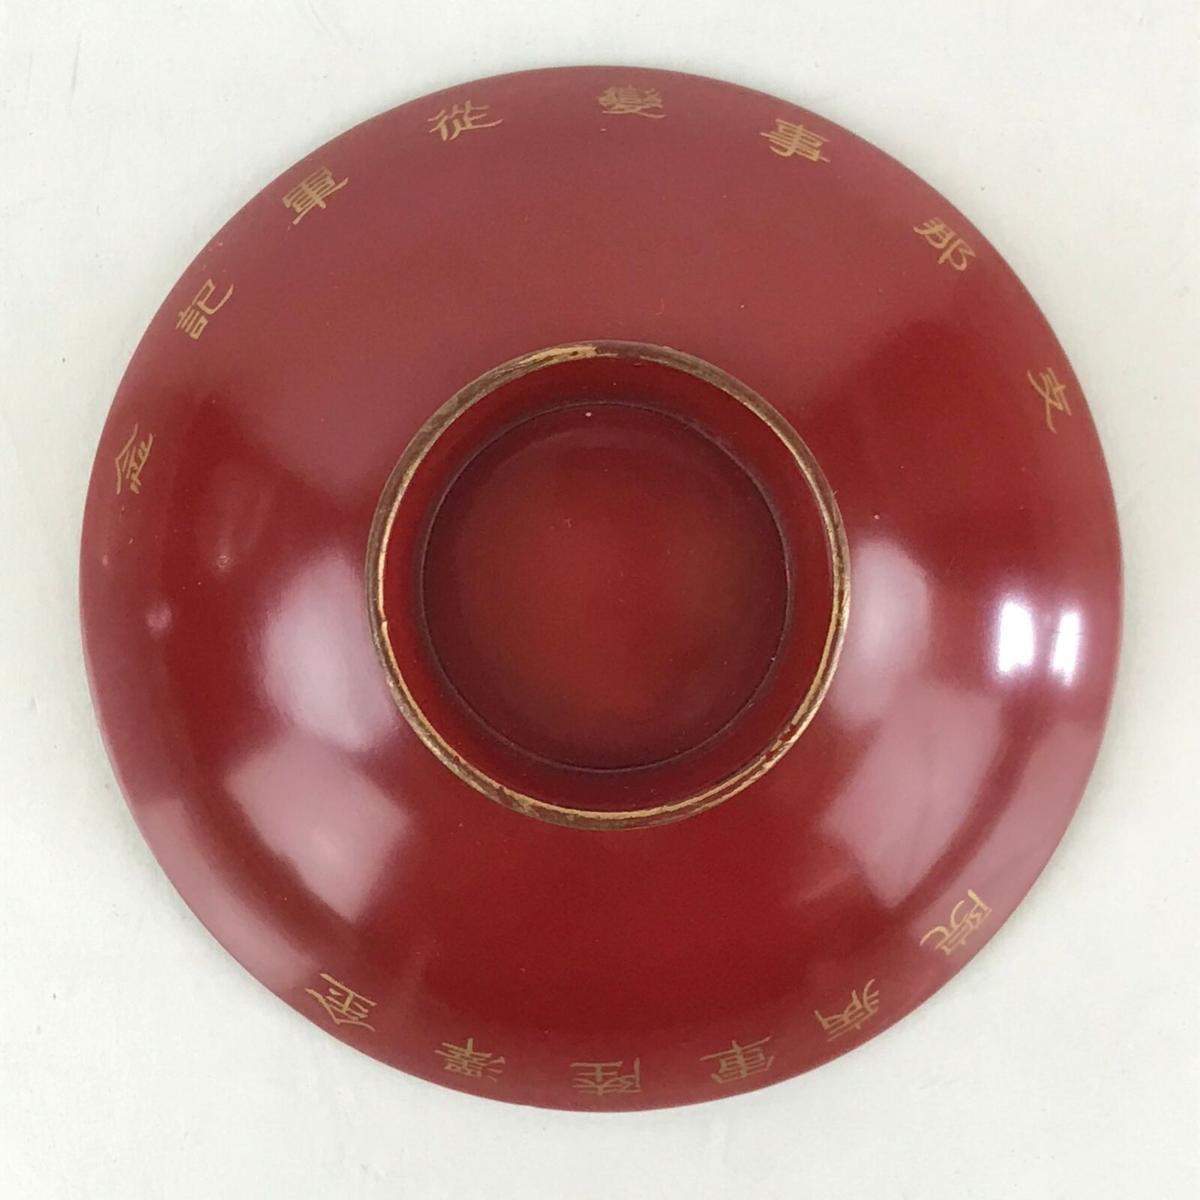
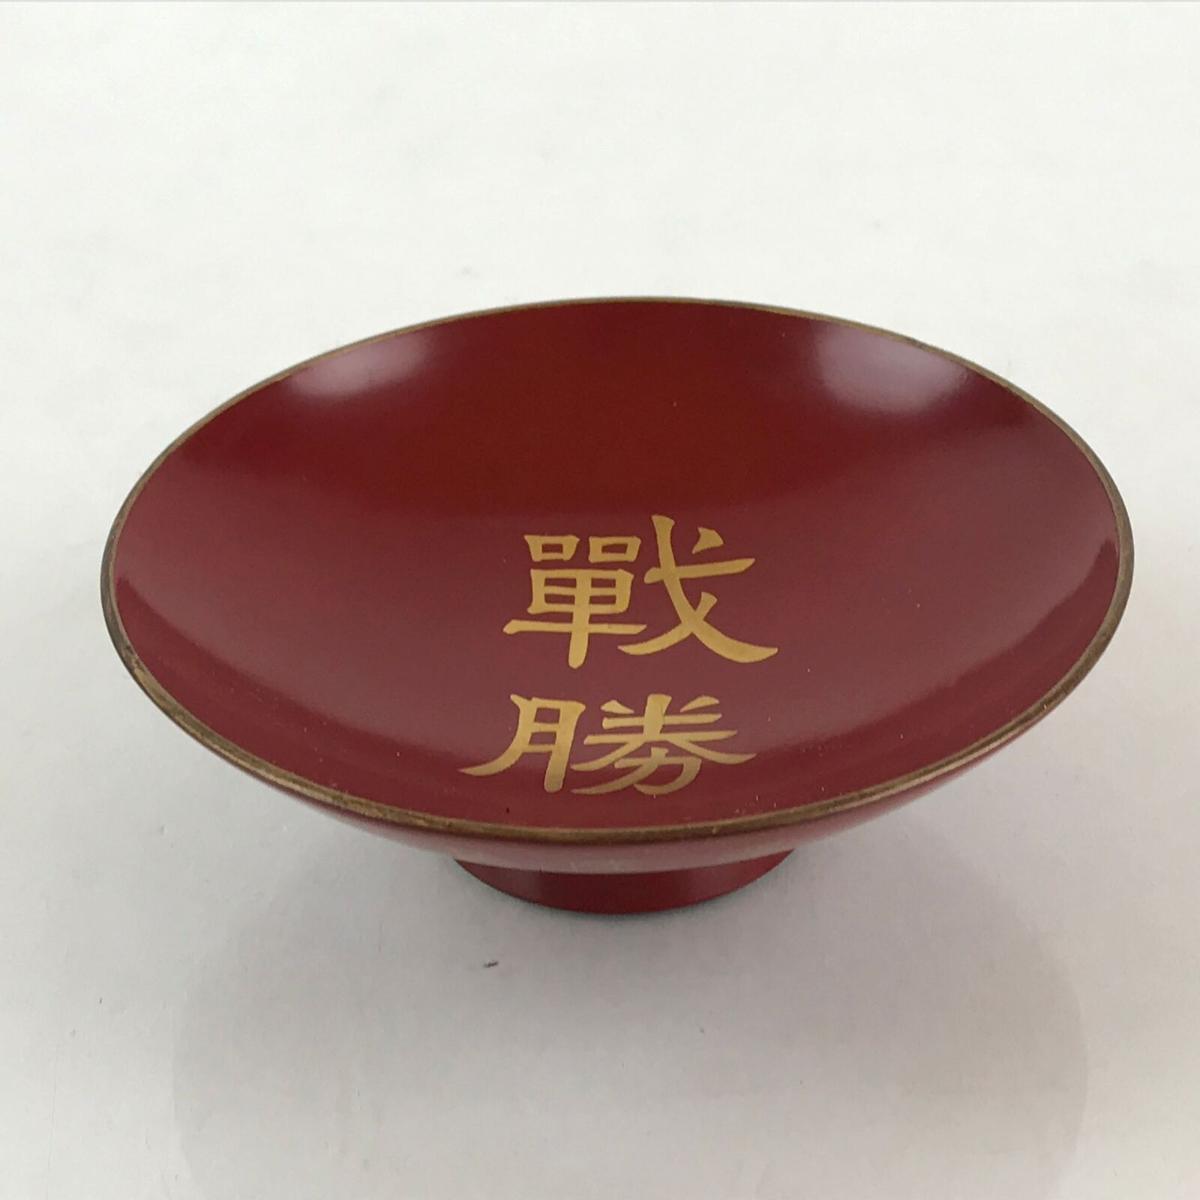
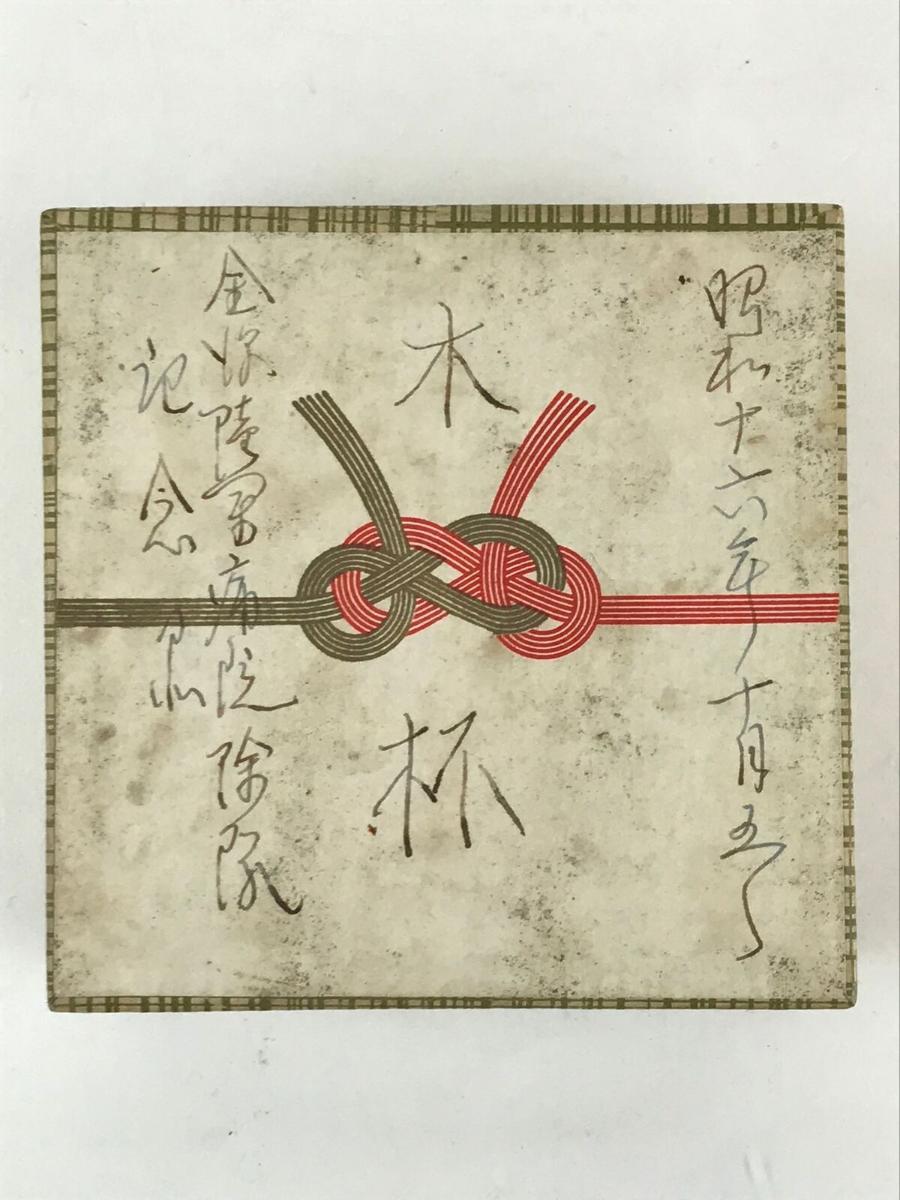
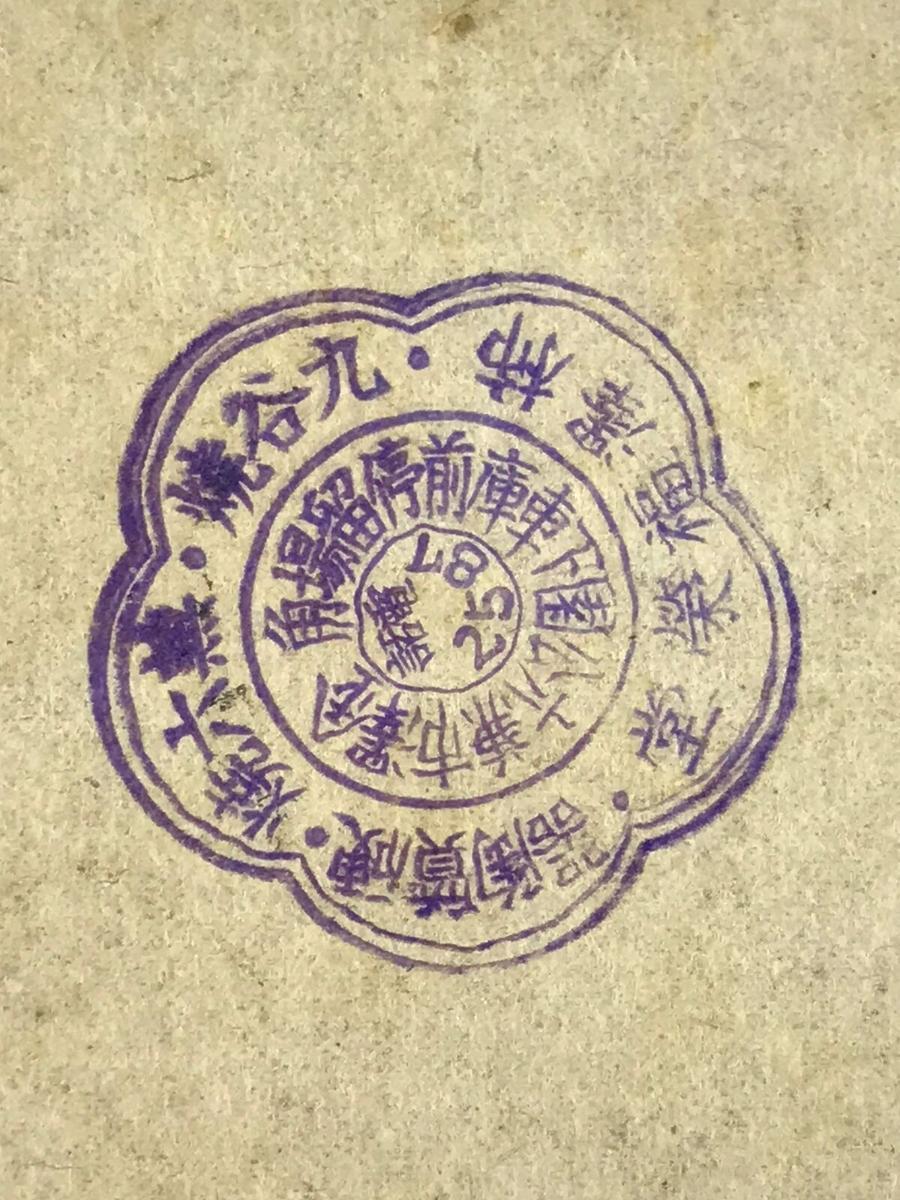
Japanese Lacquered Sake Cup (Sakazuki) for the China Incident
This is a vintage Japanese wooden lacquered sake cup, sakazuki. It is written as a sake cup that was given to him when he was discharged from the Kanazawa Army Hospital after being injured in the China Incident War.
• Japanese wooden lacquered sake drinking cup, sakazuki
• China Incident War
• Words on the box: Sowa 16. Oct. 5th. Wood cup, Discharged from Kanazawa Army Hospital
• Words on the sakazuki: Victory/ Kanazawa Army Hospital/ Commemoration of the China Incident
• Wood
• Item weight: 35 grams
• Packed weight: 235 grams
• C1941
• Approx. 9 cm wide x 3 cm tall
• Acquired from a home in Gifu, Japan


 0
0


Canada General Service Medal clasp Fenian Raid 1866 & VR LSGC Pair to 394 Gnr J Biddle 10th Brigade RA
in Commonwealth Realms: Canada, New Zealand & Australia Medals & Militaria
Posted · Edited by azyeoman
Canada General Service Medal clasp Fenian Raid 1866
394 Gnr J Biddle 10th Brigade RA
Long Service and Good Conduct Medal Army Victoria
394 Gunner J Biddle 10th Bde RA
With details here extracted from his on-line service record TNA WO97/1768 filed under his Coastal Brigade RA number 6288 and other on-line records.
The Canada General Service Medal and Long Service and Good Conduct Medal both officially impressed naming.
John Biddle was born in Henley on Thames, Oxfordshire in 1838 a Laborer, he attested for the Royal Artillery age 19 years on 1st December 1858 joining the 3rd Battalion Royal Artillery as Gunner. Transferring to the 10th Brigade 14th December 1858 and finally to the Coastal Brigade Royal Artillery 1st July 1877 serving in the forts around Portsmouth and the Isle of Wight until his discharge 18th May 1880 having completed 21 years and 170 days service. John served overseas in St John’s, New Brunswick 19th December 1861 to 3rd February 1862, Canada 4th February 1862 to 30th July 1867 and Malta 31st July 1867 to 7th November 1873. Awarded the Long Service and Good Conduct Medal with a £5 Gratuity in 1877 TNA WO102/13/1 refers, he was awarded the Canada General Service Medal clasp Fenian Raid for service with No 4 Battery, 10th Brigade Royal Artillery TNA WO100/110 Part 2 pages 19 and 194 refers, the Medal being sent to his home address 6 Horn Street, Sandgate, Kent. John served his entire service as a Gunner and was awarded his Fifth Good Conduct Badge 1st December 1879, a Very Good soldier he was never tried by Court Martial and was never entered in the Regimental Defaulter’s Book, he did not hold an Army Education Certificate. Awarded a pension on discharge of 18 shillings and 5 pence per week. John was admitted to the Royal Hospital Chelsea as an in-pensioner 27th October 1904, he stated his age as 64 years 11 months and previous address as 6 Horn Street, Shorncliffe Camp TNA WO23/178 refers. He was still alive in 1925 when his pension was increased for the last time.
I can't find anything on what the 10th Bde RA did in Canada and any insight and information would be greatly appreciated. Thanks in advance. J