.jpg.c1d9bcec183c96b9ddb1eb6551289cc3.jpg)
archie777
-
Posts
1,593 -
Joined
-
Last visited
-
Days Won
14
Content Type
Profiles
Forums
Blogs
Gallery
Events
Store
Everything posted by archie777
-
.thumb.jpg.8f11964f4d04824d881c313e10a95c32.jpg) “Hertzog, who had occupied Philipstown on December 19, now threw out his feelers to reconnoitre the most favourable direction for an advance. Forced by the presence of Settle’s columns at Hanover Road to abandon his intention of a direct march to the south, he moved rapidly west, engaged an armoured train at Houtkraal (De Aar - Orange River line) and passed some of his men across the line at this point.” Times History, Vol V, p128-9. Myles Adams, Cape Government Railways, as “Wounded and died of Wounds: Houtkraal, 20 December”. On the QSA Roll for the Mafeking Railway Volunteers he is noted as “Killed in action at De Aar” and on the QSA roll for the Vryburg Town Guard a marginal note for 152 Private Miles Adams reads “Shot in armoured train. Died at De Aar October or November 1900”. He is buried in De Aar. The incident was recorded on the Boer side, albeit with a slight discrepancy regarding the date: “Hertzog went via Philipstown and on 18 December he crossed the railway line at Houtkraal, north of De Aar. It was here where Klaas Havenga “die penkop van alle penkoppe” charged on his horse Harry alongside the railway line and tried to shoot the driver of an armoured train with his revolver!” Hertzog Series (Booklet 2), Free State Museum Service, 1984 (freely translated from Afrikaans) Klaas Havenga, in his attempt to shoot the driver of the armoured train, managed to fatally wound the stoker, Myles Adams. The 18-year-old N.C. (Klaas) Havenga was the Secretary of Gen Hertzog. When Gen Hertzog became Prime Minister in 1924 Havenga was appointed Minister of Finance, a position he filled for 21 years.
“Hertzog, who had occupied Philipstown on December 19, now threw out his feelers to reconnoitre the most favourable direction for an advance. Forced by the presence of Settle’s columns at Hanover Road to abandon his intention of a direct march to the south, he moved rapidly west, engaged an armoured train at Houtkraal (De Aar - Orange River line) and passed some of his men across the line at this point.” Times History, Vol V, p128-9. Myles Adams, Cape Government Railways, as “Wounded and died of Wounds: Houtkraal, 20 December”. On the QSA Roll for the Mafeking Railway Volunteers he is noted as “Killed in action at De Aar” and on the QSA roll for the Vryburg Town Guard a marginal note for 152 Private Miles Adams reads “Shot in armoured train. Died at De Aar October or November 1900”. He is buried in De Aar. The incident was recorded on the Boer side, albeit with a slight discrepancy regarding the date: “Hertzog went via Philipstown and on 18 December he crossed the railway line at Houtkraal, north of De Aar. It was here where Klaas Havenga “die penkop van alle penkoppe” charged on his horse Harry alongside the railway line and tried to shoot the driver of an armoured train with his revolver!” Hertzog Series (Booklet 2), Free State Museum Service, 1984 (freely translated from Afrikaans) Klaas Havenga, in his attempt to shoot the driver of the armoured train, managed to fatally wound the stoker, Myles Adams. The 18-year-old N.C. (Klaas) Havenga was the Secretary of Gen Hertzog. When Gen Hertzog became Prime Minister in 1924 Havenga was appointed Minister of Finance, a position he filled for 21 years. -
“On the farm Nooitgedacht, at the foot of the Magaliesberg range, Major-General RAP Clements, recently joined by Colonel Legge, commands about 2000 men and ten field-guns. He has placed pickets in small fortified positions forming a 3km perimeter on the high mountains above his camp on both sides of the gorge. In the valley, he has positioned his guns and defences in a 3 km radius semicircle around the mouth of the gorge, with small pickets on isolated outposts at various distances from his camp. The strongest is on a prominence called Yeomanry Hill, some 3 km south-east of the camp. General De la Rey’s plan of attack calls for General CF Beyers to clear the British positions on the mountain with about 1000 burghers, while De la Rey and Smuts, exercising independent command for the first time, will attack the main position with about 700 men. The nature of the terrain to be covered makes it difficult to estimate the time needed by the different groups to reach their starting points. De la Rey’s plans go slightly awry when his left flank under Commandant Badenhorst gains contact with the enemy outposts at about 03:30 – earlier than expected. He immediately attacks but draws fire from all sides. Both sides suffer casualties - Colonel Legge is among the first to fall –and Badenhorst is repulsed. On the mountain, the sentries are alerted by the shooting and they open fire on Commandant Krause’s approaching burghers At sunrise, Krause, on Beyers’ right, starts the attack against the emplacements on the western mountain and his yelling burghers charge forward. Covering each other’s advances with heavy rifle fire, Commandants Krause and MP van Staden systematically overrun the positions on the western ridge. They pour fire into the retreating troops below and support Commandants Kemp and Marais in their assault on the eastern side of the gorge. At about 07:00 the troops there also surrender, and the summit is in Boer hands; the defenders suffering 97 killed or wounded. Sergeant D D Farmer, 1st Battalion, the Queen’s Own Cameron Highlanders, with fifteen men, going to the assistance of the embattled pickets on the ridge, come under heavy fire. Two are killed and five are wounded, including Lieutenant Sandilands. Without hesitation, Sergeant Farmer goes to his assistance, carrying him to safety before returning to the firing line until taken prisoner. For this courageous act, he receivesthe Victoria Cross. Directing fire from the ridge, Beyers forces the major part of Clements’ force to flee, enabling De la Rey to take the camp. De la Rey and Smuts, however, their line of attack having been altered by Badenhorst’s early setback, are not in position to prevent Clements’ retreat. Smuts is too late and Clements, leaving behind most of his supplies, reaches Yeomanry Hill under the covering fire of the Yeomanry and Yorkshire Light Infantry. Again, the burghers, anxious not to lose out on the looting, are half-hearted in their pursuit of the fleeing British and are soon back at the camp to share in the booty. Genl Broadwood’s force, less than 20 km away on the northern side of the mountain range, can hear the firing but they are put at ease when a Boer heliographist, using captured equipment, signals: All’s well, no assistance needed. The British casualties – the heaviest they have suffered since arriving in the Transvaal – include 109 killed, 186 wounded and 368 taken prisoner, while the Boers lose 32 killed and 46 wounded. They also take 70 laden wagons, 200 tents, ammunition of all types, 700 horses and mules, and about 500 head of cattle. When he discovers that one of the wagons is carrying liquor, General De la Rey presents it to his prisoners and is astonished when they crowd around him, singing For he’s a jolly good fellow.” “The Anglo-Boer War: A Chronology” by Pieter G. Cloete.
-
Prior to General de Wet crossing the Orange River for the Boers’ Second Invasion of the Cape he sent a small unit under Commandant P. H. Kritzinger and Captains W. D. Fouche and Gideon Scheepers in the direction of Rouxville with orders to cross the Orange River as soon as the opportunity presented itself. Kritzinger struck sharply at the troops trying to bar his path to the Cape Colony. On 13 December 1901 at Koesberg near Zastron he ambuscaded and overwhelmed a party of 250 Brabant’s Horse. Creswicke Vol VI, p135 refers: “In the Zastron district a party of the 2nd Division of Brabant’s Horse – mostly raw recruits – got into difficulties on the 13th. They became detached from the main body, were caught in a defile, and 120 of them were taken prisoner. The captain in command was wounded in several places, and the Colonials lost eight killed and eighteen wounded, three of whom since died.” In “After Pretoria: The Guerilla War”, p232-3 different casualty figures are given: “…3 men were killed, 17 others wounded and 107 taken prisoner.” And some scathing comments: “No detailed information of this humiliating affair has ever been published, but it seems to have been the result of raw and untrained men to come into contact with a veteran enemy.”
-
The 2nd Battalion Royal Lancaster Regt served in South Africa from December 1899 to May 1902. In October 1900 they became the garrison at Vryheid with a strength about 900, and were based at what was thence known as Lancaster Hill. At about 2am on 11 December some 1200 Boers attacked the hill from the north. The defenders fought hard but were nearly overwhelmed and when Lt-Col. Gawne led reinforcements out of the town he was mortally wounded. The Boer advance was eventually stopped by heavy defensive fire and the barbed wire at the top of the hill. British casualties were 8 killed, 20 wounded and 30 taken prisoner. On the Boer side it would seem that 2 men were killed, with an unknown number wounded.
-
The action at Rhenoster Kop was described in the “Times History” as “the last orthodox pitched battle of the sort that had been so common in the early Natal campaigns and in Roberts’ great advance through the territory of the republics” It was an all-day fight, lasting from five in the morning until after nightfall. Colonel Hickman’s and General Plumer’s Brigade of Australians, New Zealanders, the 1st West Riding Regiment and the 1st Royal Munster Fusiliers lay all day under a heavy fire and a hot sun. The tenacity of the British caused the Boers to retreat gradually, and eventually they evacuated an important and naturally strong position. The Boers, some 500 strong, were under General Viljoen and Commandants Grobelaar, and Erasmus. So heavy was the Boer fire during this severe action that it was not possible to rise out of a perfectly prone position without the risk of being shot. Very noticeable was the gallant conduct of the doctors, who came into the firing line to attend the wounded. Referring to the action in his despatch of 8th March 1901, Lord Kitchener said “that the seizure of this position secured an important centre from which to block several of the most extensively used roads leading up from the bush veldt to the high veldt. In this action I had to deplore the loss of Lieutenant Colonel G.E. Lloyd, who fell whilst gallantly leading his men.” British casualties were 15 Killed, 6 Died of Wounds and 66 wounded. Viljoen claimed that 2 Boers were killed and 22 wounded.
-
In his book “With Rimington” Captain L March Philipps, writing from Frankfort, notes on p 206 that his last diary entry was for 20 Nov 1900, as “each day’s events became monotonous”. However, on p207 he describes an incident that took place a few days later: “…we were camped on the river and had a picket on the other side. Two or three Boers crept up the river right between our picket and the main body, and then walked straight to the picket as if coming from us and fired into it at point-blank range. They mortally wounded one of our men and in the dusk escaped.” In the early 1900’s there were 2 farms named Groenfontein in the Frankfort District, both bordering the Vaal River. Serjt. Bertie James Webber was the only Rimington’s Guides casualty recorded during November 1900. It is not known where he is buried but he is commemorated on the Boer War Memorial in Grahamstown.
-
“Major WG Massey is in command of the garrison consisting of three companies of the Gloucester Regiment, one of the Highland Light Infantry, 50 mounted infantry, a few police and other soldiers totalling about 450 men with two guns and a Maxim. He has positioned his main force on the heights west of De Wetsdorp with a smaller force on the eastern side. Chief Cmdt Christiaan R de Wet, with Lategan and Philip Botha, attack from three sides on 21 November, taking one defensive post after the other. Approaching from the east on 22 November, Field Cornet Wessel Wessels surrounds and captures an isolated post on Lonely Hill and the British are also soon forced to abandon their post called Crow’s Nest. The Boers can now approach the main eastern position along a donga and the Highlanders abandon this strongpoint and fall back to the main position to the west. Here, the trenches are overcrowded and efforts to extend their positions are hampered by a shortage of picks and shovels. On 23 November a Gloucester trench north of town is taken after some resistance and the burghers can now direct plunging fire into the main position. On the eastern side, the Boer Krupp opens fire from Lonely Hill and, as the day progresses, the defenders’ supply of water and ammunition becomes critical. At 16:00, a junior officer in an isolated gun pit raises the white flag but it is immediately ordered down. Soon afterwards on an absurd report that the burghers are murdering the wounded it is raised again and Dewetsdorp, named after his father, is captured by Chief Commandant CR de Wet. British losses amount to 14 killed, 52 wounded, 30 slightly wounded and 384 taken prisoner.” “The Anglo-Boer War: a Chronology” by Pieter G Cloete.
-
Hi Megan, I believe that you have pictures of all their medals? Regards Archie
-
Morning Megan, My pleasure and I'm also glad to be of any help. According to the information I have, you are correct, but somewhere they changed it. I couldn't find any information on the second medal and yes, I love my medals as well. There is so many interesting information. Regards Archie
-
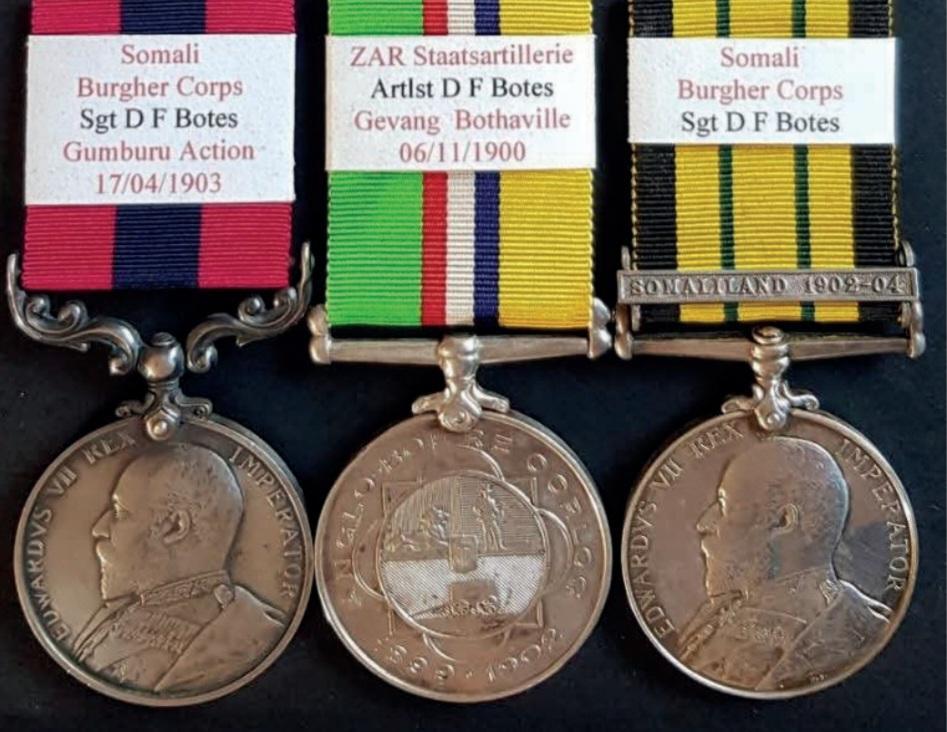
DCM (Edw VII): unnamed ABO: Artlst D.F. Botes; Africa General Service medal 1902-56, clasp Somaliland 1902-04: 38 Serjt. D.F. Botes. Som. Bur. C. David Frederick Botes enlisted in the ZAR State Artillery in 1898 (Muster No 657) and was in action at Magersfontein and Paardeberg. At Bothaville he was one of the 28 “blue uniformed” gunners who were taken prisoner. He was sent to Ceylon (PoW No 15073) and held in the Urugasmanhandija Camp where he signed the Oath of Allegiance to the British Crown on 2 July 1902 and returned to the Transvaal. Early in 1903 he volunteered for service in the Somali Burgher Contingent against the “Mad Mullah” in Somaliland. This small mixed force of Boer, Colonial and British Volunteers was commanded by Captain W. Bonham. The Recommendation for the award of the DCM to three members of the Somali Burgher Corps as, submitted to King Edward VII, was worded as follows: “It is further most humbly submitted to your Majesty that Silver Medals forDistinguished Conduct in the Field be conferred upon the undermentioned soldiers of the Boer Contingent in recognition of their gallant conduct during the operations in Somaliland. Sergeant D.F. Botes, Corporal S.J. Herbst, Trooper C.J. Dwyer (sic). War Office July 1903”. These awards were duly gazetted on 7 August 1903. A year later, Captain Bonham’s recommendation report dated 3 May 1903 for the award of the DCM to these three men September 1904 was published in the London Gazette. He had reported as follows: “Serjeant Botes has always been the first to volunteer for any hard work or arduous duty; has shown fine soldierly qualities throughout the campaign. All these men displayed coolness and steadiness in action, and performed distinguished service in the affair near Gumburu on 16th April, 1903.” In his covering report Major P.A. Kenna, who commanded all the Mounted Troops of the Somaliland Field Force, endorsed Captain Bonham’s recommendations and went on to recommend Bonham for the award of the D.S.O. The “affair near Gumburu on the 16th April” preceded the disastrous action at Gumburu on 17 April 1903 when a significant British force was surrounded in the thick bush and attacked at close quarters and were virtually annihilated by a far superior force of the Mullah’s mounted riflemen. Interestingly Captain Bonham singled out the names of four other men of his Burgher Corps in the following manner: “All these men have done exceptionally good work throughout the campaign. It is not recommended that they should receive any military reward or decoration, but, if the General Officer Commanding thinks fit, that their names should be submitted to Lord Milner with a recommendation that their services should be rewarded in such manner as may seem good to the Colonial Government, either by assistance in re-settlement or employment in Government service.” In an article by Don Forsyth on the Somali Burgher Corps Botes is noted as “Served previously in Magoto War. Returned from Ceylon & joined SAC”.
-
“All day on the 8th and 9th of November, troops, mostly mounted, had been coming in from the west, and on the latter date, to the great delight of everyone, eight of the enemy’s guns were brought in and parked in the market square, together with a large number of prisoners, who were handed over to a guard of the troops in garrison. These were the outcome of a most successful surprise of a Boer commando carried out near Bothaville on the 6th of November. The guns were a varied lot: there was a 12pr. Belonging to U battery and lost by them at Sanna’s Post, many months before; there was a 15pr. Which had belonged to the 14th Field Battery; two Krupp 9prs. In splendid condition; a Vickers Maxim, or pom-pom; a one-pounder quick-firing Krupp, a Maxim with a portable tripod stand, and a large quantity of ammunition. The successful capture of all these guns, prisoners, ammunition and wagons was largely due to our old friend, Major Lean, of the 5thM.I., and after a good deal of questioning (for, like all good soldiers, he was reluctant to talk about his own achievements), the story of the fight was extracted from him. It seems that Le Gallais’ force of Mounted troops, mostly Mounted Infantry, with U Battery, R.H.A., were near Bothaville, when intelligence was received of the presence of a Boer laager in the neighbourhood; so Major Lean with a few men of his own corps, all dismounted, went out one night to reconnoitre. They had to ford the river, the water reaching up to their waists, and then went on for some distance, until Major Lean observed some horses hobbled close to them: thinking this very curious, he went on a little further, and then saw, behind an ant heap, what looked like the head and shoulders of a man: without an instant’s hesitation he dashed forward and yelled to the man, “ Hands up!” To his astonishment several other men rose and put up their hands, and he discovered that he had inadvertently held up an entire Boer picket. Handing over the prisoners to his men, he and his party went on cautiously, and on coming to the summit of a rise in the ground saw the whole Boer laager at their feet. The party was discovered, and a heavy fire opened on them at once; but the thirty men of the Mounted Infantry spread out under cover and devoted themselves to preventing the Boers from inspanning their oxen into the guns and wagons. Word had been sent back to Colonel Le Gallais, who came up rapidly and joined in, U battery opening fire on the Boer guns at a range of 400 yards, but from the other side of a ridge, firing by indirect laying. The Boers answered the fire from their guns, and an artillery duel was in progress for some little time. A message had been sent back to General Knox, who, however, was out of reach, and also to Colonel De Lisle, who was some eight miles away; and the latter with his men came up rapidly, travelling the whole distance without drawing rein. They moved so as to envelope the flanks, but on their approach the enemy fled, leaving a large number of killed and wounded, and a considerable number of prisoners (114) twenty-eight of whom were dressed in the blue uniform of the Staats Artillerie. Unfortunately our loss had been severe, the gallant and dashing Le Gallais, Lieut.-Colonel Ross of the Durham Light Infantry, and two other officers having been mortally wounded, and seven officers severely wounded, while eight men were killed, and twenty-six wounded; but the success was great, and the rout of the Boers complete. They left the whole of their guns, wagons and Cape carts, and fled on their horses, some not even waiting to saddle up first. The prisoners said that De Wet and Steyn had both been with the laager, but that they had fled directly the firing commenced.” “Two Years on Trek” by Lt-Col du Moulin, p237-9
-
“The story of Jacobsdal was one of carelessness and bravery. Here were 45 Cape Town Highlanders, 8 police, and a 15 pounder, manned by some Colonial Volunteers. The men were lodged partly under canvas on the market square, partly in houses near at hand. In the night of October 25… 70 Boers under Field Cornet Bosman crept up the bed of the Riet River which runs through the town and gained some houses commanding the tents of the sleeping Volunteers. Opening fire at 3am, they killed 14 and wounded 13 of the 34 men in the tents. Those in the buildings held out until a relief party of 54 men arrived from Modder River. On the next day the town was evacuated, only to be immediately reoccupied by the Boers.” Time History, Vol V, p25-6
-
On 20 October 1900 the combined commandos of De Wet and Liebenberg, numbering some 1500 men with two Krupps and two pom-poms, take up positions adjoining General Barton’s camp at Frederikstad (20 km north of Potchefstroom). Barton immediately signals for reinforcements and recalls his patrols. The burghers press closer, complete the encirclement and sustain a constant long-range fusillade until twilight. During the night of 21 October Barton abandons his camp at the railway station, leaving only his hospital, and disperses his troops on two hills, virtually splitting his force in two. He places the Royal Welsh Fusiliers with five guns on Gun Hill, north-east of the station, the Royall Scots Fusiliers on a long hill to the south-west with the rest of his men thinly spread out in between. Barton, under the impression that De Wet is being pursued by a British force, resigns himself to taking defensive positions and waits for reinforcements. On 23 October the burghers push their ramparts to within 400m of South Hill. De Wet realises that Barton’s reinforcements are approaching and on 24 October he and General Liebenberg decide to force the issue. Having noticed that the besieged force relies on water from a small dam near the railway bridge, De Wet orders Liebenberg and Froneman to furnish 200 volunteers to occupy positions dominating the dam. He is convinced that, if the British can be denied water, they will surrender. The intended positions are about 1000m from the Boer lines, meaning that the men will be without support and will only be able to fall back safely after dark. In the early hours of 25 October only about half of the burghers ordered to occupy the exposed position at the railway bridge between Frederikstad and Gun Hill muster. They move out under cover of darkness and, leaving their horses about 2km away, they make their way to the bridge where they dig in. At daybreak some black attendants lead horses and mules to water. One turns and runs when ordered to surrender and is shot down. Barton initially thinks that only a few snipers are involved and sends ten ILH men to deal with them. However, when they are repeatedly repulsed, he launches a full-scale two-pronged attack, using five companies, against the isolated burghers. Elsewhere De Wet directs his attack at Barton’s main positions. Barton comes under fierce fire and is hard pressed until reinforcements led by Colonel H T Hicks start arriving from Welverdiend Station, where they have detrained. The burghers near the railway bridge put up a stubborn resistance, but with their ammunition running low, they are forced to make a fast retreat over open veld towards the river and are mown down by artillery firing from high ground. In the confusion some burghers put up white flags while others continue firing. Liebenberg retires towards Klerksdorp while De Wet heads back to the Free State. The burghers suffer heavily – losing about 80 killed, wounded and captured. In retaliation for the alleged abuse of the white flag the British deny a Boer doctor access to the wounded
-
After discussing the Boer attack on the Jagersfontein garrison the “Times History” Vol V, p25 continues: “At Fauresmith there stood a smaller garrison, consisting of 117 Seaforth Highlanders, 20 Imperial Yeomanry and a Town Guard of 17 men, the whole under Capt A B A Stewart. Closely encircled on 3 sides by hills, which are themselves commanded by higher hills, Fauresmith was a difficult place to defend with such a weak force. Stewart wisely kept his Highlanders together on a kopje south of the town, while the Yeomanry under Lt Richardson held a fort built of stones and sandbags on a low ridge to the north. At 4.15am on October 19 a determined attack was made, mainly against the H’landers. All the troops held firm, and by 8:30, having inflicted nine casualties, the Boers drew off.”
-
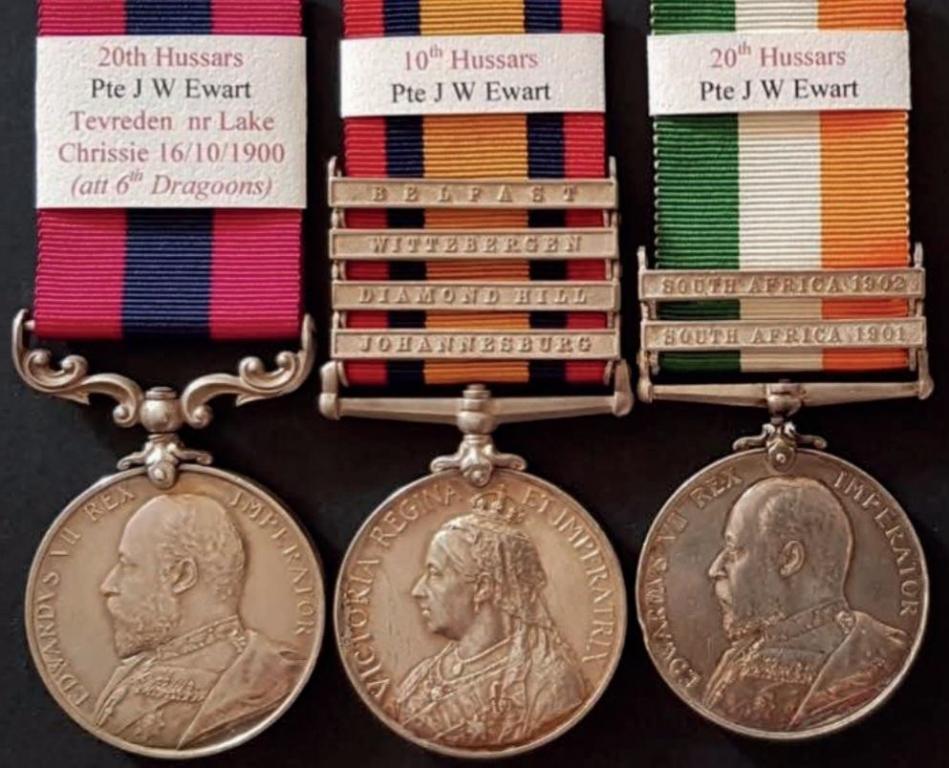
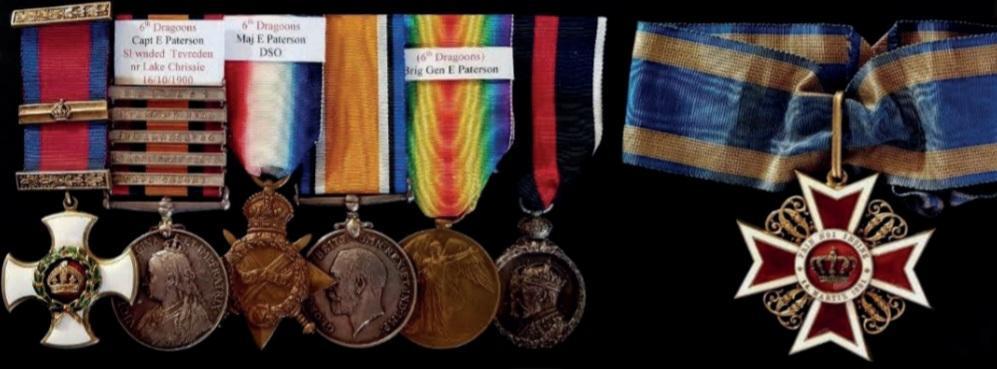
DCM (EVII): 3356 Pte. J.W. Ewart, 20th Hussars; QSA, 4 clasps Jhburg, D Hill, Witt, Belf: 4479 Pte. J.W. Ewart, 10th Hussars; KSA, 2 clasps SA’01, SA’02: 3356 Pte. J.W. Ewart. 20th Hussars John Walter Ewart was born in February 1873 and joined the 20th Hussars in March 1891. A qualified Marksman and Signaller, he served in England until 1895 and in India till 1898. After the outbreak of hostilities in South Africa he was recalled from the Reserves, initially for service with the 10th Hussars, but afterwards with his old regiment, the 20th Hussars. While attached to the 6th Dragoons he received the recommendation that resulted in the award of the DCM. Serving in “B” Squadron, commanded by Lieutenant Ewing Paterson, he took part in the affair at Tevreden, near Lake Chrissie. The Squadron, while keeping communication between other elements of the 6th Dragoons and 4th Brigade, found itself abandoned on the left flank. Undeterred, Patterson led a spirited attack against the enemy displaying “great dash”. Exactly what role Ewart played in the action is unknown but he must have shown considerable bravery, as a letter written by Paterson to Ewart in 1904 confirms: “I was so glad you got the DCM but honestly you deserved the VC and I was sorry I was unable to get you it. You earned it if anyone did, but I am afraid I was not senior enough in rank to push it further….” Ewart was mentioned in Roberts’ Despatch of 4 September 1901 (LG 10 September 1901, p5930) and awarded the DCM in the LG 27 September 1901, p6305. He returned to civilian employ after the War, joining the Royal Borough of Renfrew as a Sanitary Inspector, a position which he held until his death in 1930.
-
DSO (VR), complete with top riband bar and 2nd award clasp; QSA, 5 clasps CC, OFS, Jhburg, D Hill, Belf: Capt. E. Paterson, D.S.O., 6/Drgns; 1914-15 Star: Major E. Paterson. D.S.O. 6/Dns.; BWM & AVM: Brig. Gen. E. Paterson.; Coronation Medal 1902 (silver): unnamed as issued; Order of the Crown of Romania, Commander: Neck Badge O’Moore, Creagh and Humphris in “The Distinguished Service Order 1886-1923” devote almost a full page to Ewing Paterson, and they quote from the Yardley book: In the fight at Tevreden, near Lake Chrissie, “Lieutenant Paterson behaved with great dash, being slightly wounded as he galloped, unfortunately unarmed, alongside Commandant Smuts himself”. After describing the gallantry of the Inniskillings, and the heroic death of Lieutenant Swanston, Colonel Yardley states: “Lieutenant Swanston and our other dead were buried at sunset at the foot of the Tevreden Hills, close by which I lay wounded, with Lieutenants Paterson and Harris. The sadness of it I shall never forget, with no feeling of victory to cheer the heart - only regret”. And later: “Lieutenant Paterson, shot through the thigh at Tevreden, pluckily returned to duty; but this inflamed his wound, and he was invalided home in consequence”. Paterson was mentioned in despatches (LG 10 Sept. 1901, p5929) and was created a Companion of the Distinguished Service Order in the LG of 27 Sept. 1901, p 6304). The Insignia were presented by the King on 29 Oct. 1901. During WWI he commanded the Inniskilling Dragoons in France (1915-18) and the 6th Cavalry Brigade from 2 Sept. 1918 to the end of the War, being mentioned in despatches five times. In addition, he was awarded a Bar to the DSO (Supplement to the LG of 22 June 1918, p7394). “For conspicuous gallantry and devotion to duty. Owing to the neighbouring troops being driven back, his flank became exposed and a gap was made in the line. Though he had very few men, he at once extended his flank and maintained a most gallant and determined resistance for an hour against largely superior numbers, closing the gap at a most critical moment until other troops were able to advance and restore the line. His tactical handling of the brigade during successive withdrawals, often with one or both flanks exposed, was magnificent.” Ewing Paterson was the second son of John Paterson of Kingburn and Langraw, St. Andrews, in Fife. He was born on 8 June 1873 and was educated at St. Andrews and in Germany and joined the 3rd Militia Battalion Manchester Regiment as a Lieutenant in 1889. He transferred to the 9th Dragoons on 9 September 1893 being promoted Lieutenant on 1 January 1895. During the fighting in March 1900 Lieutenant Paterson found himself somewhat cut off and alone with his troop, Colonel Yardley later recording: “Lieut. Paterson, who was in advance on the left front did good service” … “Lieut. Paterson, with his troops galloped on to a big hill and climbed the precipitous sides just in time to forestall the enemy and drive them back giving us a commanding position.” He was Commandant, Cavalry School, from 1920 to 1922 and retired in 1923.
-
“On the 16th General French directed an advance on Ermelo by different routes, the columns being widely extended to sweep the country. Our 1st Cavalry Brigade, under General Gordon, took the left, via Tevreden and Lake Chrissie; at daylight we moved off, the Inniskillings being advanced regiment, with Major Dauncey, Captain Yardley, and Captain Hamilton commanding the advanced squadrons. We drove a good many sniper out of the farms, and early in the afternoon reached the Tevreden Hills. Advancing along these, our advanced scouts surprised the Boer main laager and at once became heavily engaged; supporting them, we reported and awaited reinforcements. Unfortunately, the brigade had suddenly changed its direction, halted, and was making arrangements to bivouac! Meantime the enemy, about 1000 strong, with two guns in position behind their laager, rallied. Our advanced scouts exhausted their ammunition. The enemy got our range accurately with several belts of pom-pom and shell from their guns; one man was horribly mutilated, a pom-pom shell bursting full in his stomach. Under cover of this fire about 600 made a bold attack; our advanced scouts were driven back, galloping, mixed up with the enemy, who were firing at them from their horses. Major Allenby at this juncture, coming to the firing line, informed me that the hill must be held, otherwise the enemy would rush the bivouac. Major Dauncey, with a few men of B Squadron, was holding the centre, whilst I was holding an advanced position on his right, with Lieut. Swanston and nine men only of my A Squadron. I considerably checked the enemy’s rush, which came direct on my post, for some time stopping it altogether, and enabling the advanced scouts to get back clear, whilst reinforcements and two guns at last got out from the brigade to support. Finally, my small party was overwhelmed, the Boers, with Commandant Smuts at their head, getting right amongst us. I ordered those who could to escape being made prisoners, and fired my last shot at the Boer leader, who sprang from his horse as I pulled the trigger. Men and horses were falling fast under a hail of bullets, but I seemed to bear a charmed life. Vaulting on my horse, which, like myself, bore a charmed life, I galloped twenty yards off, and then pulled up to see if anyone was left. Immediately I did so I was shot high in the thigh, the bullet passing through me and just missing the spine. Gripping the pommel, I galloped away, my clothes riddled with bullets; but the one only had struck me. I found Major Allenby leading the regiment on, supported at last by two guns, and one squadron preparing to charge. The enemy almost reached the guns, which were firing case, but they were driven back, and our old positions were reoccupied. All our men whose horses had been shot, and who would have been taken away prisoners, were rescued. My wound and loss of blood prevented my taking further part. Lieut. Walton, A.M.D., came to my aid, and, still mounted, I reached an ambulance.” “With the Inniskilling Dragoons”. By Lieutenant Colonel J Watkins Yardley.
-
Parties of Boers under Hans Botha had been seen by the English on the hills near Vlakfontein (Balfour). In order to ascertain what they were doing an armoured train was sent out. Captain George Paget of the Rifle Brigade together with a detachment of his men and a few engineers proceeded along the line in the train. Hans Botha allowed the train to pass Vlakfontein then had one party blow up two culverts behind it while another party tore up the rails ahead of it. A tremendous fire was then opened on the occupants. Although they made a gallant resistance the ambush was a complete success and they were ultimately compelled to surrender. Captain Paget was mortally wounded and most of his men were casualties by that time. Another party of 25 men under Capt Archibald Stewart, 1st Bn Rifle Brigade, followed on foot in support of the train. Stewart’s party was also attacked and he was killed in the engagement. They were within a few kilometres of a column under General Clery, which was en-route to Vlakfontein, but they arrived too late to be of any service. At the armoured train one of the Imperial Military Railway guards, Thomas Ingoldsby, from Scotland, was wounded and died two days later. He and two officers have been reinterred at Standerton. “Heidelbergers of the Boer War” by Ian Uys
-
“Early in Sept. 1900 the three-pronged eastwards advance of the British under Genls. Buller, French and Pole-Carew put the retreating Boers, many of them without horses, under great pressure. At a Boer Council-of-War, held at Hectorspruit on 16 Sept 1900, it was decided that only mobile fighters, well experienced in local conditions, would continue with the next (guerrilla) phase of the war. Approximately 2000 burghers under Genls. Louis Botha and Ben Viljoen withdrew northwards and the balance, some 3000 strong, were advised to join Genl Coetzer at Komatipoort or to cross the border into Mozambique. This motley array consisted of elderly burghers, foreign volunteers, Cape rebels, deserters, dejected Boers and even men and their families who had previously hidden in the bush! The Portuguese Authorities were afraid that the Boers would destroy the bridge over the Komati River or even engage the British on Portuguese soil. After a message from President Kruger that the bridge must not be touched, General Coetzer left with some 250 men with serviceable horses to join General Botha: this left General F.J. Pienaar in command. On 21 Sept Portuguese secret agents promised Pienaar favourable terms if the Boers would surrender to the Portuguese and thus prevent a confrontation with the advancing British forces. During the night of 22-23 September General Pienaar crossed the border into Mozambique with some 700 Boers and Pienaar ordered his forces to lay down their arms. Towards the end of the month a larger group of about a thousand, which included women, children, foreign volunteers and even a few servants also crossed the border. Those who were armed laid down their weapons and a special train carried them to Lourenco Marques. According to international custom the Boer Burghers were now internees and were warned that they would be shot or imprisoned if they tried to return to the ZAR. The British were not quite satisfied with the presence of the Boers in Mozambique and after lengthy negotiations it was decided that the majority would be sent to Portugal. This was finally done between February and June 1901 when some 890 males and 175 females, of which 150 were younger than 16 years, were interned in 6 Portuguese towns (Abrantes, Alcobaça, Caldas da Rainha, Oeiras, Peniche and Tomar).” “Viva os Boers” privately published in Afrikaans by O.J.O. Ferreira, Pretoria, 1994. “The Foreign Volunteers, on the other hand, were in a different category: initially the representatives of the ZAR Government in Mozambique distanced themselves from the Volunteers, implying that they would have to make their way home at their own cost. This led to vehement protests by the Volunteers, who requested free passage home as well as some form of remuneration. In this they were strongly supported by the Portuguese authorities who wanted to get rid of them. Eventually a Committee of ZAR officials was formed to facilitate repatriation of the Volunteers and after clandestine (so as not to sour Portuguese-British relations) over-border negotiations money was made available by the ZAR Government and a suitable vessel was chartered. On 2 October 1900 the SS “Styria” left Lourenco Marques for Trieste with 378 passengers, of which almost 370 were Foreign Volunteers. The leader of the party was a Mr de Cock (an official in the ZAR Auditor-General’s office) who afterwards submitted a report and passenger list with destinations of individuals to the ZAR Government. The SS “Styria” docked in Trieste on 31 October 1900 and, on instructions of the Lourenco Marques committee, the Trieste branch of the travel agency Thomas Cook paid out “pocket-money” to each Foreign Volunteer and issued each one with a travel-ticket to a city of his choice.” Source: An Afrikaans article “Die Repatriëring van Buitelandse Oorlogsvrywilligers uit Transvaal na Europa in 1900” by C de Jong, published in “Africana Notes and News” Sept 1981.
-
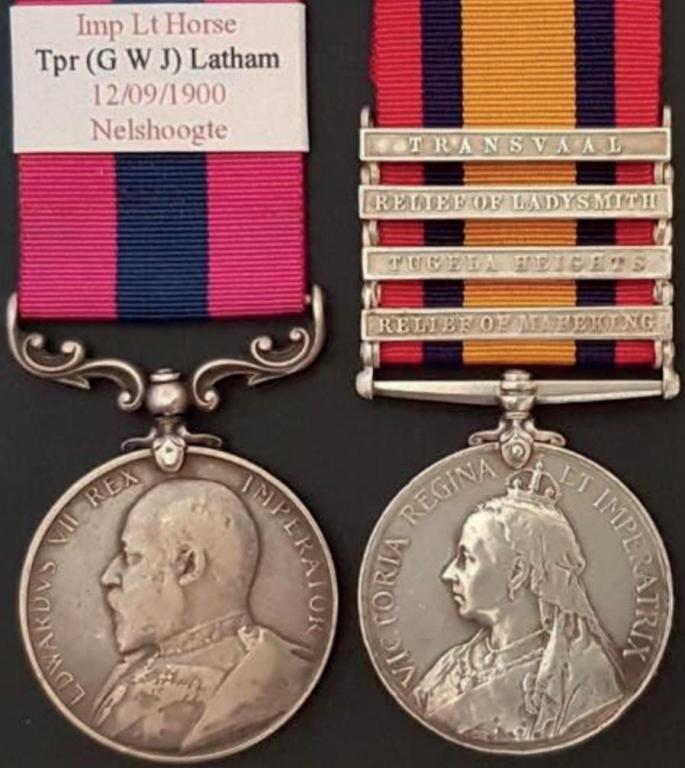
On this date, Maj Gen French’s cavalry division occupied both sides of Nelshoogte Pass during their advance to Barberton. This action forced the Boers under Assistant Commandant General Tobias Smuts to retire. DCM (EdwVII): Tpr. Latham Imp: Lt Horse; QSA 4 clasps RoM, Tug H, RoL, Tvl: 155 Tpr. G.W.J. Latham Imp: Lt Horse George Latham enlisted in the ILH at Pietermaritzburg on 22 September 1899 and was discharged on 12 October 1900. His DCM, as well as that awarded to Tpr James was gazetted on 27 Sept 1901 without a citation. However, Gibson in “The History of the Imperial Light Horse”, p220/1 describes the event that led to the two awards: “When the column was climbing the high Nelshoogte (Nels Heights), which could have been held by a thousand determined men against an army, great difficulty was experienced in dragging the Naval guns and the wagons up the steep hills. To add to the difficulty, a sniper on the side of the mountain kept up a persistent and effective fire, at about 800 yards range, getting a horse or dropping an ox dead in its yoke with every other shot. Two of the most experienced I.L.H. scouts, Troopers James and Bob Latham, were despatched to deal with the lone sniper and the firing soon stopped. The two scouts on rejoining the Regiment reported that they had found an old Boer with long white hair and beard, firing at the column with an ancient Martini Henry with a 100 or more cartridge in an old haversack by his side. “What happened to him?”. “We had to shoot the poor old chap, and this is his rifle, haversack and ammunition.” “Why on earth did you not ‘hands up’ the old man and take him prisoner?” “It is all very well to talk like that. The old chap had taken up such a position that we could neither flank him, or get behind him and it meant that we had either to get him or he would have got us, so in shooting him it really amounted to shooting in ‘self defence’!” It was felt that it was an unique achievement for one old man, about 70 or 80 years of age to put himself against some 5000 troops. He must have realised that there could only be one end to his foolhardy but glorious act. The men thought that the poor old Burgher was, no doubt, too old to go on Commando and scorned to be relegated to the lowly position of doing odd jobs about the wagons for the women and children, so he took a hero’s way out of his dilemma.
-
On 4 September 1900 in the Gatsrand, near the present Fochville, Commandant Danie Theron was planning an attack with General Liebenberg’s commando on General Hart’s column. Whilst out scouting to discover why Liebenberg was not at the agreed position, Theron ran into seven members of Marshall’s Horse. Contemporary Boer sources allege that Theron killed three and wounded the other four. The column’s escort was alerted by the firing and immediately charged up the hill, but Theron managed to avoid capture. Finally, the column’s artillery, six field guns and 4.7-inch naval gun, were unhitched and the hill bombarded. The legendary Republican hero was killed in an inferno of lyddite and shrapnel. Eleven days later, the body of Commandant Danie Theron was exhumed by his men and later reburied next to his late fiancée, Hannie Neethling, at her father’s farm (Eikenhof, Klip River.) The SAFF Casualty Roll contains the name of only one man (MacMillan) of Marshall’s Horse: he was mortally wounded in the incident. The “Official History” Vol III, p376 mentions: “Near the scene of the previous day’s encounter the guns fired on a party of the enemy, killing four, of whom one was Commandant Daniel Theron, a well-known captain of scouts.”
-
A party of 4 men of the 18th Hussars were attacked by Boers. The Sergeant in charge was wounded but got away with one of the men while Lambert and the other man were captured. Lambert re-joined his unit in Lydenburg on 19 Sept 1900. WO 108/372 (SA Surrenders). 3406 Pte. F.W. Wyatt. 18/Hrs. Wyatt was the “other man” who was captured. He must have spent some 10 days moving around with his captors: according to his Service Papers “Recovered Lydenburg 19/9/00”.
-
“On 31 August 1900 the 3rd Cavalry Brigade under Col Little and the Colonial division under Col Dalgety were marching for Krugersdorp when they were attacked on the farm Quaggafontein (11 km east of Derby) by some 450 burghers with guns from Asst Cmdt-Gen de la Rey’s commando. During the action De la Rey arrived with some 600 more burghers and artillery, and Dalgety sent the Kaffrarian Rifles on an enveloping attack around the left flank of the Boer position, where they bore the brunt of the enemy fire as the cavalry pulled back. Once this was accomplished, the Kaffrarians advanced, only to be pinned down by a withering hail of bullets from Boers who had been waiting for them l on a group of rocky kopjes. They remained in this exposed position until sunset when firing ceased. The British lost 11 men killed in action and 6 officers and 26 men wounded.” The Regimental History by Francis Coleman.
-
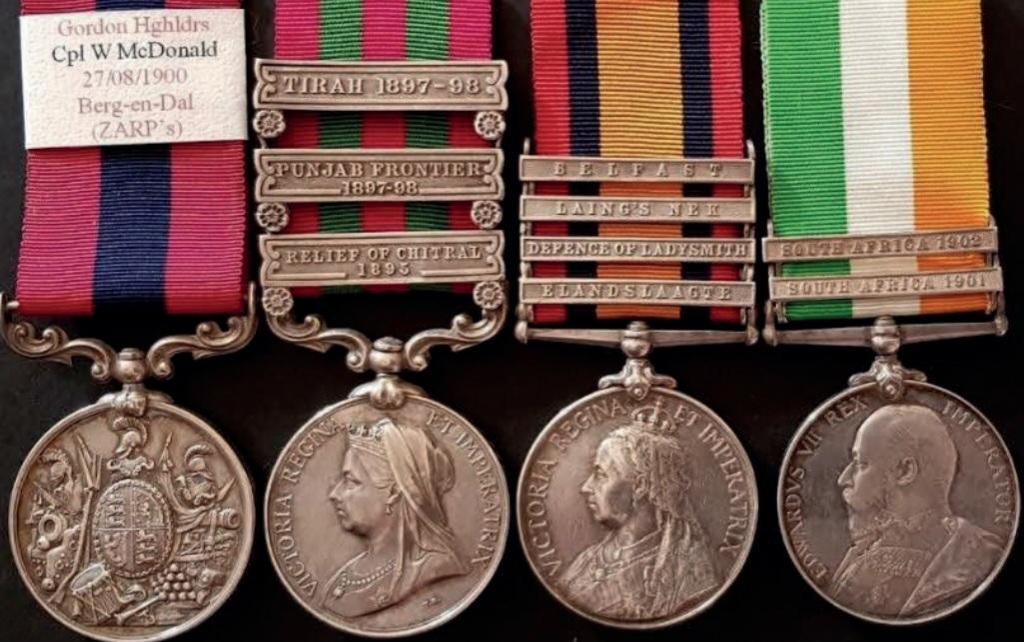
DCM (VR) 2860 Cpl. W. McDonald, 2nd. Gordon High’drs; India Medal 3 clasps RofChit, Punj Fr 97-98, Tirah 1897-98: 2860 Pte. W. McDonald 1st. Bn. Gord. Highrs; QSA 4 clasps Elandsl, DoL, L Nek, Belf: 2860 Pte. W. McDonald, Gordon Highrs.; KSA, 2 clasps SA’01, SA’02: 2860 Serjt. W. McDonald, Gordon Highrs. William McDonald’s handling of his machine gun attracted widespread attention at the time: Buller’s Despatch of 13 September 1900 (LG 8 Feb 1901, p963): “One very noticeable incident in the attack was the great tactical skill with which the Maxims of the Gordons, Inniskillings, Rifle Brigadeand Devons were handled by their respective detachments. The fire of these guns contributed materially to the successful result of the assault. General Kitchener especially brings to notice the conduct of No. 2860 Corporal William McDonald, Gordon Highlanders, and of Lieutenant A.C. Jeffcoat, of the Inniskilling Fusiliers, while in command of gun detachments” Buller’s Despatch of 9 November 1900 (LG 8 February 1901, p977): No 2860 Corporal W. McDonald – ‘This non-commissioned officer was in charge of the machine guns of the battalion, and his conduct on all occasions was specially worthy of commendation’ Official History , Vol III, p400-1: ‘The lines of the Rifle Brigade rolled on, and they had come within eight hundred yards of the kopje, when the Police, who were watching keenly through the interstices of their toppling ramparts, showed that some of them still lived by delivering a fierce volley. It was followed by a withering magazine fire, not only from the kopje itself, but from some schanzes which, thrown up in advance of the main position north of the line, took the battalion in flank. Halting his men for a few moments to reply, Metcalfe deflected to the left one company from his reserve to deal with the northerly trenches, and another to the right to gain touch with the line of advance of the Royals. With the Rifle Brigade had gone the machine gun of the Gordon Highlanders, in charge of Corporal W. McDonald, who, utilising the pause, audaciously took his weapon into the foremost line, whence he poured bullets against the kopje.’ Times History, Vol IV, p454: “The Riflemen threw themselves on the ground and replied; their Maxim and that of the Gordons, which Corporal Macdonald had gallantly brought up in support, proving at this moment of great service”. The Joyous Patriot: Ralph Verney, Editor David Verney, p19: “Several men deserved the V.C. that day, though they won’t get it, especially a Corporal of the Gordon Highlanders who brought a Maxim gun on his back right up into the first line amid a storm of bullets, and fired away as quietly as if he was practising on the range”.