

.jpg.c1d9bcec183c96b9ddb1eb6551289cc3.jpg)
archie777
-
Posts
1,593 -
Joined
-
Last visited
-
Days Won
14
Content Type
Profiles
Forums
Blogs
Gallery
Events
Store
Everything posted by archie777
-
.thumb.jpg.8f11964f4d04824d881c313e10a95c32.jpg) “On the 27th, French advanced 8 miles further north, and drove the enemy from Swartz Kopjes. From this position he threatened the enemy’s line of retreat, although he could hardly yet be said to have turned their right flank. Meanwhile, however, General Buller was able to take more decisive action at the other extremity of the Boer line of defence. At Bergendal, 3 miles south-east of Belfast, the Boers had established a very strong position on a low rocky kopje, and in some farm buildings and plantations, which formed the key to that portion of the main position. The kopje was heavily entrenched and was garrisoned by the Z.A.R. Police with a pom-pom. The ground, which sloped gently away in all directions, afforded no cover.” Roberts’ Despatch of 10 October 1900, published in the LG of 8 Feb 1901, p867. The British bombardment began shortly before 11 am and the shelling continued for three hours without intermission. From the Times History: “no such severe and concentrated fire having been witnessed during the war since the days of Vaal Krantz and Pieter’s Hill. The top and all sides of the platform were swept by a hail of shrapnel, while the rocks themselves were torn and rent by the explosion of the lyddite shells. Smoke and sulphurous gases and rocks shooting up in the air made the place look like a Vesuvius in eruption. But the police lay close behind the rocks. For, in spite of the accuracy of the fire, the trenches were so good that its material results were almost nothing”. Early afternoon the British infantry assault began. Again, quoting from the Times History: “...the Riflemen swept onward towards the position regardless of their losses. Two captains, Lysley and Steward, and the adjutant, Maitland, fell; three other officers and seventy-five riflemen, dropping in their tracks, testified to the steadiness and marksmanship of the hard-fighting Zarp’s and Metcalfe himself fell severely wounded. The Zarps went on coolly firing till within the last five minutes, then, most of the survivors rushed to their horses in the kraal and galloped away… they found and took prisoner the brave commandant, Philip Oosthuizen, who was severely wounded. Lieutenant Pohlman was killed, and some forty others of the seventy-four were killed, wounded or captured… The pom-pom was also captured; the Maxim had already been blown to atoms by a shell”. Casper Hendrik du Plessis held the rank of Sergeant in the elite ZAR Police unit. His initial service was in Natal (Colenso and Ladysmith), followed by Abrahamskraal (Driefontein). At Dalmanutha he was one of 74 ZARPs who were entrenched among the rocks on the Bergendal Koppie and were subjected to the fire of Buller’s thirty-eight guns. Miraculously, the 27-year old Du Plessis was neither wounded nor killed but was taken prisoner and sent to St Helena as PoW No12217.
“On the 27th, French advanced 8 miles further north, and drove the enemy from Swartz Kopjes. From this position he threatened the enemy’s line of retreat, although he could hardly yet be said to have turned their right flank. Meanwhile, however, General Buller was able to take more decisive action at the other extremity of the Boer line of defence. At Bergendal, 3 miles south-east of Belfast, the Boers had established a very strong position on a low rocky kopje, and in some farm buildings and plantations, which formed the key to that portion of the main position. The kopje was heavily entrenched and was garrisoned by the Z.A.R. Police with a pom-pom. The ground, which sloped gently away in all directions, afforded no cover.” Roberts’ Despatch of 10 October 1900, published in the LG of 8 Feb 1901, p867. The British bombardment began shortly before 11 am and the shelling continued for three hours without intermission. From the Times History: “no such severe and concentrated fire having been witnessed during the war since the days of Vaal Krantz and Pieter’s Hill. The top and all sides of the platform were swept by a hail of shrapnel, while the rocks themselves were torn and rent by the explosion of the lyddite shells. Smoke and sulphurous gases and rocks shooting up in the air made the place look like a Vesuvius in eruption. But the police lay close behind the rocks. For, in spite of the accuracy of the fire, the trenches were so good that its material results were almost nothing”. Early afternoon the British infantry assault began. Again, quoting from the Times History: “...the Riflemen swept onward towards the position regardless of their losses. Two captains, Lysley and Steward, and the adjutant, Maitland, fell; three other officers and seventy-five riflemen, dropping in their tracks, testified to the steadiness and marksmanship of the hard-fighting Zarp’s and Metcalfe himself fell severely wounded. The Zarps went on coolly firing till within the last five minutes, then, most of the survivors rushed to their horses in the kraal and galloped away… they found and took prisoner the brave commandant, Philip Oosthuizen, who was severely wounded. Lieutenant Pohlman was killed, and some forty others of the seventy-four were killed, wounded or captured… The pom-pom was also captured; the Maxim had already been blown to atoms by a shell”. Casper Hendrik du Plessis held the rank of Sergeant in the elite ZAR Police unit. His initial service was in Natal (Colenso and Ladysmith), followed by Abrahamskraal (Driefontein). At Dalmanutha he was one of 74 ZARPs who were entrenched among the rocks on the Bergendal Koppie and were subjected to the fire of Buller’s thirty-eight guns. Miraculously, the 27-year old Du Plessis was neither wounded nor killed but was taken prisoner and sent to St Helena as PoW No12217. -
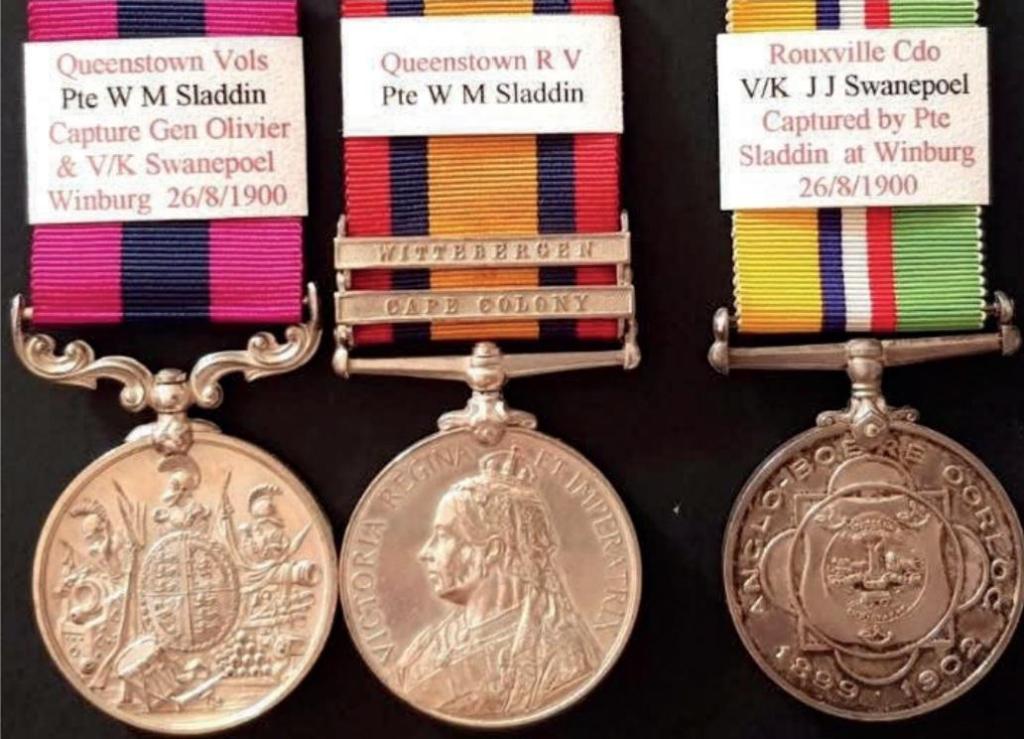
Next day (27 August) Olivier attacked the town from the north, north-east and north-west, but was repulsed on every side, losing twenty-five of his men by capture. Finally, he himself with his three sons rode into a trap set by the Queenstown Volunteers, from which he emerged a prisoner of war. “Official History” Vol III, p334. DCM (VR): Pte. W.M. Sladdin, Queenstown Volunteers; QSA, 2 clasps CC, Witt: Pte. W.M. Sladdin, Queenstown R.V. Tpr Sladdin was mentioned in despatches (LG 16 April 1901, p2611) and was awarded the DCM in the LG of 19 April 1901, p2709. He served with the Queenstown Rifle Volunteers until 21 March 1901. According to the QSA roll he received his medal on 13 January 1902 and the Cape Colony & Wittebergen clasps on 21 February 1902. There is no record of entitlement to a SA 1901 clasp. ABO: Veldkornet J.J. Swanepoel “At dawn of 26 August all were awakened by the rattle of rifles and the boom of guns. Olivier and his men were audaciously attempting to rush the town. After two hours’ heavy firing the Boers were repulsed and the mounted men among the British were ordered to follow them up. The Queenstown Volunteers pressed close on the enemy’s extreme left. Sladdin, whose modest and interesting narrative of these events we have followed, with seven others found himself, in the heat of the chase a long way in advance of the British and right in the midst of the enemy. Reaching a small eminence, this little band halted there, when one after other burghers rode up to them, taking them for Boers, and were compelled by their levelled rifles to surrender. “Among the first we took,” says Sladdin, “were General Olivier and his three sons. We had captured 24 prisoners by now and they were being taken over the eminence to a kraal on the other side, where they were dismounted and sent on on foot. I was riding up in the rear, when I turned around and saw another man coming towards me. I rode towards him and ordered him to give up his gun. He said he was damned if he would. He had his rifle loaded but was uncertain whether to fire or not. The instant I saw him hesitate he was lost, for I was only a couple of yards from him, and I dug the spurs into my horse, bounded on to him, and caught the muzzle of his rifle in my hand. At the same time, I called to one of our fellows to shoot him. On hearing this he gave me his gun.” He proved to be Field Cornet Swanepoel, a well-known Boer leader. As soon as he had been secured, the captors returned to the summit of the kopje, and were startled to see 200 Boers galloping towards them. There were now only five of the British left, as two messengers had been despatched to beg assistance. But these five put on a bold face and opened a hot magazine fire. The Boers were so surprised at this unexpected shower of bullets that they bolted incontinently. Three were killed, the rest made good their escape. As for the Queenstown Volunteers, they brought their prisoners back in safety to the British lines, and were received as heroes.” “After Pretoria: The Guerilla War” p152-3 Jacobus Johannes Swanepoel served in the Rouxville Commando under Gen J H Olivier. When completing his Vorm “B” medal application, he listed 15 engagements in which he had participated. These included Stormberg, Wepener, Waterwerk (Sannas Post), Mostertshoek, Rooiwal, Retiefsnek and Lindley. He was taken prisoner by Pte Sladdin and sent to Ceylon as PoW No 11613.
-
“On August 24th reports were received that Olivier, with 1000 men and two guns had suddenly appeared north of Winburg and had surrounded a British force about nine miles from that town. This party, which consisted of 190 mounted men and thirty infantry, was under the command of Lieut.-Col Ridley (16th battalion I.Y.), who had been sent out by Major-General Allen on reconnaissance towards Ventersburg. Bruce Hamilton was immediately ordered to proceed to his aid… and succeeded in extricating him at 9am on the 26th. The relief came only just in time. For two days and three nights Ridley’s men had withstood, almost without cover, shrapnel and common shell from three guns and the unceasing fire of a thousand rifles. Twice they had been summoned to surrender; but surrounded though they were by vastly superior numbers they held out with deter-mination, losing thirty-two officers and men.” “Official History” Vol III, p333. “…what a sight met our gaze. I shall never forget it. 100 ponies had been shot dead; some were piled up to form a breastwork for the Queenstown fellows. Five men were killed and 21 wounded, their Maxim gun was smashed to pieces and only 30 rounds of rifle ammunition remained to them” “The Boer War Diaries of No 18405 Bombardier Walter Mitton” p53.
-
About three miles east of Van Wyk’s Vlei, where the country begins to dip in a succession of ledges to the valley of the Komati, Privates Evans and Bee, who were leading men of a patrol of Lieut. Field’s troop, came suddenly on a number of Boers who were artfully concealed near a farm. The Boers opened fire, hit both Privates Evans and Bee, and captured Private Bee and the horses, but Evans, seeing that the Boers were lying in wait at this spot, where the ground kept dropping so sharply that their presence could not be detected, and that part of a company of the Gordon Highlanders were rapidly advancing into the same trap as he had fallen into, managed, in spite of his wound, to wave his helmet and shout to the Gordons, preventing them advancing to probably the same fate as he had met. Lieut. Field, seeing that his patrol had got into a tight place, went forward to their aid, and finding Evans severely wounded, endeavoured to get him away out of fire, but in doing so he was hit himself in the shoulder, and had difficulty in crawling away under the heavy fire he had provoked. This resulted in the following memo from his Commanding Officer, Lieutenant-Colonel E.C. Knox, to the Brigade Major, 2nd Cavalry Brigade: “I forward herewith a statement from Lieut. And Adjutant Shee, 19th Hussars, concerning No. 4480 Private Albert Evans, of the Regiment under my command. Private Evans was employed as a scout yesterday in front of his Squadron “C” and was wounded severely while reconnoitring near a farm. I have the honour to request that you will bring the conduct and behaviour of this man to the notice of the General Officer Commanding for favourable consideration.” Lieut. Shee’s statement read: “With reference to your memorandum of today, asking me to give the particulars in the case of Private Evans, 18th Hussars, I have the honour to state that yesterday afternoon, the 21st of August, I was walking across the plateau above the farm, two miles east of this camp, and met a company of Gordon Highlanders advancing to the edge of the ridge overlooking the farm. About 500 yards off, on the left flank of the Gordons, a man was waving his helmet whilst lying on the ground, and the officer commanding the party asked me to find out what he wanted, and I did so. I found the man to be a Private of the 18th Hussars, who was wounded in two places. He told me that he had waved his helmet in order to attract attention, and let the Gordons know that the enemy were holding the farm (about 400 yards from the ridge), and that if they, the Gordons, advanced to the edge they would show up against the sky line with no cover. I galloped back and told the officer of the Gordons before mentioned, whose name I do not know, and then went back and brought Private Evans into the doctor. He informed me on the way that one of his patrol had been killed close to the farm, and that he had crawled away over the ridge and lay there until the Gordons advanced.” The 18th Hussars in South Africa, p102-3. Although Lieut. Field was subsequently Mentioned in Despatches, Private Evans did not receive any form of recognition for his gallant act.
-
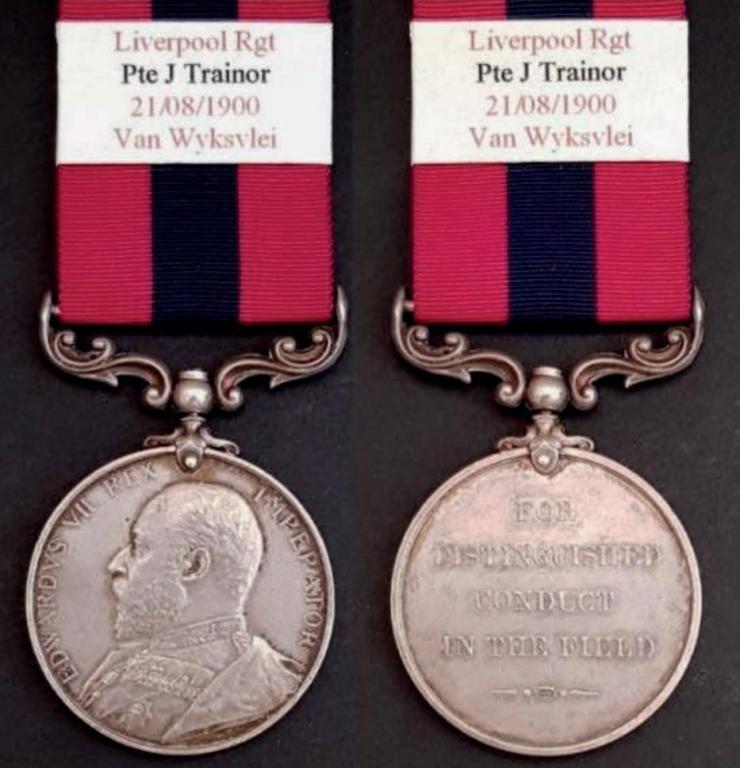
“As soon as the troops engaged in the pursuit of De Wet became available for operations elsewhere, I redistributed the field army with the object, first, of advancing along the Delagoa Bay Railway to Komati Poort, and, secondly, of forming flying columns… the military situation was as follows: On l0th August, Sir Redvers Buller’s forces reached Twyfelaar. French was in command at Middelburg. On the 18th August, the Mounted Infantry were holding the line stretching from Wonderfontein to Doornkop, 12 miles north of Middelburg, and French’s Cavalry was distributed between Wonderfontein and Twyfelaar. On that date French rejoined his two Cavalry brigades. On the 21st, Buller marched to Van Wyk’s Vlei, 15 miles south-east of Belfast, and two days later the 11th Division, under Pole-Carew, was concentrated at Wonderfontein. Buller met with some opposition on the 23rd in the neighbourhood of Van Wyk’s Vlei, and towards evening two companies of the 1st Battalion Liverpool Regiment entered by mistake a hollow, out of sight of the main body, where they came under a heavy fire, losing 10 men killed, and one Officer and 45 men wounded. The other casualties on this occasion were one man killed, and three Officers and four men wounded. On the 24th August, I left Pretoria for Wonderfontein, and on the 25th proceeded to Belfast… occupied the previous day by the 11th Division. Some opposition was encountered, our casualties amounting to one man killed, and one officer and 14 men wounded. As soon as I arrived, it became apparent to me that we were already in touch with a part of the Boer main position. This position, extended from the neighbourhood of Swartz Kopjes on the north to Dalmanutha on the south, a distance of some 20 miles. It was furnished with numerous artillery… and was entrenched at various points of importance. My first idea was to hold the enemy in front with the 11th Division, whilst Buller and French turned their loft from the south. On consultation, however, with General Buller, it seemed that the ground was not favourable to a turning movement from this quarter, and I therefore decided to contain the enemy’s front by the 18th Brigade and turn his right flank with the Guards Brigade, assisted by General French and Colonel Henry’s Mounted Infantry. With this object French moved, on the 26th, from Geluk, 12 miles south of Belfast, and passing to the west of the town reached Lakenvlei, 6 miles to its north on the evening of this day. Pole-Carew, with the 11th Division, endeavoured to advance along the Lydenburg road in his support but came under so heavy a shell and rifle fire that he made but little progress. Buller, whose Artillery was engaged throughout the day, pushed back the Boers, who were holding a series of strong positions to the south-east of Belfast, to within 4 miles of the railway between that town and Dalmanutha. Our casualties on this date amounted to five men killed, and two Officers and 56 men wounded.” Roberts’ Despatch of 10 October 1900, published in the LG of 8 Feb 1901, p867. DCM (EVII): 4572 Pte. J. Trainor. Liverpool Regt. On 21 August, during the operations near Van Wyk’s Vlei, Corporal Knight, Liverpool Regt., was posted in some rocks with four men, covering the right rear of a detachment of the same company, who, under Captain Ewart, were holding the right of the line. The enemy, about 50 strong, attacked Captain Ewart’s right and almost surrounded Corporal Knight’s small party. This NCO held his ground, directing his party to retire one by one to better cover, where he maintained his position for nearly an hour, covering the withdrawal of Captain Ewart’s force and losing two of his four men. He then retired bringing with him two wounded men; one of these he left in a place of safety, the other he carried for nearly two miles. The party were hotly engaged the whole time. For his gallantry on this occasion Knight was rewarded by the Victoria Cross. 4572 Pte. J. Traynor and 5360 Pte J McNamara were in Cpl. Knight’s party and were both awarded the DCM for the part they played in this VC action. All published accounts (Regimental History and London Gazette) as well as the DCM Issue Register incorrectly refer to No 4572 as Trainor, hence spelling of surname on the DCM. Traynor was also awarded a 3-clasp QSA and a 2-clasp KSA. DCM Provenance: H Y Usher Collection.
-
“Paget in the afternoon followed the enemy along the northern road east of the railway, leaving half a battalion of the West Riding regiment and two guns at Hamanskraal. Baden-Powell’s force was on the right across the Pienaar’s river. Two squadrons of the Rhodesia regiment which covered his advance came suddenly upon a party of 100 mounted Boers of the Waterberg commando, which had been detailed by Steenkamp to work round Paget’s right flank. Both sides alike were completely surprised. A fight ensued, in which the Rhodesia regiment lost one officer and four men killed, and two officers and six men wounded. Upon reinforcements… the enemy were driven off, losing nine killed and ten wounded”. Official History, Vol III, p366-7. “After Elands River, the Rhodesian Regiment and Volunteers operated east of Rustenburg for a further short period before being disbanded in November 1900, but sadly not before five men of the Rhodesia Regiment were killed in action at Klipdrift. On 20 August 1900, Lt Colonel John Spreckley of ‘E’ Squadron and his party were surrounded by Boers, who, being dressed in khaki, were first taken for friends. When the mistake was discovered and Spreckley and his party were called upon to surrender, he replied, “Never give in to them, lads” and was immediately killed. By his death, Rhodesia lost one of its best-known and most popular men.” AngloBoerWar.com
-
The Siege of Elands River began on 4 August 1900 when over 2500 Boers under General Koos de la Rey surrounded the camp. The Boers had five modern artillery pieces as well as three 1pdr pom-poms and two Maxim machine guns. The men within the compound numbered about 500 there being almost 300 Australians, 200 Rhodesians, a few British and Canadians and some civilians and native porters all under the command of Lieutenant Colonel Charles Hore. Their only heavy weapons were two machine guns and an old muzzle loading 7pdr gun. The camp was a supply depot which held supplies estimated at around £100000, including 1500 head of livestock and horses, making it an appealing target for the Boer forces. With little warning, the defenders began construction of defensive trenches far from the camp. A hospital was constructed out of biscuit boxes and a Red Cross flag raised over it. At the time of the initial attack the trenches did not provide adequate protection and the men had to shelter behind rocks piled up into a defensive wall. The Boers began the attack with an artillery and pom-pom gun barrage. At an early stage an Australian, Trooper John Waddell, was hit by a pom-pom shell and died within a few minutes. A couple of minutes later James Duff, another Australian, also receiving a pom-pom shell to the chest and was killed instantly. During that first day, the Boers fired an estimated 1700 shells into the besieged camp and killed five men: two Australians, two Rhodesians and a native worker. Most of the 1500 animals were either killed or wounded by the shells. Little could be done for wounded animals as men assisting them were targets for Boer snipers. On the second day, a relief force under Maj-Gen Frederick Carrington was seen in the distance and much of the Boer force was moved to meet this new threat and Carrington’s column fell back after a brief skirmish with the Boers. Carrington mistakenly told his superior Lord Roberts that the camp had fallen and as a result a second larger relief force under Baden-Powell turned away from the camp. On the 8th General de la Rey sent an offer of honourable surrender to the besieged. This offer was dismissed out of hand by the Rhodesian Captain Butters who was first to receive the message. Also, on the 8th a shell hit the hospital. On the 13th a runner reached the British with a message that proved that the camp was still holding out. Upon hearing the news General Kitchener, without waiting for orders, immediately moved two brigades to go the relief of the camp. They arrived on the 16th to break the siege. Captain Albert Duka, a doctor from Queensland who had treated all of the wounded, listed 73 casualties, including 16 killed: 8 were Australian, 4 were Rhodesian and 4 were natives.
-
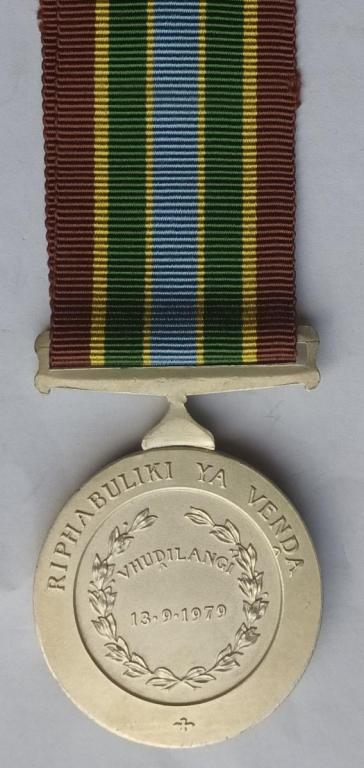
Hi Megan, Here we have a possible sample, because I couldn't get any information on it, but its also a Venda Independence Medal Regards Archie
-
Hi Megan, There you go Regards Archie
.thumb.JPG.b8ef3a50a9374be7604356e47f677a08.JPG)
.thumb.JPG.cd9b9f52e2d4ff19f0e1273727a47dd3.JPG)
.thumb.JPG.3110b9bfd0376cc2afe0049561660909.JPG)
-
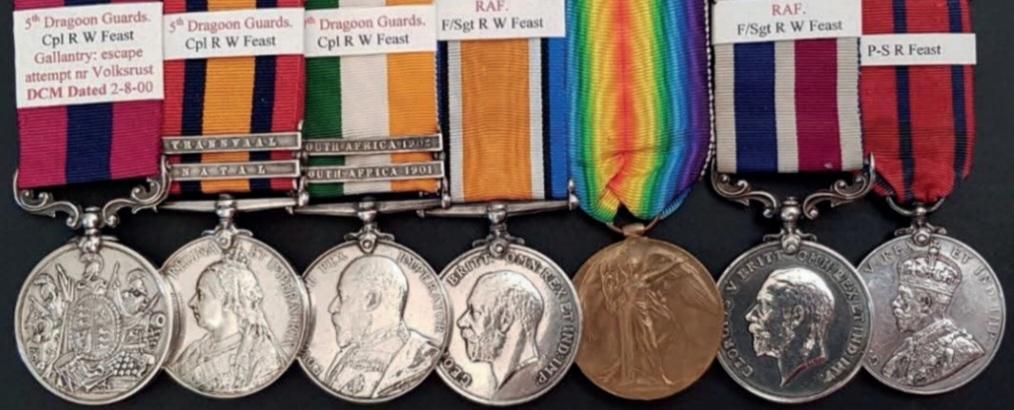
A party of 8 men, accompanied by Mr Godson of the Intelligence Department, were sent to a farmhouse to bring in two women. Two sentries were posted on arrival at the farm but, when a number of Boers suddenly attacked, the sentries bolted without giving any alarm. The remaining six men were compelled to surrender. Corporal Feast made a gallant but futile attempt to get away with Mr Godson. At the subsequent Court of Enquiry, the seven men were exonerated, and the Court drew attention to Corporal Feast’s gallant m conduct. “SA Surrenders” WO 108-372. DCM (Vic): 3517 Cpl R.W. Feast. 5th Dragoon Gds. 2-8-00; QSA, 2 clasps Natal, Tvl: 3517 Corpl. R.W. Feast. 5th Dragoon Gds; KSA, 2 clasps SA’01, SA’02: 3517 Corpl R.W. Feast. 7th Dragoon Gds; BWM & AVM: 9092 F. Sgt. R.W. Feast R.A.F.; RAF MSM (Geo V): 9092 F/Sjt. R.W. Feast R.A.F.; Metropolitan Police Coronation Medal 1911: P.S. R. Feast Robert William Feast was born in St. Pancras in London and attested for the 5th Dragoon Guards at Oxford on 9 March 1891. He served with the Regiment in South Africa, 8 February 1900 – 31 December 1900, and 26 November 1901 – 1 August 1902. He was awarded the DCM for the abovementioned incident where he was taken prisoner and subsequently released. The Regimental History gives the following additional details: “The regiment continued to be employed on lines of communication till 1st May 1901, being kept most of the time split up in small detachments of half a squadron or even less. Patrolling was constantly carried out, so that there were daily some twenty patrols in constant touch with the Boers. On 2nd August one such patrol was sent with a guide to a farm near Wakkerstroom. It was attacked by the Boers, and the guide was wounded. Corporal Feast, who was in charge of the patrol, could have got away, but he went back to assist the guide, and they were both captured. Cpl Feast was afterwards awarded the DCM for his conduct on this occasion.” Feast’s DCM must have been awarded as a direct result of the Court of Enquiry’s comment. Although he was mentioned in Army Order 163 of July 1901, he was never officially mentioned in the London Gazette. In addition, it is one of the very few Boer War DCM’s where the date of the act of gallantry was impressed as part of the naming. Cpl Feast transferred to the 7th Dragoon Guards on 31 March 1902. He was discharged in March 1903 and joined the Metropolitan Police. He advanced to Sergeant (Mounted Police), before enlisting in the Royal Flying Corps on 31 August 1915. He served as a Flight Sergeant with the 8th Brigade, Royal Air Force, in the French theatre of war 22 May 1918 - 9 January 1919. Primarily a bomber formation, it became part of the Independent Air Force June 1918. He was discharged 30 April 1920. D.C.M. London Gazette 19 April 1901. M.S.M. London Gazette 3 June 1919. Provenance: Elson Collection: Part 1, Glendining & Co, February 1963; Lovell Collection, Sotheby, November 1978; Donald Hall Catalogue, January 1984; Buckland Dix Wood, October 1993; Dix Noonan Webb, December 2016
-
Quoting from the regimental history: “Lord Methuen’s force left us and proceeded to Potchefstroom and the Gordon Highlanders went to Krugersdorp. They had no boots, so we were left to bring a convoy on to Potchefstroom. July 28 we were joined by the City Imperial Volunteers and 33 sick and wounded who were captured in the wrecked train and sent in by the Boers. The convoy arrived on the 29th and we proceeded towards Potchefstroom the same day. An unfortunate accident attended with considerable loss of life happened on the way. A heavy train of supplies passed us just as we were approaching camp at Frederikstad on July 30 and seated on the trucks was a draft of ours which had lately arrived in the country together with some sick men re-joining. Our yeomanry scouts had been ordered to inspect the line as they advanced but they failed to perceive that on a sharp curve where the line ran down a decline some of the fishplates had been unscrewed and the rails loosened but carefully replaced. The engine on reaching the spot was derailed and the heavy supply trucks ran up one on top of the other. Thirteen of our men were killed, together with the engine driver and forty-one injured.”
-
“As the advance guard of the 8th division was the first to reach the goal, Clements’ and Paget’s brigades were halted a few miles from Fouriesburg, and did not move again until the 27th, when they entered the place after a feeble opposition from a few snipers dropped by the main body of the enemy who, still ignorant that British troops awaited them at the eastern passes, were retreating at speed towards Naauwpoort Nek and the Golden Gate. But though most of the burghers were hurrying eastward, it was necessary to ensure that no detachments should break out through Slabbert’s, Retief’s, or Commando Neks, and so heavy was the call upon the infantry to garrison these defiles that Hunter could only muster five battalions to drive the Boers into the net spread by MacDonald and Bruce Hamilton. One of these was the 1st battalion, Royal Irish regiment, which with part of the Wiltshire formed the advance-guard under Clements on the 28th, when the burghers fought a rear -guard action near Slaap Kranz ridge with great tenacity and cunning. The position proved to be a very strong one, and Clements was unable to oust the enemy from it, though his artillery and infantry were engaged throughout the day. Colonel Guinness was anxious to be allowed to seize a commanding knoll in front of the left of the Boer line, which seemed to offer a good base for an assault upon the pass itself, but General Clements considered that the Royal Irish had done enough for the day, and ordered a battalion of the Scots Guards, recently arrived on the field, to occupy it. At midnight they advanced on the main position and found it undefended, for the Boers, after checking the whole column for many hours, had silently disappeared when they saw that the odds had become too heavy for them to face. The casualties of the day amounted to thirty-four killed and wounded, the Royal Irish losing one man killed and five wounded. With the encounter at Slaap Kranz the campaign in the Brandwater Basin came to an end.” The Campaigns and History of the Royal Irish Regiment from 1684 to 1902, p340-1.
-
“At 9.30pm on the 24th July reports were received that Commandant Liebenberg, with a commando, had arrived “2½ hours” north of the town. Lieutenant White, in his evidence before a Court of Inquiry assembled on 7th September 1900, spoke to receiving such reports from two different sources on the evening of the 24th and immediately reporting the fact by letter to Captain Lambart, who acknowledged its receipt. The latter, however, gave witness no special instructions, as he did not consider there was any urgency in view of the fact that “at present only a small rumour has come in, which is nothing to be alarmed at.” There would appear to have been no verbal communication as to the course to be adopted in the event of attack. Captain Lambart subsequently issued orders for all troops, including the civilians, to parade at 4am on the 25th in the market square. At that time no further news had come in, and two natives who had been sent out had not returned. Lieutenant Sheppard, with two men, was out on patrol to the north, having started on the morning of the 24th, but no news had been received from him. Captain Lambart ordered Lieutenant Blagden, with 11 men of the Kimberley Mounted Corps, to go to the north-west kopje, and Lieutenant Purves, with the remainder of the Kimberley Mounted Corps (16 men), to go to a kopje situated a short distance south of Lieutenant Blagden’s and on the other (south) side of the Hartebeestfontein Road. At daylight, about 250 Boers were seen north-west of the town, and a few (about 20) advanced against the kopje occupied by Lieutenant Blagden and came to a point within 200 yards of it, neither side firing. The remainder, passing behind a kopje some distance to the west of Lieutenant Panes’ kopje, then advanced within 300 yards’ range to the foot of this kopje, and the kopjes to the south of, and commanding it. Lieutenant Purves would not allow his men to open fire, and retired, thinking he saw Boers coming down the road in his rear. He sent a man in this direction who stayed there for 20 minutes but saw no Boers on the road. Meanwhile Lieutenant Blagden, seeing Lieutenant Purves had retired, became uneasy at the close approach of the small party of Boers referred to above, also retired. Although the party of Boers offered an excellent target, he did not open fire, his excuse for not doing so being that he thought they might be Yeomanry. Both Lieutenant Purves and Lieutenant Blagden then rode back to the market square and met Captain Lambart there. A Boer with a white flag came in with Lieutenant Blagden and gave a note to Captain Lambart demanding the surrender of the town. Captain Lambart at once rode out to the Boer Commander and surrendered the town. No shot was at any time fired on either side, and the enemy apparently had no guns though Captain Lambart says he saw two. Lieutenants Blagden and Purves were permitted to resign their commissions.”
-
Hi Chris, Thanks a million for the share Regards Archie
-
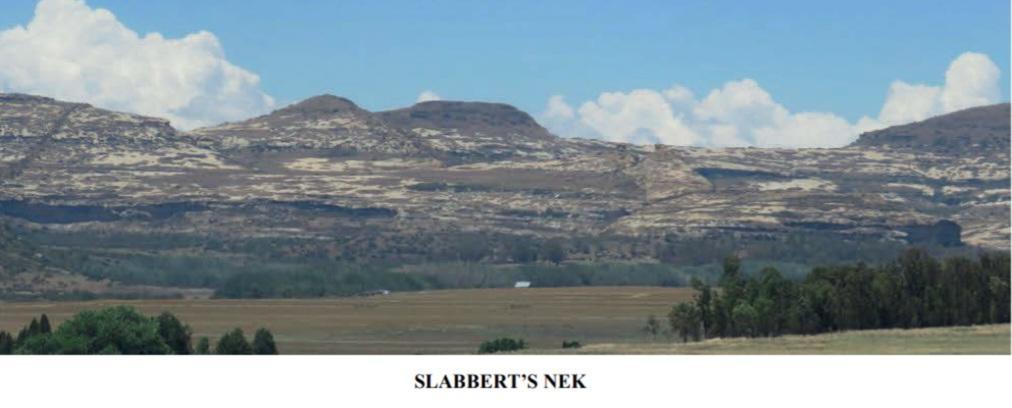
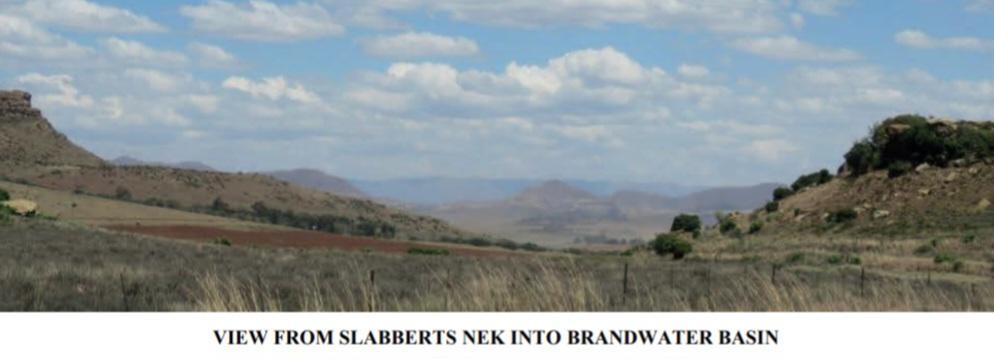
The terrain towards which the Boers retired in July was in the shape of a horseshoe some 120 kilometres long, formed by the Wittebergen range of mountains which extends from Commando Nek opposite Ficksburg to the north and the Rooiberge range which continues in a south-easterly, then easterly direction, terminating at Golden Gate. Wittebergen (English: White Mountains) refers to the exposed white sandstone deposits underlying the lava strata that intruded afterwards. To the south of thes mountains flows the Caledon River, separating the Free State from Lesotho (then called Basutoland). The principal passes in these mountains are Commando Nek, Retiefs Nek, Slabberts Nek and Naauwpoort Nek while less conspicuous are the gaps such as Witnek, Nelspoort, Bamboeshoek and Golden Gate. Within the enclosure are deep valleys through which flow the Brandwater, the Little Caledon and Caledon rivers. In this mountainous region, known as the Brandwater Basin, some 8400 Boers including their leaders President M T Steyn and Cmdts Christiaan de Wet and Marthinus Prinsloo, were encircled by 16000 British troops. SLABBERT’S NEK There were however some passes in the mountain barrier which Gen A Hunter, commanding the British troops had not yet blocked and the Boers decided to quit the basin through them while there was yet time. They split into four groups and the largest under De Wet, with President Steyn, left on the night of 15/16 July 1900. Two more were due to depart the following day, and the fourth, under Prinsloo, would hold the passes open and leave last of all. De Wet’s column of 2 600 men and 460 wagons escaped via Slabbert’s Nek. The next two parties were delayed because they were waiting for commandos from Natal to join them, but eventually tried to halt the oncoming British at Slabbert’s and Retief’s Nek. At Slabbert’s, on 23 July, the British suffered a loss of 8 men killed and 34 wounded, while at Retief’s Nek, on the same day, their casualties amounted to 12 killed and 81 wounded.
-
In the Battle of Witpoort, British commander Edward Hutton had four companies of the Royal Irish Fusiliers, the 1st Mounted Infantry (which was made up of the 1st and 2nd Canadians who had arrived in camp on 15 July), as well as the Australians of the Queensland Mounted Infantry. Under the command of Major Munn were three companies of the Royal Irish Fusiliers and 60 troopers of the New Zealand Mounted Rifles. The men were placed on the three hills straddling the Witpoort Pass. General Ben Viljoen had positioned his troops for attack during the night of 15 July and then launched a three-pronged assault on Major Munn and the Irish positions at daybreak. Viljoen ordered a ‘general storming of the British’s entrenchments’. The battle opened at 06h45 with heavy shelling on Major Munn’s troops. Boer fighter Roland Schikkerling (who published his Boer War diary under the title “Commando Courageous”) and his comrades went to the north of the New Zealanders’ ridge and then charged under heavy rifle fire. The New Zealanders surrendered one of the three hills they occupied, putting the Boers in possession of the higher hill which commanded the lower middle hill. Schikkerling captured a captain and twenty New Zealanders and some continued right over the ridge and captured a number of horses. The Canadians mounted a counterattack. Colonel Edwin Alderson sent two squadrons of the Canadians to assist ‘the Irish on the kopje which had been vacated by the New Zealanders’ and, with the fire from the guns, the position was regained.Lieutenants Borden and John Edgar Burch of ‘B’ Squadron led a counterattack. They were successful, but at the cost of their lives. Boer marksmen less than 200 yards distant shot them as they stood up to lead the rifles forward. Lord Roberts reported to the War Office that Borden and Burch “were killed while gallantly leading their men in a counterattack upon the enemy’s flank at a critical juncture of his assault upon our position.” At 14h00, British officer Edward Hutton moved all of his available troops onto the desperately regained positions and by sundown the battle of Witpoort had ended. Hutton’s losses were seven killed with 30 wounded. Two officers and 22 soldiers had been taken prisoner. The Canadian losses were heavy and included Lt Borden, the son of the Canadian Minister of Defence. See Mil Hist Journal Oct 1999 p137-148. Joseph Kennington served in the 3rd New Zealand Mounted Rifles, raised and equipped by the people of Canterbury. He was one of the 20 men from the unit who were taken prisoner at “Funk Kopje” during the Witpoort skirmish. Later the rest of the unit was in the advance east which ended in the capture of Barberton on 13 September 1900 when their comrades were released. Due to an administrative problem, men of the 2nd and 3rd NZMR had unnamed medals issued to them. (Kennington received his QSA at Wellington on 19 June 1901). As a consequence, the medals were named by local jewellers, the details engraved in different styles (and not impressed), with variations in rank and unit titles and usually taking up the whole rim. Many early medal collectors rejected these medals, considering them to be fakes and/or renamed specimens. The result is that QSA’s to the 2nd and 3rd NZMR are rare today.
-
“Owing to some bad scouting by the I.L.H., Mahon, after marching eight miles unmolested, walked into a trap, prepared for him by the Boers. The I.L.H. retrieved their mistake by two gallant charges up the ridge from which the Boers commanded the column. Nevertheless, Mahon, who was somewhat tardily reinforced by Hutton, was obliged to retire on Rietfontein with a total loss of thirty-five men, which would have been heavierif the Boer shells had been more effective”. Times History, Vol IV, p389 However, Gibson in “The History of the Imperial Light Horse”, p197, emphatically states that: “This account is inaccurate and singularly unfair to the I.L.H., doing poor justice to the gallantry displayed by them that day”. This is followed by a more than 3-page detailed account of the action and on p201 he concludes “It will be seen from the foregoing that there was no question of ‘Bad Scouting’ or of ‘Walking into a Trap’. The position was that ‘B’ Squadron was ordered to occupy a hill and did their best to do so, but while the Boers supported their Burghers to an extent of some 250 to 400 men, the I.L.H. Squadron received no support and was compelled to fight it out alone against these very great odds.”
-
“On the 3rd July Paget drove the Boers from a strong position they were holding across his line of march and bivouacked 15 miles north-west of Bethlehem. On approaching the town on the evening of the 5th July, Clements, who, as senior Officer, was in command of the three columns, found C de Wet occupying the hills to the south. The next morning Bethlehem was summoned to surrender, and, on this demand being refused, Paget moved to the north-west with the object of turning the enemy’s left, while Clements’s troops operated on their right flank. On the morning of the 7th a general assault was made, and by noon the place was in our hands and the Boers were in full retreat to the north-east. On this occasion the 1st Battalion Royal Irish Regiment specially distinguished itself, capturing a gun of the 77th Battery, Royal Field Artillery R.F.A. which had been lost at Stormberg.” Roberts’ Despatch of 10.10.1900 (LG, 8 Feb 1901).
-
“On 24 June Gen Clemens ordered Lt-Col Grenfell to move with some 800 mounted men on 25 June so as to take a Boer laager on the farm Leliefontein, some 15 miles north-west of Senekal. At dawn on the 26th, instead of being in a position to attack, he was surprised by a force of Boers. They had five guns to Grenfell’s two, but he was extricated from a very difficult position by the arrival of reinforcements from Senekal. British casualties were 2 killed, 13 wounded and 20 missing.” Times History, Vol IV p301. 171. QSA, 4 clasps CC, Webster, Witt, Belf: 317 Tpr. A.B. Webster. Brabant’s Horse
-
“The British entered Heidelberg on the morning of the 23rd (1900), the cavalry from the north and the infantry from the east. The cavalry continued beyond the town to pursue the retreating Boers. Kpl John Spruit had anticipated this by setting an ambush, which included his pom pom gun. Unknowingly Capt F.S. Whitaker led a detachment of Roberts’ Horse directly towards Spruit’s position. Spruit fired into the approaching horsemen at point-blank range. The three officers leading the detachment were severely wounded. Captain Whitaker was to die of his wounds the next day. The Boer Corporal kept the troopers pinned down until British reinforcements arrived, then removed his gun and watched them head south for Villiers”. Ian Uys “Heidelbergers of the Boer War”, p57. Capt. E.R. King, Roberts Horse; “In the next advance from Bloemfontein to Pretoria, the regiment was in the 5th Mounted Infantry Corps under Lieut.-Colonel Dawson, along with the 5th Mounted Infantry Regulars and Marshall’s Horse. Frequently during the advance Roberts’ Horse was heavily engaged and suffered sharp losses. The regiment had sharp fighting near Heidelberg on the north side of the Vaal on 23rd June. The day was a disastrous one for the officers of the corps. Captain Whitaker was mortally wounded, Captain M. Browne and Lieutenants C.L. Learmonth and Rix King were wounded, while there were about 20 casualties in other ranks.” The Colonials in South Africa, Roberts Horse, p165. Edward Rex King was born on 13 November 1869. He was the son of Capt. William King, J.P. and was educated at Winchester. He was gazetted to the 3rd Battn. Royal Scots (1887-1891). He went to America, engaged in business and returned to England in 1898. After the outbreak of the Boer War he re-entered military service and sailed for South Africa on 1 January 1900, where he enlisted in Roberts Horse. He was given a commission on 2 February 1900 and promoted to Captain on 24 June 1900. He served in Roberts Horse from 23 January 1900 to 3 April 1901 and was slightly wounded in the 23 June incident at Heidelberg. He was mentioned in Roberts’ despatch, published in the London Gazette of 16 April 1901, p2611, and was created a Companion of the Distinguished Order (London Gazette, 19 April 1901): “Edward Rex King, Capt., Roberts Horse. In recognition of services during the recent operations in South Africa.” On 3 April 1901 he was appointed to the South African Constabulary for a 3 year period with the rank of Captain. On 3 April 1904 his service was extended for a further 2 years until 2 April 1906 thereafter being extended indefinitely. He served in C Division (headquartered in Heidelberg) from 27 April 1901 to 6 October 1903, as Assistant Chief Secretary for Permits, Transvaal, and thereafter as ADC to the Lieut. Governor, Transvaal. He subsequently transferred to HQ division as O/C F Mobile unit and served until 6 December 1905. He then reverted to being ADC to the Lieut.-Governor, Transvaal. He died at the age of 37 on 21 June 1906 at the S.A.C. hospital in Potchefstroom. He was not married: his estate of £64 was left equally to his father and to his brother William Henry King.
-
“Marching all the evening of the 13th (June), De Wet, struck the railway at Leeuw Spruit Station about midnight and surrounded the station, in which were standing two trains with supplies and railway material. The working party, 200 strong, was taken by surprise: a hail of bullets was poured in on them as they were mending the line, but in spite of the fact that there were only nine rifles at hand, the workers succeeded in holding off the enemy, though the trains and the new bridge over the spruit were destroyed.” “With the Flag to Pretoria”, p672. According to WO 108/372 “SA Surrenders”, 1 man was killed, and an Officer and 6 men were wounded. It also mentions that the bridge was destroyed, but states the enemy was compelled to leave the trains and retire on approach of a large British force.
-
On 13 June the newly appointed General (Rev) Paul Roux with the Senekal Commando, another 200 men of the Ladybrand Commando, Capt John Hassell with his American Scouts, two pom-poms and a field gun advanced towards the British post at Virginia to destroy the important railway bridge over the Sand River. Lt -Col Capper, RE, in command of 730 men (mainly Railway Pioneer Regiment and Royal Lancaster Militia), had been warned of the impending Boer action by a “hensopper” and the British positions on both banks of the river which had been well entrenched. Early on the 14th the Boers advanced, chiefly under cover of dongas and scrub on the east and west and initially wasted time and ammunition firing on empty tents left by Capper when he shifted camp. Although the nature of the ground gave them excellent cover and a potential advantage, the Boers retreated by noon, after some hours fighting, when a body of some 170 Yeomanry appeared on the scene. Major L.I. Seymour, Rly. Pnr. Rgt. Louis Irving Seymour was born in Whitney Point, New York in the USA in 1860 and came to South Africa in 1889 to work as a Mechanical Engineer with De Beers in Kimberley. In 1896 he was appointed Chief Mechanical Engineer to Rand Mines and other companies in the Eckstein Group. He left Johannesburg via Delagoa Bay on 14 October 1899. Arriving in Cape Town he was instrumental in the formation of the Railway Pioneer Regiment which recruited mainly from engineers and mechanics of all kinds from the Rand. Major Seymour was killed in the 14 June action at Sand River. Lt Col Capper, in his despatch of 15 June 1900 (LG 8 Feb 1901, p904), stated: “I especially deplore the death of Major Seymour, whose loss will not only be felt by us as a regiment, but by the whole of South Africa. He was killed while advancing with the extended line through the bush, to clear out the snipers.” His memorial stone stands in the small military cemetery near the old railway station at Virginia. In July 1900 his friends and colleagues decided to establish a technical library in his memory. A sum of £11 477 was collected and the Seymour Memorial Library was opened in 1905. It is now one of the special libraries falling under the Johannesburg Public Library
-
After receiving Botha’s negative reply to his offer to negotiate, Roberts attacked Botha’s new position at Donkerhoek on 11 June where Botha had formed a line from south of Donkerhoek, north-eastwards to Doringfontein along the beginning of the Magaliesberg. The Boers were well protected by the sandstone ridge while the British were forced to advance over open veld. The battle was concentrated on the road to the east and went on throughout the day. To the north [Kameelfontein] De la Rey was engaged with Gen. French’s cavalry. Night set in and Roberts returned to Pretoria without much to show for the day. The fighting continued from 03h00 on 12 June. The British under Pole-Carew waited for Inigo Jones’ guns to arrive while Botha fights them from the crest of the hill. At 15h00 the British forces took the ridge but could not continue over the crest before dark set in. To the north De la Rey nearly encircled French, but Botha could not supply him any aid. British numbers were once more difficult to repulse and during the night of the 12th the Boers withdraw to the east. The two days had come to good use in getting the ZAR government away from Pretoria and to make further plans. Botha’s force also regained much of its pride and the decision was that the war will continue, albeit by smaller groups.
-
On 11 June Maj-Gen Lord Dundonald’s 3rd Mounted Brigade discovers Gen Joachim Fourie’s burghers preparing trenches on both sides of the Vrede-Volksrust road where it passes through Alleman Nek and initiates a preliminary skirmish, but they are stopped by shelling from four Boer guns and pom-poms. Gen Hildyard postpones his attack until the Infantry Brigades are in position. At 14h30 the British frontal assault starts, but the men of the 2nd Infantry Brigade, forming the front ranks, are pinned down in a dry gulley by Boer crossfire from the heights. However, the burghers in their half-completed trenches are subjected to a heavy barrage from more than 30 guns and when Maj-Gen Coke’s 10th Infantry Brigade joins the action, Fourie’s men start falling back. At 17h00 the infantrymen charge the heights commanding the pass, but skilful rear-guard actions by the Boers prevent the cavalry from overtaking them. British losses were 26 killed and died of wounds with 126 wounded. Boer losses are not known accurately but are believed to be less than 10 men killed.
-
Although the British had taken Pretoria two days earlier, the Orange Free State forces remained very active, blowing up bridges and ambushing supply convoys. As a result, Roodewal Station, which had been taken by the British on 23 May and garrisoned with men of the 4th Derbyshires, was the temporary railhead where goods were off-loaded until the railway to the north could be brought back into commission. De Wet captured a wagon train en route to Heilbron from Vredefort Road Station at Zwavelkrans, near the Rhenoster River on 5 June. It surrendered without resistance as the 200 men on board were outnumbered three to one. Fifty-six wagons of supplies were taken. On 6 June, still undetected, De Wet returned to the railway line where he divided his force into three. The first (300 men and one 75mm Krupp under Steenekamp) had to deal with Vredefort Road Station at sunrise the next day: they took 38 prisoners with ease. The second (another 300 men, two Krupps and a Pom-Pom under Froneman) were ordered north to attack the British camp at Rhenoster River bridge: in heavy fighting 36 men were killed, 104 wounded and 486 officers and men surrendered to the Boers. De Wet himself, with eighty men and one Krupp, headed for the station at Roodewal itself. The British, who were attacked at dawn, resisted fiercely and De Wet’s men were pinned down until the northern party had succeeded at the camp and brought two more 75mm Krupps south to help. The increased artillery fire forced a British surrender. De Wet observed that their fortifications were constructed of bales of clothing and blankets, which kept British fatalities down to twenty-seven men, while 200 or so were captured. The richness of the prize was beyond Boer powers to exploit, for they lacked the transport to carry it away. The post-bags were opened and looted by Boer and British alike and what the commando could not carry off was to be burnt. De Wet had to work hard to ensure a place for rifle ammunition among the goods his men took, then, according to De Wet: “When the sun set, the burghers were again on the march. But what a curious spectacle they presented! Each man had loaded his horse so heavily with goods that there was no room for himself on the saddle; he had, therefore, to walk, leading his horse by the bridle.”


.JPG.eb6e402bfae7687e0e94726371220218.JPG)
.JPG.77c9bdbb51ceb27f86f6d06a8a955c59.JPG)
.JPG.a7030daf09bbf582aca80c9b6f3c44c6.JPG)

