.jpg.c1d9bcec183c96b9ddb1eb6551289cc3.jpg)
archie777
-
Posts
1,593 -
Joined
-
Last visited
-
Days Won
14
Content Type
Profiles
Forums
Blogs
Gallery
Events
Store
Everything posted by archie777
-
.thumb.jpg.8f11964f4d04824d881c313e10a95c32.jpg) “The Campaigns and History of the Royal Irish Regiment from 1684 to 1902”, p360-1: The dynamite episode occurred two months later. Among the blockhouses held by the Royal Irish was one, named by the troops Ben Tor, which stood on a kopje so thickly covered with big boulders that the sentries could not watch all the approaches to it. The building was of stone, roofed with sheets of galvanised iron; and on the night of the 18th of March it was held by a non-commissioned officer – Sergeant M’Grath – and nine private soldiers. A bout two o’clock in the morning of the 19th, the two men on sentry outside the blockhouse heard sounds which they rightly interpreted to be those of approaching feet. While one remained on the lookout, the other crawled into the blockhouse and reported to Sergeant M’Grath, who immediately stood to arms and manned his loopholes, but almost before the men were in their places, a bomb was hurled on the roof, which unfortunately being flat, not sloping, afforded the missile a secure lodgement. In a second there was a tremendous explosion: the blockhouse was wrecked and every man of the garrison dangerously or severely wounded, except the sentry outside who escaped all injury. After capturing this man the Boers waited for some minutes to see if anyone was still on foot; then, satisfied that no resistance was to be expected, they rapidly looted the blockhouse and decamped, fortunately without finding the boxes of reserve ammunition hidden under the sheets of galvanized iron which formed the beds of the garrison. Beyond stripping some of the wounded, the burghers did their victims no harm, and sent off the uninjured soldier to summon medical aid from Lydenburg. By dawn a detachment of troops, a doctor, and an ambulance were on the way to Ben Tor, where, says one of the officers, “the place was like a shambles – too horrible to describe.” As soon as the wounded men had been removed, the blockhouse was rebuilt and greatly strengthened.
“The Campaigns and History of the Royal Irish Regiment from 1684 to 1902”, p360-1: The dynamite episode occurred two months later. Among the blockhouses held by the Royal Irish was one, named by the troops Ben Tor, which stood on a kopje so thickly covered with big boulders that the sentries could not watch all the approaches to it. The building was of stone, roofed with sheets of galvanised iron; and on the night of the 18th of March it was held by a non-commissioned officer – Sergeant M’Grath – and nine private soldiers. A bout two o’clock in the morning of the 19th, the two men on sentry outside the blockhouse heard sounds which they rightly interpreted to be those of approaching feet. While one remained on the lookout, the other crawled into the blockhouse and reported to Sergeant M’Grath, who immediately stood to arms and manned his loopholes, but almost before the men were in their places, a bomb was hurled on the roof, which unfortunately being flat, not sloping, afforded the missile a secure lodgement. In a second there was a tremendous explosion: the blockhouse was wrecked and every man of the garrison dangerously or severely wounded, except the sentry outside who escaped all injury. After capturing this man the Boers waited for some minutes to see if anyone was still on foot; then, satisfied that no resistance was to be expected, they rapidly looted the blockhouse and decamped, fortunately without finding the boxes of reserve ammunition hidden under the sheets of galvanized iron which formed the beds of the garrison. Beyond stripping some of the wounded, the burghers did their victims no harm, and sent off the uninjured soldier to summon medical aid from Lydenburg. By dawn a detachment of troops, a doctor, and an ambulance were on the way to Ben Tor, where, says one of the officers, “the place was like a shambles – too horrible to describe.” As soon as the wounded men had been removed, the blockhouse was rebuilt and greatly strengthened. -
A patrol left Garies on 18 March 1902 and during an engagement at Brandy Wyn’s Kop, Lieutenant Charles Darter was killed in the “the Gorge”… after the engagement they encamped in the gorge and buried Lieutenant Darter at 12pm. On 19 March 1902 they were nearly surrounded at Rietkloof by the Boers, who failed also to occupy Brandy Wyn’s Kop. Captain Montagu led the Cape Police to capture a kopje occupied by the Boers; he was successful with no one being hit. The Boers were unable to bottle up the column. The column retired from Brandy Wyn’s Kop with the assistance of Lieutenant Maddison, who held the pass in advance of the withdrawal. Captain Montagu and his men covered the retreat. Sergeant Bidmead was mortally wounded and Corporal Kenney slightly wounded. At a subsequent time, Commandant de Villiers told Major Cobbe that he thought the attack on the Kopje one of the smartest things he had seen. Garies was reached but Sergeant Bidmead died. “O’Okiep” by Brian Kieran, p.46
-
“On the night of March 11, 1902, at Spion Kop near Van Wyk’s Rust, about 100 Boers attacked a post held by Sergeant Horace Saxby, a former member of Strathcona’s Horse, with some troopers of 1/A Troop. As the Boers advanced under the cover of heavy rain and mist about 11pm, Saxby had his men ready and lying down at their posts. When the alarm was given, they were able to beat back the first rush. A close-range fire fight went on for fifteen minutes, then the attackers retired to the foot of the kopje where the fort stands. Firing continued until about 4.30am when the Boers departed, having lost one man killed and two wounded. The South African Constabulary had no casualties. Captain Charles Rowe reported that Saxby and his sixteen men defended a position that he considered required a garrison of not less than fifty men. He credited Saxby’s constant presence, cheeriness, and movement from point to point for much of the success. Saxby and one man effectively defended the only road onto the kopje.” SAC Journal, Vol 1, No 1, page 6: made available by the late Mrs. Audrey Portman.
-
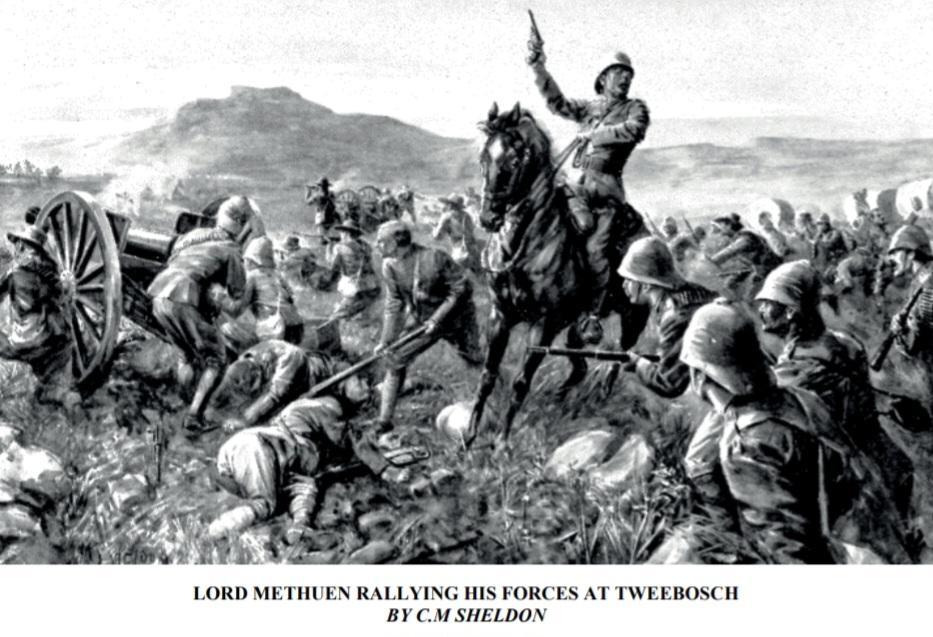
On 7 March De la Rey ambushed Methuen’s column at Tweebosch on the Little Harts River. The British force numbered 1250, including nearly 1000 mounted men and four guns. Methuen’s force was largely made up of green troops; these panicked and fled or surrendered. Only the British regulars in the column fought stubbornly in the combat which lasted from dawn until 9:30 am. The British lost 200 killed and wounded, plus 600 men and all four guns captured. After being wounded twice and suffering a broken leg when his horse fell on him, Methuen was captured. He was the only general taken prisoner by the Boers during the war. De la Rey sent the wounded Methuen to a British hospital in his own carriage under a flag of truce, despite demands from his own troops to execute him. Upon hearing news of the disaster, a badly shaken Kitchener retired to his bedroom for two days and refused to eat.
-
On 24 February 1902, a convoy heading for Klerksdorp bivouacked on the farm, Elandslaagte, between the Yzer and Jagd Spruits, 25km south-west of Klerksdorp. The convoy was escorted by 230 Imperial Yeomanry of the 5th Bn, 9th Bn and 10th Bn as well as regular soldiers, mounted infantry and artillery. Early the following morning, the march resumed, with both the advance guard and the rear guard, including Yeomanry and infantry, covering the movement. Some 3km further on, 250 Boers under Gen Liebenberg attacked the front of the convoy, while Gen J Kemp, with 250 men, attacked its left flank. This assault was beaten off with artillery and rifle fire. A second attack was met with the same result. A third assault, by Gen J G Celliers with 100 men, came from the rear, the Boers charging through the defensive ring of infantry. Some of Celliers’ men then attacked on the right flank, while Kemp renewed his attack. This broke the outer defensive ring and, shortly afterwards, resistance collapsed on every side. The wagons were stampeded towards the Jagd Spruit, where they became stuck in the muddy waters of the stream and were captured. Some mounted infantry escaped to Klerksdorp, where the alarm was raised, and reinforcements gathered. They hurried to the scene, but, on arrival, confronted by Kemp and his men, they could only report back that the disaster had been complete. British losses were 73 men killed or mortally wounded, 110 wounded, 270 taken prisoner. Thirty-two men of the Imperial Yeomanry lost their lives. Of greater importance for the Boers was the capture of 156 wagons, 1500 mules, four artillery pieces, 2000 rifles and half-a-million rounds of ammunition. The Boer casualties were twelve dead and 42 wounded.
-
During the night of 23/24 February General de Wet with some 600 men (including President Steyn and other Government members) managed to break through the British cordon near Harrismith, breaching that part of the line held by the 7th New Zealand Mounted Infantry. Both sides suffered heavy losses. De Wet left 14 dead on the field and carried away 20 wounded, while the New Zealanders, who had shown fine tenacity, had 23 killed and 43 wounded.
-
The 28th Battn Mtd Infy (3 companies of Warwickshire, Lancashire Fusiliers and Derbyshire Regiments) under Major Dowell were led in an ambush on Blesboklaagte near Klip River Station (west of Heidelberg). The 250 strong Boer force under Generals Alberts and Grobler heavily attacked the left flank, held by the Lancashire Fusiliers under Captain Challoner. After about an hour’s fighting and losing a good many men wounded, the latter began to withdraw to their horses, about two miles away. However, they were galloped down and nearly all captured by the Boers, Captains Challenor and Le Marchant being wounded. The Derbyshire Company on their right held their position until the Warwickshire Company retired through them. They then retired, some of both companies being captured. The battalion had only just arrived from Malta and had no experience of either South Africa or of Boer tactics. 1 Officer and 11 men were killed, 6 Officers and 36 men were wounded and 6 Officers and 87 men (including the wounded) were taken prisoner. WO 108/372 “South African Surrenders”refers. The Boers lost 5 men killed and a number of men wounded. In his unpublished memoirs Veldkornet Kamffer of the Heidelberg Commando noted: “Andrew Brink and I then asked the wounded officers why they had not surrendered. They replied that they had been told that the Boers fought under a black flag and that there was no use in surrendering as they would be shot in any event.”
-
Hi Megan, I will send the pictures that I have to my phone tomorrow Regards Archie
-
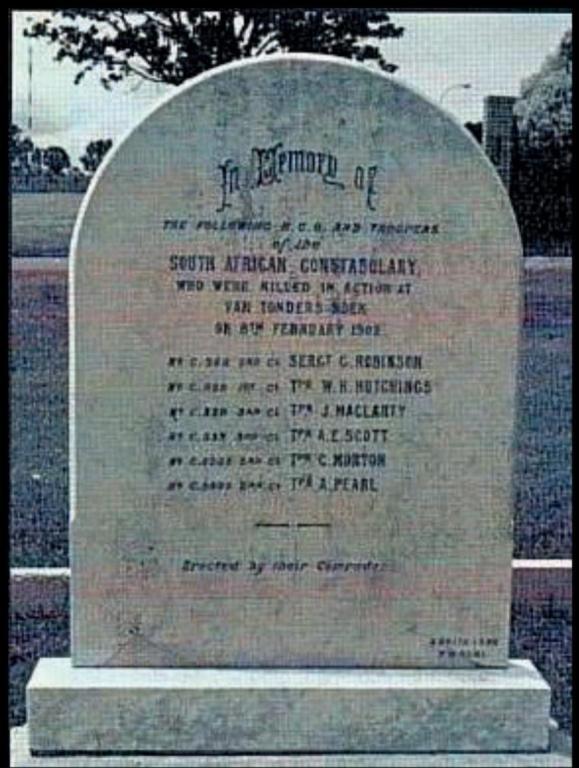
The commanding officer of ‘C’ Division of the SAC was Major J Fair (21st Lancers). The ‘C’ Division manned a line of police posts which stretched between the Johannesburg-Natal and the Pretoria-Delagoa Bay railway lines. In February 1902 these posts extended from Brugspruit on the Delagoa railway to Waterval on the Natal railway, with an extension to Villiersdorp (today Villiers). The area west of the line was the so-called ‘protected area’ and was supposedly clear of Boers. Intelligence reports, probably from local African inhabitants, persistently indicated that a Boer force had encroached into the protected area. When the Commander-in-Chief, General Lord Kitchener, ordered the line of SAC posts to be moved further eastward, Major Fair ordered a reconnaissance preparatory to making such a move. The party consisted of 150 men drawn from three troops of ‘C’ Division under the command of Captain A E Capell. They assembled at the farmhouse on Syferfontein (or Cyferfontein) that had been taken over by the SAC as a fortified post, and set off 04h00 on 8 February 1902. They proceeded northeast towards the neighbouring farm, Vlakfontein and from there headed towards Van Tondershoek. The intelligence proved to be accurate: the Boers were hidden in a hollow next to a perennial stream, a short distance from the Van Tondershoek farmhouse. The Boers were General Piet Viljoen’s men. After suffering severe losses from a number of British raids, Viljoen decided to move into the protected area. Commandant Joachim Prinsloo with 200 men made the first incursion into the area, followed on 24 January by another 400 men of the Pretoria, Germiston and Heidelberg commandos. Capell’s men seem to have rather injudiciously opened fire on the laager, but his 150 men were greatly outnumbered. Indications are that the Boers lay hidden until the last possible moment and when it became obvious that their lair had been detected, they returned fire and attempted to outflank the policemen on both sides. What followed was an orderly retirement back to base at Syferfontein. There were experienced fighters on both sides and a running fight took them back over Vlakfontein. There, the left and right flank guards were fiercely attacked by the Boers and found themselves unable to join the rest of Captain Capell’s men, who got away safely. Capell managed to get most of the left flank away, but eight men, a sergeant, an officer and the medical officer, Captain Martin-Leake, were unable to find a way to escape. They were engaging some Boers at a distance of 1 600 yards and seemed to be secure until a group of Boers crept up a small donga and opened fire from a flank. All eight men were quickly killed or wounded. Captain Martin-Leake attended to a number of the men, dressing their wounds and controlling bleeding, apparently oblivious to the heavy close-range fire. When Lieut. Abraham was wounded, suffering a mortal injury, Martin-Leake ran over to make him more comfortable and ease his pain. It was here that the doctor was shot three times, being wounded in the right hand and left thigh. The Boers overran the little group but were not inclined to take prisoners. They left them where they lay, expressing regret that they had shot the doctor, and disappeared back the way they had come. The dead and wounded lay where they had fallen for some hours. Help arrived, probably after dark, bringing stretchers, blankets, bandages and water. Men, when severely wounded, quickly develop a raging thirst and lying for hours in the hot sun must have been agonising. There was at first a limited amount of water, but Martin-Leake refused to take his share until all the others had been served. The right flank was under the command of Lieutenant Swinburne, who apparently had 24 men with him. A message from Capell did not reach him, the orderly entrusted with its delivery having been shot, but Swinburne’s force managed to hold the Boers off until nightfall, when they made their way back to Syferfontein. The dead and wounded were brought back to Syferfontein, where the dead were buried. In about 1965, the remains were reinterred in the Garden of Remembrance in Standerton Cemetery. Martin-Leake returned to service as a Lieutenant during the Great War and was awarded a BAR to his Victoria Cross for his Gallantry in November 1914 being one of only three recipients to have been awarded the coveted Decoration on two occasions. The Boers did not pursue the SAC patrol. Their hiding place had been discovered and they moved away to the north-west, where the same men were involved in a number of encounters with the British up to the end of the war. Martin-Leake was taken to hospital in Heidelberg. His wounds healed easily, but the ulnar nerve had been severed, causing the hand to be paralysed. This was a disaster for a man wishing to become a surgeon, but an operation in England by Sir Victor Horsley was partially successful, although leaving him with a permanent loss of flexibility. The Victoria Cross was conferred on Martin-Leake by King Edward VII at Windsor Castle on 2 June 1902.
-
Recommendations sent by Maj Gen Baden Powell to Gen Lord Kitchener, dated 4th August 1902. For Gallantry Badges: “C” Division SAC. Captain Cornwall, 293 Sgt WR Pedley. “On 8th February 1902 Capt. Cornwall went with ten NCO’s and men to bring in a wagon etc. on Auge Wyst. While doing so he was attacked by a force of Boers. Captain Cornwall and Sgt. Pedley advanced to a good position, which they held against the Boers in order to cover the retreat of the wagon and their party. They were eventually cut off and surrounded by the enemy but made a good attempt to dash through them. Captain Cornwall’s horse was hit and Sgt. Pedley returned and took him up on his horse under heavy fire. This horse was then shot and both Officers were then captured”. War Office Records refer.
-
The action at Gruisfontein, when the whole of Commandant Sarel Albert’s commando was captured, was reported on and published in the London Gazette as follows in Lord Kitchener’s despatch of 8 February 1902: “During Major Leader’s advance he came upon and captured a Boer picket, from which he ascertained that General De la Rey had already moved his camp, but that Commandant Sarel Alberts’ laager was for that night at Gruisfontein, which he reached just before daybreak. Our men charged the enemy’s laager with great dash, the Scottish Horse taking the main share of the attack, and as most of the Boer horses had been stampeded by the fire of Major Leader’s pom pom, the gallantry of the attacking force was rewarded by an unusually large measure of success: 7 Boers were killed, 132 prisoners taken, 11 of whom were wounded, together with 130 rifles, 2800 rounds of ammunition, and a large number of horses, mules, cattle, and waggons were taken. Our casualties were 2 officers (Cpt I M’Kenzie and Lt W Tanner) and 6 men wounded, all belonging to the Scottish Horse”.
-
February 1902 opened with Malan’s 800 men harassing Crabbe’s column. Crabbe was clearing the way for Major Crofton’s convoy of 100 donkey wagons, transporting supplies from the railhead at Beaufort West, through the dry Karoo to Fraserburg. The encounter lasted several days and ended on 5 February when Malan attacked the entrenched convoy on Uitspanfontein. Crofton, after fighting valiantly, lost his life and the convoy was looted and set alight
-
Colonel E M S Crabbe, with his column of some 500 men, was ordered to move in advance and clear the way for Major Crofton’s convoy of 100 donkey wagons that left the railhead at Beaufort West on 30 January 1902 with supplies for Fraserburg. It was very difficult country and, with the donkeys moving at a very indifferent pace, Crabbe soon outdistanced them. On 1 Feb he easily beat off an attack by Commandants Smith and Van Reenen some 40 km east of Fraserburg and camped for the night on the farm Rietfontein. Shortly after advancing towards Fraserburg on the 2nd, he found himself in a hornet’s nest. Gen Malan with some 800 Boers surrounded them and Crabbe had to dig in. After some hard fighting, in which according to the Times History, “the 104th IY particularly distinguished themselves”, Crabbe camped at the farm Waterval. 11 of his men had been wounded and another 11 were taken prisoner.
-
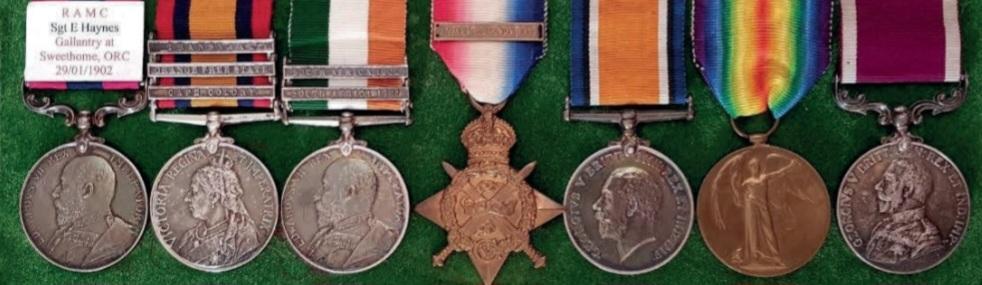
The “Particulars” for Sgt Edward Haynes’ Mention in Despatches: London Gazette of 18 July 1902, p4601: “For gallantry under heavy fire at close range, on 29th January, 1902, at Sweethome, Orange River Colony”. Fortunately, Major General Charles E Knox gave a more detailed account of the event when he forwarded Haynes’ name “for good service” (WO108/141). “For running out from a place of safety to restrain some of the enemy from firing on the late Pte Tucker, 2/Royal West Kent Regt. Who, not having heard or understood an order to hands-up, had fired at a party of Boers who had surrounded Major Lawless, R.A.M.C. Sergt. Haynes was heavily fired at at a range of considerably under 50 yards.” Sweethome is a farm some 15 km north of the village of Hertzogville.
-
“It happened that a party of Boers had been reported at Treurfontein, some twenty miles to the south-east (of Lichtenburg). On January 21st Lieut-Colonel K. Chesney was despatched to engage them with 200 men. But the supposed small band proved to be a strong commando, under General Celliers, who, after demolishing Chesney’s advance-guard squadron, proceeded to outflank and hustle the rest back towards Lichtenburg. Within six miles of the town the detachment, which had lost more than a third of its strength, was fortunately met by Lord Methuen, who had heard of the affair, sallied out to the rescue with 500 men and three guns.” Official History, Grant p406-7. WO100/372 (SA Surrenders) adds an interesting observation: “The Yeomanry appear to have lost all cohesion, and retired in a disorganized state through the British South African Police”. It also notes British losses as 10 men killed and 25 wounded.
-
“Lieutenant-Colonel Sitwell, operating in the Kimberley district, has, during the month of January, covered the passage of two convoys into Griquatown. On the first occasion he met with a somewhat stubborn resistance at Doornfontein, about midway between Campbell and Griquatown, where on the afternoon of the 13th January he was opposed by De Villiers, who, with 400 rebels, held an entrenched position on a ridge completely commanding the line of advance. The enemy maintained their ground with great determination, although the 22nd Battalion Mounted Infantry succeeded in establishing themselves within a comparatively short distance of their defences, but at 6.40pm, on the arrival of a small detachment of the Royal Munster Fusiliers the position was carried by a well-executed bayonet charge. Our losses in this engagement were 1 Officer and 5 men killed, and 6 men wounded. The enemy removed their killed and wounded but are reported to have 5 of the former and 30 to 40 of the latter. 50 Boer horses were found to have been killed in rear of their position, and 18 others were captured.” Kitchener’s Despatch of 8 February 1902 (London Gazette, 25 March 1902). 5755 Pte. J. Moate, Munster Fus. Private Moate was killed in the bayonet charge and is buried in the West End Cemetery in Kimberley.
-
Lt Wilson and 25 men of the Natal Volunteer Composite Regiment left Vant’s Drift for Nqutu with two wagons. He put out 8 men about 1000 yards in front, but no flankers or rear-guard. The party was attacked on the left by about 70 Boers and was eventually compelled to abandon the wagons and retire to Rorke’s Drift. One man was wounded in the incident and subsequently died, while 4 men were captured without firing a shot.The Court of Enquiry considered that some attempt to keep off the enemy by firing should have been made and that Lt Wilson’s dispositions were faulty. The General Officer Commanding concurred and considered the attempt at self-defence made by those captured was “singularly feeble”. However, the 4 men were exonerated. WO108/372: South African Surrenders.
-
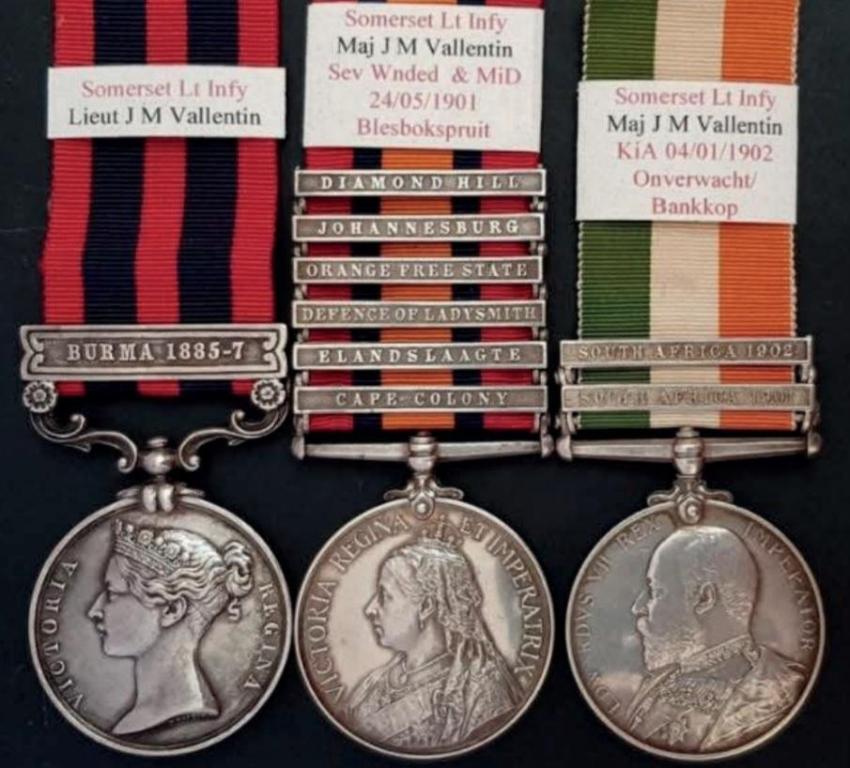
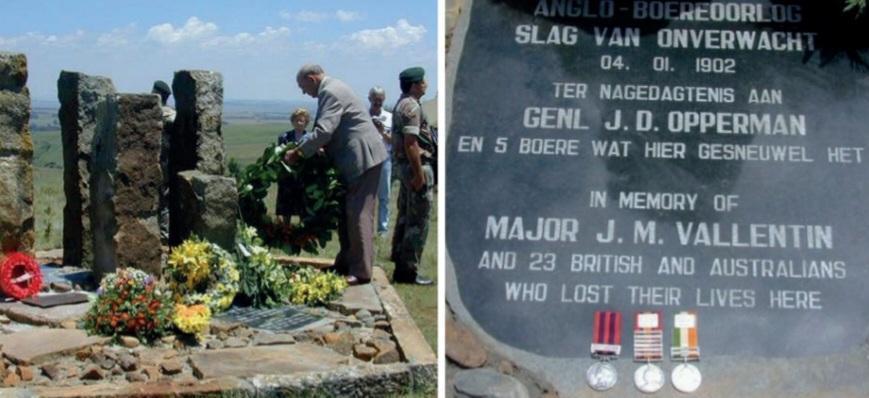
Onverwacht is a farm in the present-day Mpumalanga, 30 km south-east of Ermelo. The advance guard of Brig-Gen H.C.O. Plumer’s column under Maj J.M. Vallentin, Somersetshire Light Infantry, halted on the farm on 4 January 1902 and then saw a party of burghers moving north-east. During the pursuit, as far as Bankkop to the north-east, a commando of some 400 burghers attacked and a desperate hand-to-hand fight ensued, the British being saved by the arrival of reinforcements. However, they lost 19 killed, including Major Vallentin, 36 wounded and some 50 captured. Boer losses included Veg-Generaal J D Opperman who was killed. Both Vallentin and Opperman’s medals feature on the memorial (see picture attached) Brevet-Major John Maximilian Vallentin, Somersetshire Light Infantry, was killed in the Bankkopaction. He was the son of Sir J Vallentin, was born in February 1865, and educated at Haileybury. He entered the Somersetshire Light Infantry February 1885, was promoted Captain June 1892, and Brevet-Major November 1900. In August 1888 he married Helen Mary, daughter of Col. Carnegy. He served in the Burmese Expedition of 1886-87 with the 2nd battalion of his regiment and received the medal with clasp. He graduated at the Staff College in 1897, and before the outbreak of the war in South Africa was brigade-major at Ladysmith, Natal. On the re-distribution of the brigades of the Natal Field Force after the arrival of Sir George White, Major Vallentin was appointed brigade-major to Lieut.-Gen. Sir Ian Hamilton. At the battle of Elandslaagte, Major Vallentin behaved with gallantry in rallying the flank attack during the most critical phase. He served throughout the siege of Ladysmith until January 1900 when he had a severe attack of enteric. When convalescent, he elected to return to his chief, Sir I Hamilton, and joined him at Bloemfontein just after his appointment to the command of a division. After the occupation of Heidelberg, Major Vallentin was appointed Commissioner of that town. In the autumn of 1900, he was sent out with one of Roberts’ Proclamations to a commando in his neighbourhood and lived with the Boers for a week while the object of his visit was under discussion. Vallentin served as Major in the South African Constabulary between 22 October 1900 and 29 August 1901. He then returned to his old Regiment and saw extensive service until he met his death while pursuing with about fifty men some Boers under Generals Opperman and Christian Botha, who were several hundred strong. His party suffered severely, but General Opperman, who held chief command over a group of commandos as well as the personal leadership of the Swaziland Commando, was killed. Major Vallentin was mentioned in despatches by White on 2 Dec. 1899 (LG 8 February 1901, p918) and again in the despatch of 23 March 1900 (LG 8 February 1901, p930); also in the despatches by Kitchener of 28 July 1901 (LG 20 August 1901, p5482 : In command of Heidelberg Volunteers rendered good service on 24th May, 1901”) and of 8 August 1901 (LG 15 November 1901, p7376: “For gallantry in action on 23rd July, 1901”). He is buried in Ermelo.
-
Stirling’s “The Colonials in South Africa” p261, in the section dealing with Kitchener’s Fighting Scouts, incorrectly states “On the 20th December 3 men were killed and Lieutenant J Sampson and 6 men were wounded at Zoutpans Drift”. The incident actually took place on 30 December and is, strangely enough, not covered in the standard Boer War sources. However, according to the “mentions” obtained by 3 men (LG 25 April 1902, p2770, 2777 and 2778) the Scouts held a ridge against a much superior force of the enemy for over half-an-hour. When Lieutenant Sampson was wounded, he was bandaged by Corporal E P Berlyn under very heavy fire. Berlyn then carried Sampson under cover, being twice wounded in doing so, and continued to give directions as to the wounded men. Walter Chapman enlisted in the Imperial Light Infantry on 20 November 1900, serving until his discharge on 19 August 1901. Some 3 weeks later, on 9 September 1901, he enlisted in Kitchener’s Fighting Scouts. He was one of the three men killed in the Zoutpandrift skirmish and is buried on the farm Rietfontein.
-
On 25 Dec 1901 Capt Bertram of the WPMR decided to re-occupy Tontelboschkolk. Leaving Sutherland late evening with 80 men, he relied on night marches to evade the Rebels. He was not aware that the Boer commandos were busy harvesting wheat on the farm, and, as his column crossed the Fish River at daybreak on the 27th December, they were spotted by sentries. The Boers had excellent cover in the farmhouses, kraals and the forts and easily succeeded in “convincing” Bertram to retreat with 5 of his men wounded.
-
Groenkop/Krismiskop is a prominent hill, north of Tweefontein, 20 km from the village of Kestell in the Free State. On the east the base is broad and the ascent gentle. The hill, at a height of some 75 m, is reduced to a plateau about 230 m in diameter, in the midst of which is a rocky knoll some 6m higher still. On all sides except the east this plateau drops sharply, particularly on the western side. On 24 December, the Infantry withdrew and the British force on Groenkop mainly consisted of the 11th Battalion, Imperial Yeomanry (34th, 35th, 36th and 53rd Companies) with a Pom-Pom and one gun of the 79th Battery, RFA. The withdrawal of the infantry to Tradouw was observed by the Boer General de Wet from an excellent observation point some 60 m higher than Groenkop. This gave him a birds-eye view of the British camp and enabled him to easily observe all the selected sites of the British pickets. The night of 24 December was moonlit, but the shadows of passing clouds and a light veil of mist shrouded the march of the Boer force and not long after 1 am on the morning of the 25th the Boers were massed at the north-western foot of Groenkop. Leaving the horses and pom-pom with some 100 men at the foot of the hill, De Wet’s Burghers silently, on stockinged feet, start to climb the hill. At 02:00, after a brief rest just below the summit, De Wet shouts, “Burghers! Storm!”, and they swarm over the crest, overwhelming the sleeping pickets. They take the higher positions and unleash murderous fire on the tented camp. The surprise is complete. Several soldiers are hit in their tents. The horses stampede and about a third of the British soldiers flee down the hill in their night-clothes. Some officers vainly try to establish some resistance, but within a few minutes it is all over. The burghers, barefoot and dressed in rags, loot with enthusiasm – thoroughly enjoying their Christmas fare. At least 57 British soldiers are killed (the bodies of 25 blacks are later found on the battlefield), 84 are wounded and some 200 soldiers (including the wounded) fall into De Wet’s hands. On the Boer side 14 men are killed and 30 are wounded. Two soldiers of a patrol sent from Rundle’s camp to investigate, are also captured and Rundle’s contribution to the battle is a few shells falling among the wagons as they are removed by the victors. Contrary to their custom, De Wet takes the unwounded prisoners with him to put them across the Basutoland border a few days later. “Monuments & Battlefields” by J L Smail, p35 and “The Anglo-Boer War: a Chronology” by P Cloete, p287.
-
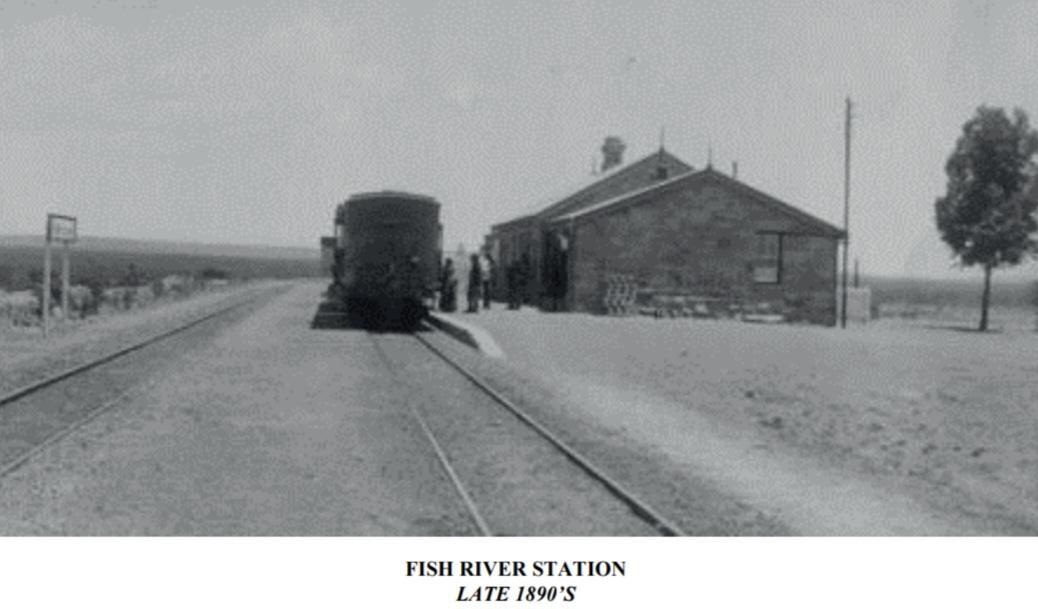
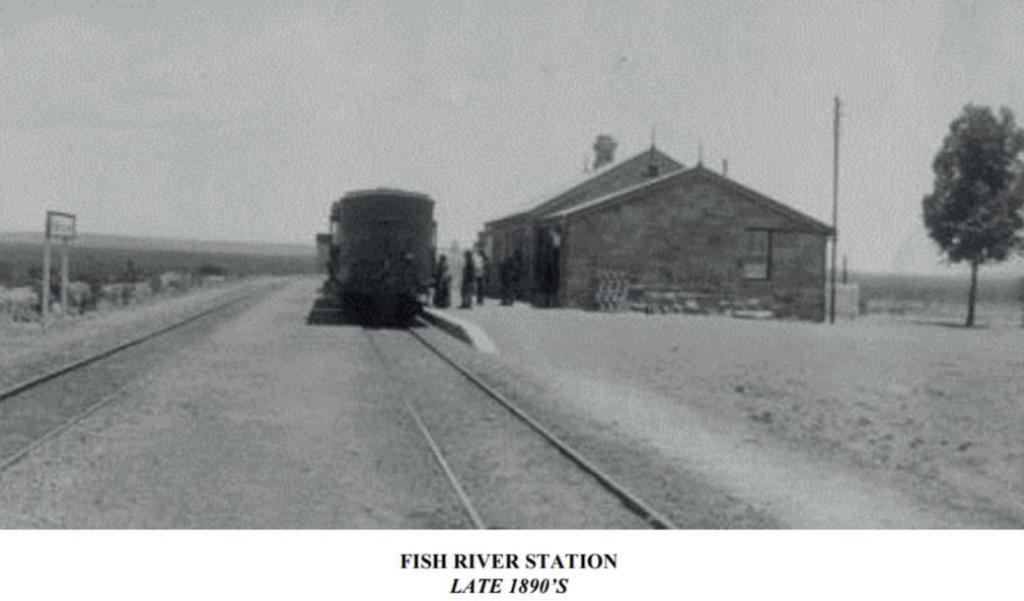
A marginal note on the QSA roll page opposite the name of Ganger A Ferrier, Cape Government Railways: “Patrolling line within zone of fire, also special services rendered upon the occasion of the attack by boers on Fish River Station on 23/12/01 for which he was publicly presented with a silver watch (with suitable inscription) on the 21st March /02” The incident is not mentioned in any of the standard Boer War reference works. However, Rodney Constantine, whose MA Thesis covered the Guerrilla War in the Cape, is of the opinion that the attack was carried out by a small Rebel Commando under Lieut G Bester, who subsequently moved 15 miles NNW and attacked Conway Station on the night of 28 December. Worthy of further research!
-
A convoy of 50 waggons left Clanwilliam on 19 December to furnish Calvinia with supplies, escorted by the columns of Lt-Col Wyndham and Lt-Col Crabbe, each with 2 guns of the 88th Bty RFA. On 20 December, as the convoy started the descent to the Doorn River on the farm Elizabethfontein, they were shot at by men from the Theron and Smith Rebel Commandos. The convoy hurried to the m river, unaware that an ambush had been set up there by men under the two Rebel Commandants Pypers. As the first waggons crossed the river the Rebels caused consternation with concentrated rifle fire but before the British guns could be brought into action, the Rebels retreated in a north-westerly direction. On the Boer side 4 men were slightly wounded. The British had 3 men killed, 4 subsequently died of wounds and 5 were wounded.
-
In this action, a large Boer force, disguised as British infantry, infiltrated a smaller British force composed of 2 guns and 55 men under Colonel Damant, protected by 40 men of the 91st Company Imperial Yeomanry. In the action that followed, the artillery horses and limbers were saved but at a cost – out of the 95 men of the column, Damant’s Horse and 39th Battery RHA lost 43 killed and wounded including Lt-Col Damant himself who was wounded in four places. In this truly heroic action, 91st Company Imperial Yeomanry had 32 hit out of 40, and, in the words of Lord Kitchener, “sacrificed itself almost to a man to save Damant’s guns”. For his gallantry Shoeing-Smith Ind, R.H.A. was awarded a Victoria Cross. The following particulars were obtained from those engaged by the correspondent of the Central News: The columns under Colonel Damant and Colonel Rimington left Frankfort on the 19th inst. and proceeded in the direction of Vrede. The force trekked all night through a most severe thunderstorm, during which three of our men were struck by lightning and killed. At daybreak the transport waggons were laagered and were left behind in charge of a small escort, while Damant with two guns of the 39th Battery, and one pom-pom and ninety-five men all told, rushed forward. The little force deviated on the left flank, where a number of Boers had been located. On reaching a ridge Colonel Damant observed a party of seventy men dressed in British uniform busily engaged driving cattle in his direction. The strangers were at first taken to be a part of Rimington’s column which had gone out on the right flank. The mistake was soon discovered, however, and almost immediately another body of the enemy was located further to the left of the British laager. Our guns were speedily unlimbered, and quickly came into action. We had only been able to fire two shots when the Boers in charge of the cattle abandoned them and galloped boldly forward towards the British position. The enemy opened a galling fire on the gunners at a range of two hundred yards, and simultaneously another party of 150 Boers who had remained carefully concealed in ambush in the long grass at the foot of the ridge enfiladed the position. A large number of the gallant defenders fell at the first few volleys, but the survivors fought tenaciously, and the enemy were only able to rush and capture the position after all the men on the ridge had been either killed or wounded except three. Previous to this, however, some of the gallant gunners and the escort had succeeded in getting away the limbers of the guns, not withstanding the heavy fire. The only gunner who had escaped the bullets then effectually destroyed the breechblocks of the guns and rendered them utterly useless to the enemy. Out of a total force of 95 in action we had 75 killed and wounded, the 91st Yeomanry losing one officer and 14 men were killed and one officer and 16 men wounded. The Boers, who were under Commandants Wessels, Alexander Ross, and M. Botha – the latter the son of the Commandant-General – also lost heavily. They had Commandant Van der Merwe and 30 men killed. Three of the Boer dead were buried by our men, and the remainder were carried away.
-
A convoy of 50 waggons left Clanwilliam on 19 December with supplies for Calvinia. They were escorted by the columns of Lt-Col P G Wyndham and Lt-Col E M S Crabbe, each with 2 guns of the 88th Bty RFA. On 20 December, as the convoy started the descent to the Doorn River on the farm Elizabethfontein, they were shot at by men from the Theron and Smith Rebel Commandos. The convoy hurried to the river, unaware that an ambush had been set up there by men under the two Rebel Commandants Pypers. As the first waggons crossed the river the Rebels caused consternation with concentrated rifle fire but before the British guns could be brought into action, the Rebels retreated in a north-westerly direction. On the Boer side 4 men were slightly wounded. The British had 3 men killed, 4 subsequently died of wounds and 5 were wounded