


Brian Wolfe
-
Posts
6,486 -
Joined
-
Last visited
-
Days Won
10
Content Type
Profiles
Forums
Blogs
Gallery
Events
Store
Posts posted by Brian Wolfe
-
-
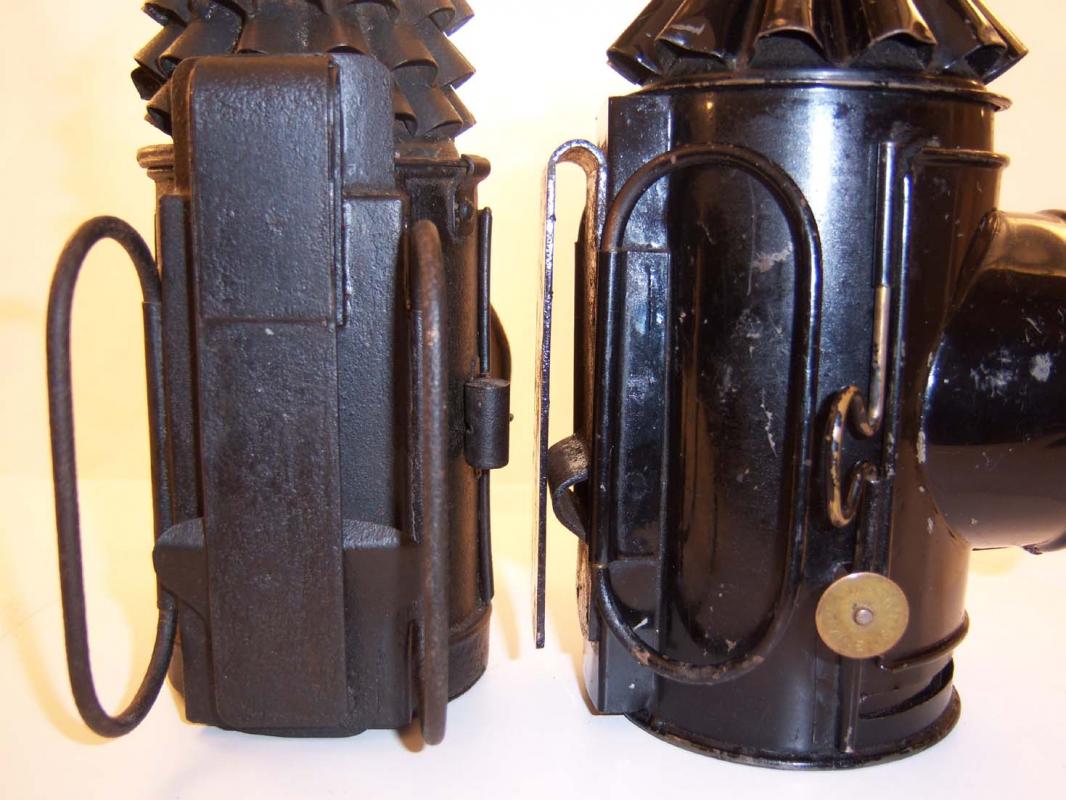
In the last photo, above, you can see a couple of different secondary hooks which would prevent the lantern from falling off the belt as mention.
0 -
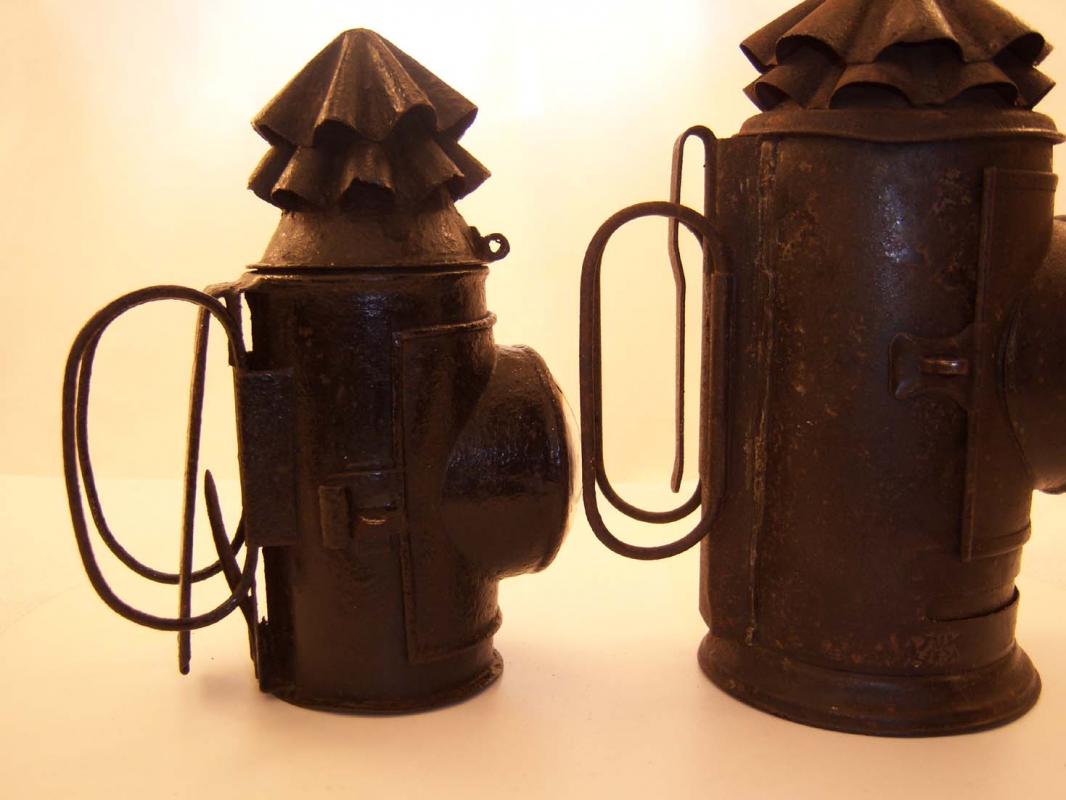
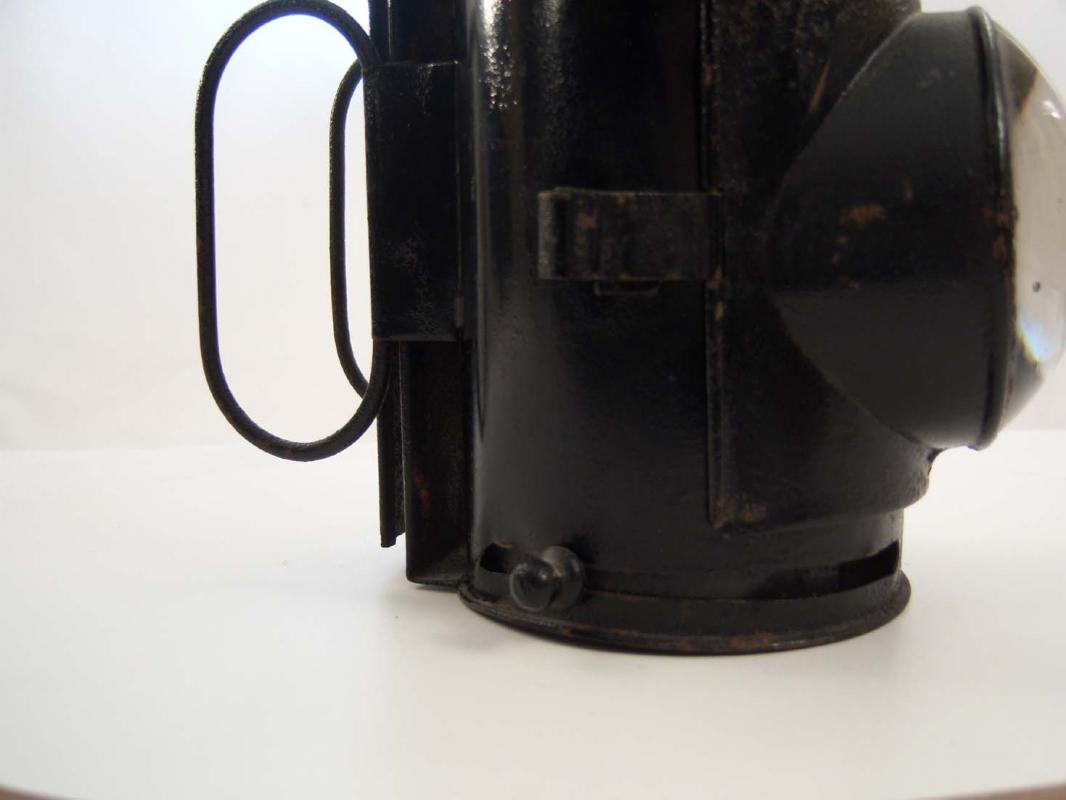
As mentioned earlier there are some main similarities common to all police lanterns, compared with lanterns designed for civilian use. These commonalities are, the double D handles and the belt hook device located at the rear of the lantern. In the collection there are a few variations on the theme and I will show them in the next series of photos. These D handles could fold back against the side of the lantern allowing the lantern to be affixed to the duty belt. In addition to the belt hook there was often found a secondary smaller hook-like device the prevented the lantern from working its way up and then falling off the belt. A few different types are also shown below.
 0
0 -
Hi Monty,
I just read your link and I must say it was very well done and has added a great piece of historic content to this post.
In my opinion all of the better posts on the forum are often a cooperative effort by several members, thanks again.
Regards
Brian
0 -
Hi Tony,
A vast improvement.
Well done, if you decide to go farther with the cleaning please post those results as well.
Regards
Brian
0 -
I must echo Ed's comment.
What a great find and the artifact has been saved, it really doesn't get better than that.
Regards
Brian
0 -
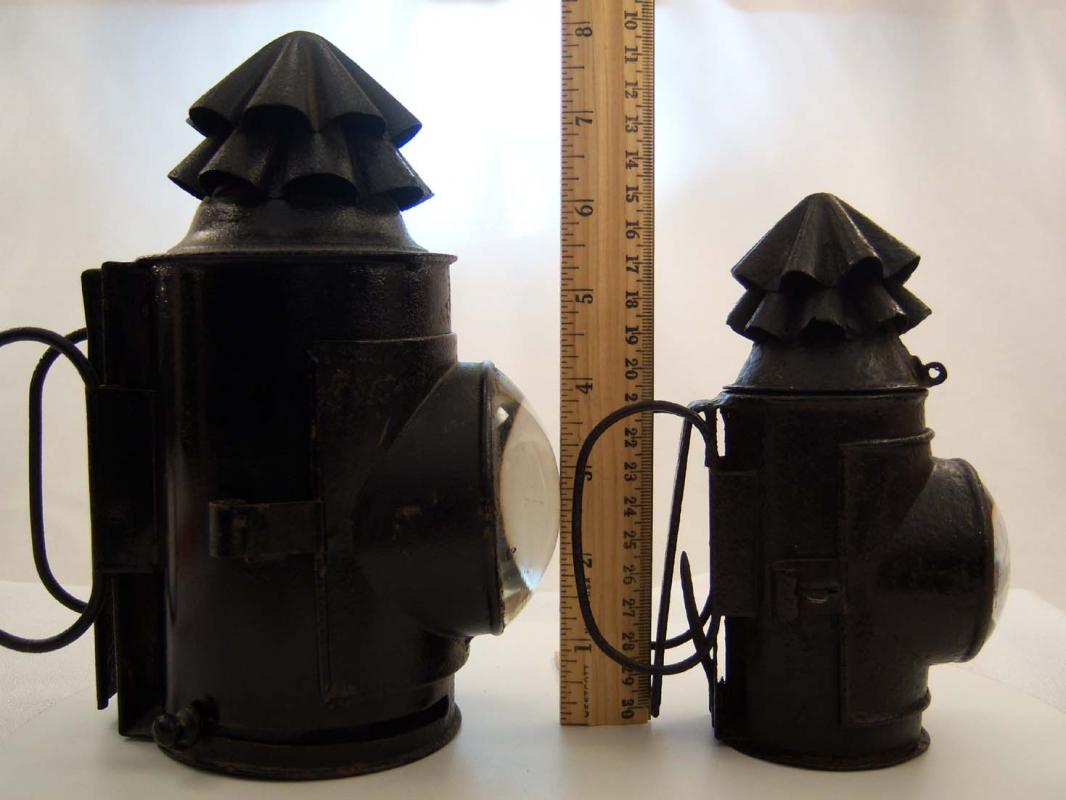
Before going any further I realized that I have made the classic error many collectors make in thinking that everyone knows the size of the item you are talking about.
Most police lanterns are around 8 inches tall (20cm.). However I did come on to one that was a lot smaller and I just had to add that to the collection. As you can see in the photo it is about 6½ inches tall (16½ cm).
I was showing this to a fellow I used to work with who is still a serving police officer and he laughed and commented that it probably belonged to a superintendent. The joke on the force is that a “super” never carries more than necessary. When he shows up on the crime scene he’ll ask for your flashlight and even if you have a pen. I’ve heard it said that, “let’s hope there isn’t a shoot out or the super will ask for a bullet”.
Just to be fair, I’ve known one sergeant who would suggest stopping for coffee and then always say he didn’t have any cash. I wonder what he does now that there are debit cards in every coffee shop.
Oh, I just remembered, he’s now a Superintendent.

Regards
Brian
 0
0 -
Hi Monty,
I would like it is you would indeed post the link here as it will be yet one more place where a fellow collector might get a chance to view it.
Regards
Brian
0 -
WOW!

The Sherman would make a great place to display my WS19 Mk 2 radio and we have room in our side yard...hmmm.
I wonder if there would be room to sleep in there as well, thinking of my wife's reaction.

Regards
Brian
0 -
Hi Tony,
I use 0000 grade steel wool in my shop for finish work and have also used it on steel artifacts. There is a light machine oil with the brand name of 3in1 that works well. The lubercant seems to allow the wool to "float over the original finish yet removes the higher points which is the rust. This will not be a quick operation as 0000 is pretty fine and won't remove rust very quickly so be ready for a good deal of work. I've used this on hunting weapons which are heavily blued with small patches of corrosion with success. You can get the 4 "0" (0000) steel wool at cabinet and furniture finishing supply shops. The secondary reason I use 4"0" on cabinets is that it comes without any oil on the wool where other courser grades always comes with a coating of oil to prevent rusting while being stored.
You already have the correct attitude in trying any method on a small area first. Considering the price this may be the perfect specimen to attempt a little restoration.
Good luck and let us know how it turns out.
Regards
Brian
0 -
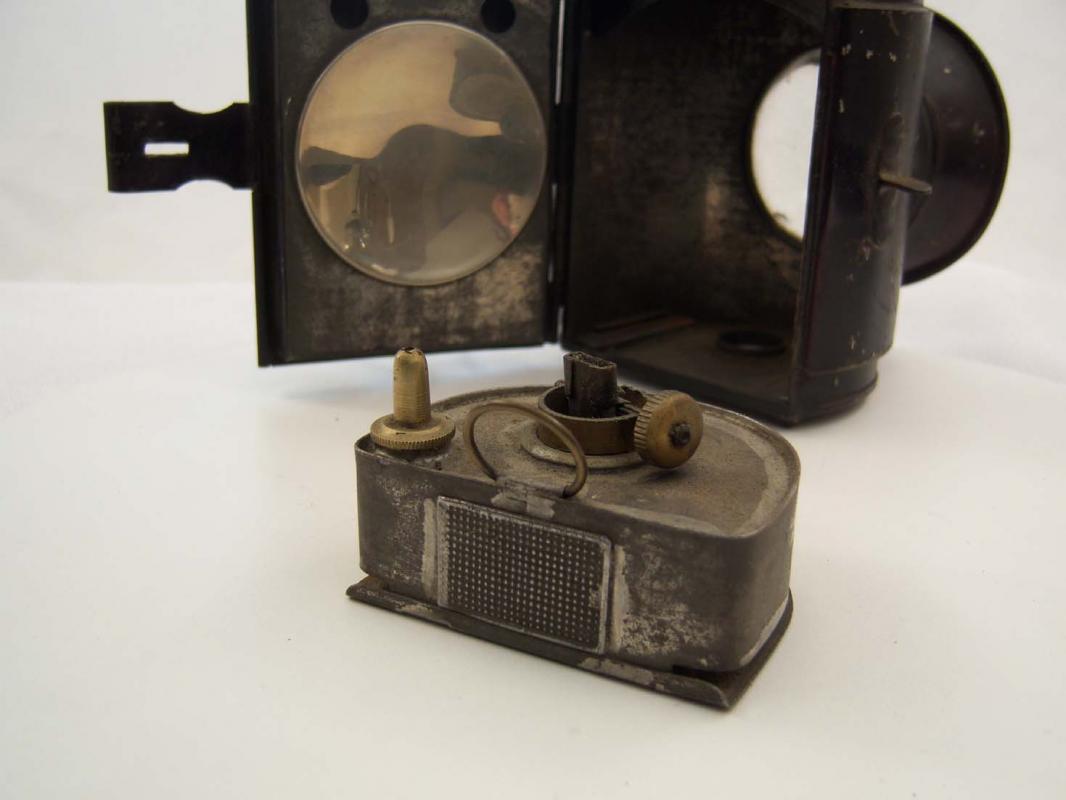
As the fine folks who brought us Monty Python’s Flying Circus would say, “And now for something completely different”, I present a burner that is not your usual variety. The lamp and the burner were designed by a police officer and I would like to take a closer look at the lamp and burner in depth later on. As you can see the shape differs and if you look closely you can see two small channels on the bottom of the lamp which correspond with channels in the bottom of the burner to more securely hold the burner in place. I'll show this more clearly when I discuss this particular lantern later.
In my opinion this lantern, with its burner, was a true innovative advancement in oil burning lantern design.
 0
0 -
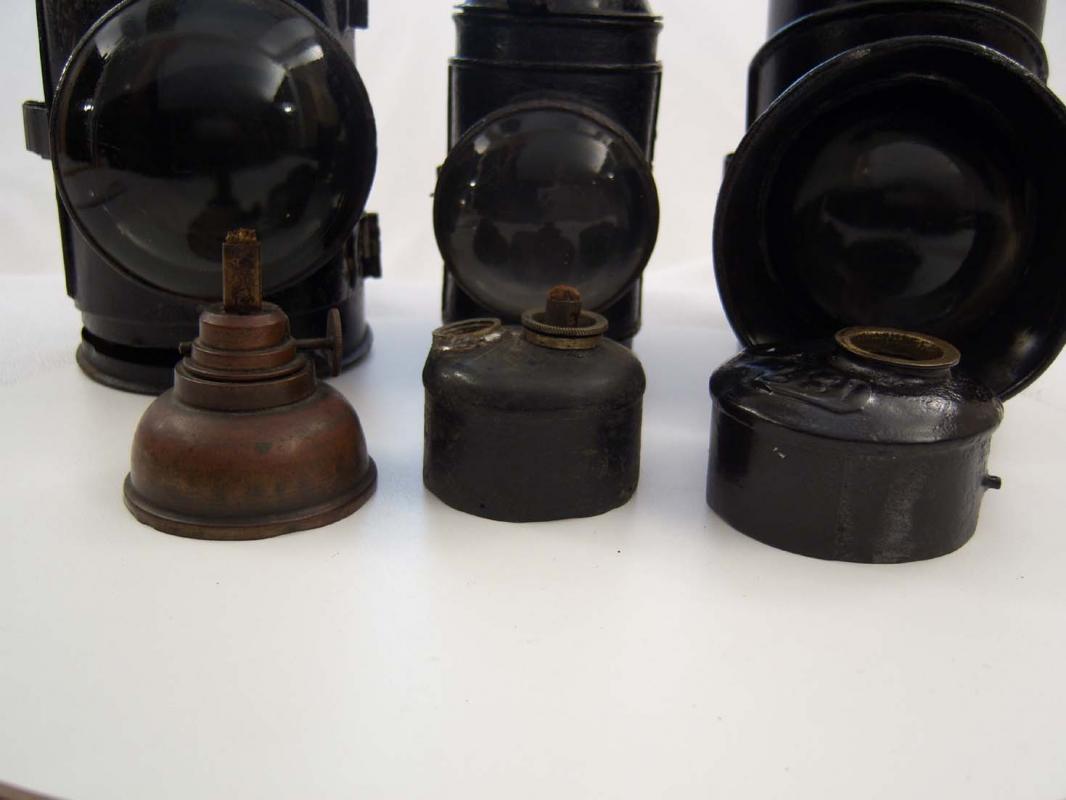
The next three burners shown, in front of their perspective lanterns, show some different varieties of design. The one on the left is adjustable, however, this would have had to have been done while the burner was outside of the lamp to avoid burning the user’s fingers, if he wanted to increase or decrease the flame. The middle burner is missing the filler cap, however, you can see that this is an example where the wick would have had to have been advanced by hand; something that would not have been advisable if the lamp had been in use just prior to the need for a longer wick. The burner on the right has only one opening and this would have no doubt served as an opening for filling as well as allowing the cap to include some sort of wick system. It’s too bad that this is missing as it would have been an interesting example to have shown in a complete state.
 0
0 -
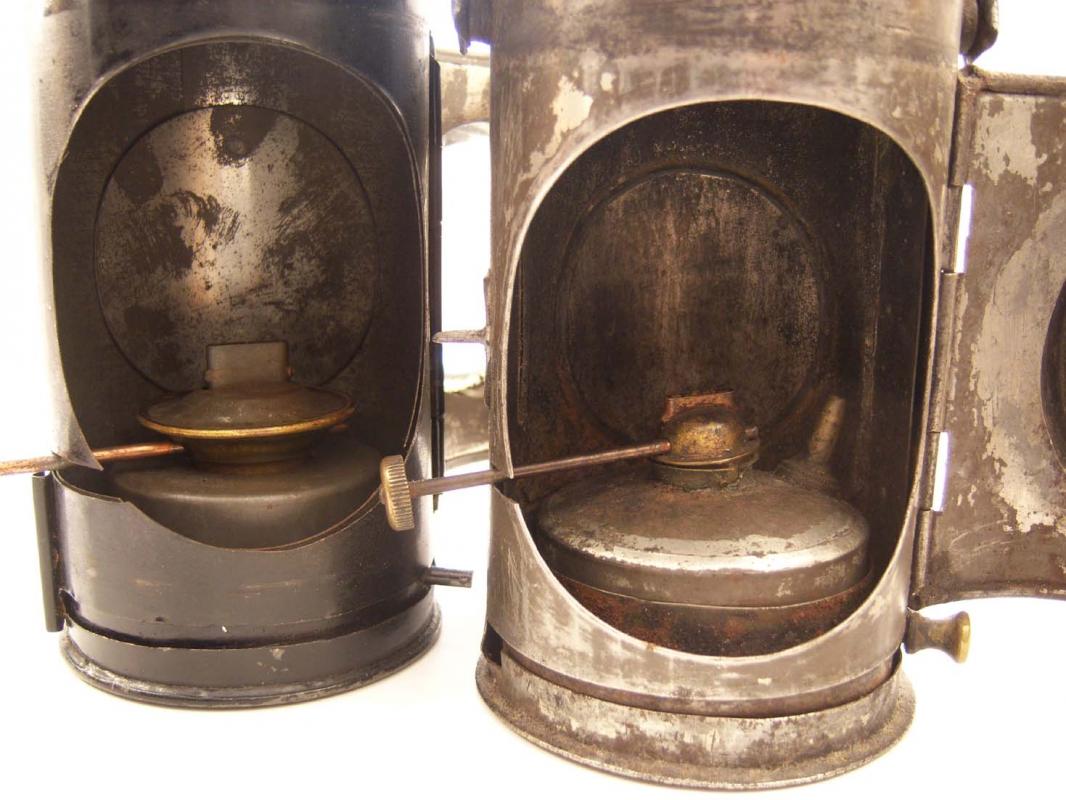
Considering the number of years the oil burning lantern was used there is undoubtedly far more varieties than I can show here. The first two lanterns I am showing below have their burners shown in place and the method of advancing the wick is similar. There is a difference in the width of wick that would have been used in each of these two and think the wider wick would have thrown out more light.
 0
0 -
Thanks Monty.
Regards
Brian
0 -
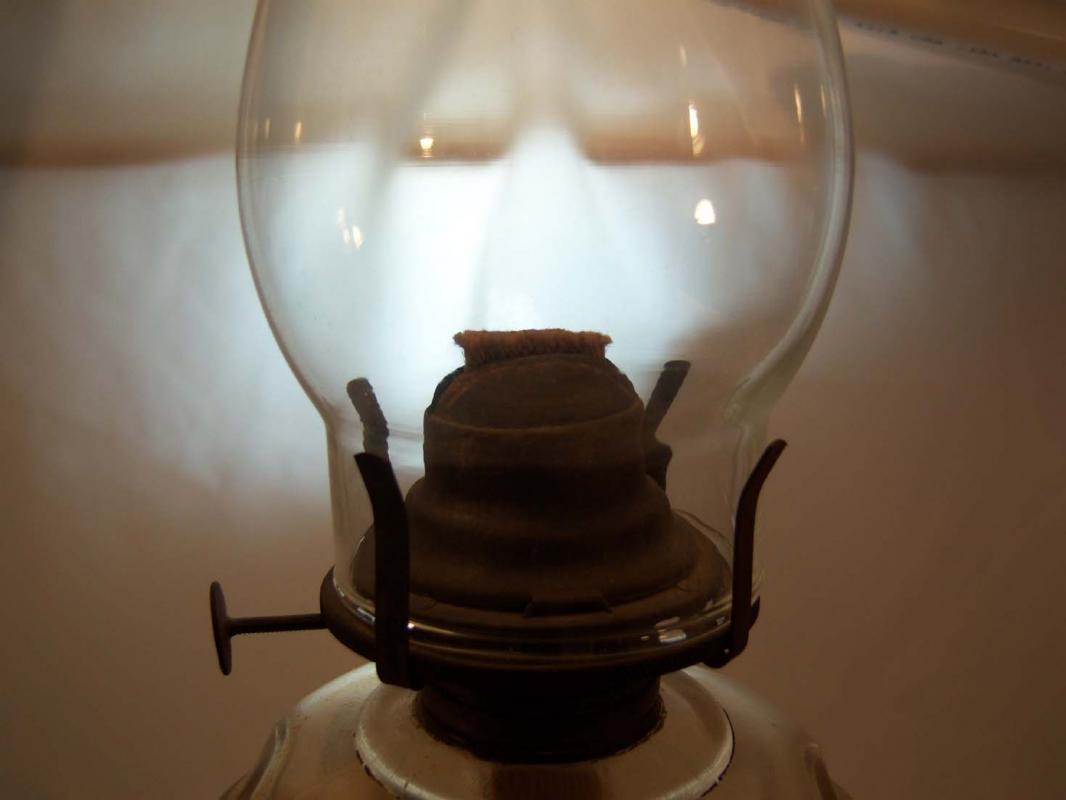
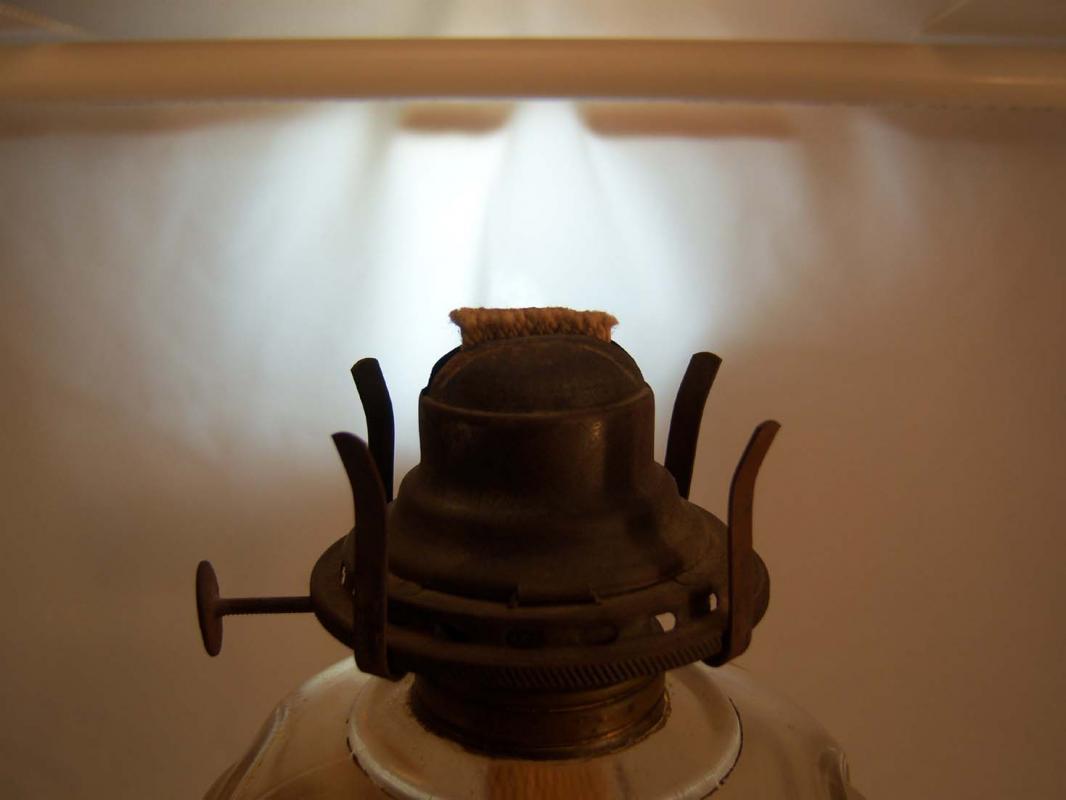
After the candle burning lanterns the oil burners were introduced and the first no doubt used whale oil and later on coal oil, or Kerosene, was used. The most common use of coal oil was in residential lamps and an example of the burner and the adjustment device is shown below.
I recall using these coal oil lamps, actually this particular one, when I was a young child staying at times at my Great Grand Mother’s and I can attest to the greater amount of light produced compared with a candle. Before you ask, “Just how old is this codger”, my family on my maternal side is Amish. You sure gain an appreciation for electricity, indoor plumbing, central heating and especially the indoor washroom facilities, after living “Amish” for a winter. Enough reminiscing it’s time to get back on topic.
Some police lanterns required the wick to be “advanced” by hand which would be most uncomfortable, to say the least, if the lantern had been lit for some time. Others used a toothed wheel on a shaft that went to an adjustment wheel similar to the oil lamps used in residences and shown below. Later on I’ll show some of the different burner styles used.
As far as maintenance was concerned, in addition to cleaning and refilling the reservoir the maintenance officer would have had to “trim the wick” which involved in cutting the wick to an even and straight edge, thereby removing the tattered burned bits left after the lamp or lantern had been used. This may not sound too difficult or important, for that matter, but that would be wrong. A wick that is frayed or uneven will not give you the best flame and therefore not the best amount of light as compared with a properly trimmed one.
I tell you this in case you ever stay with an Amish family over the winter.

 0
0 -
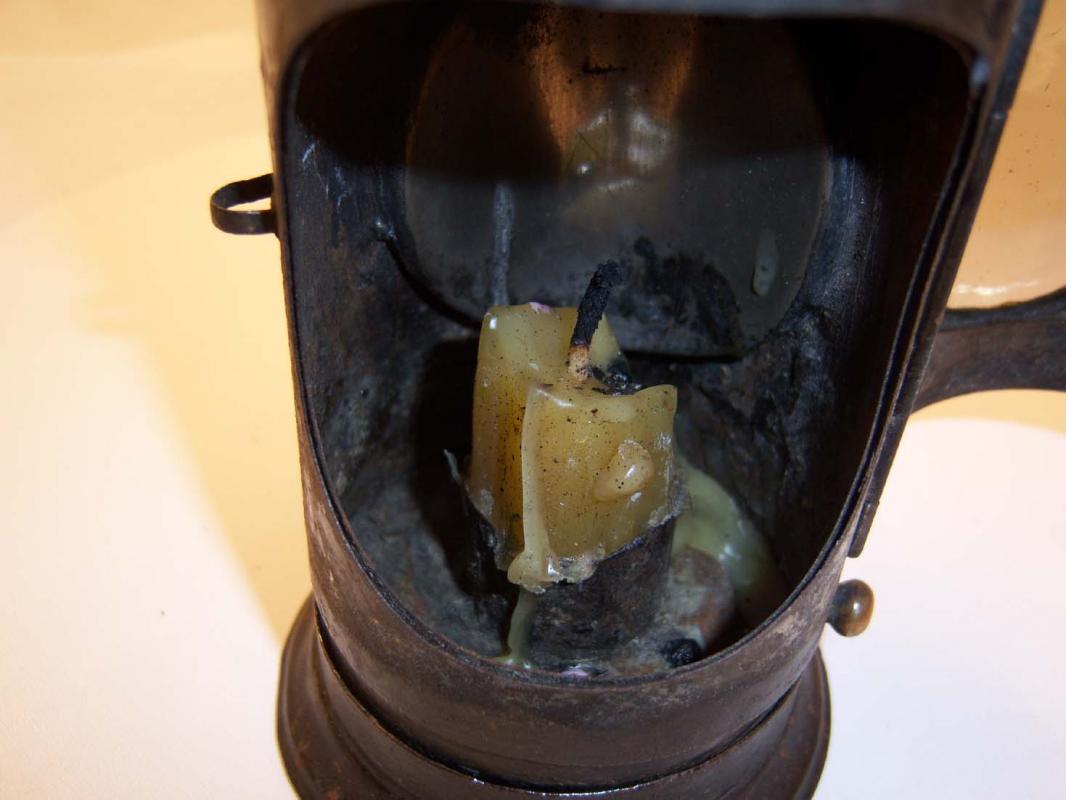
Looking at the different burner styles I thought we’d start with a candle burning lantern. The fellow I purchased this from claimed that this was a hand dipped candle from the same period as the lantern. I have my doubts about that claim, as a dipped, or tallow, candle has a different smell from this one though I have never lit it and can only say this from the fat verses wax smell when unlit. Also the wick is woven and I do not think this was the case when they dipped candles in animal fat, or used the gang moulds. Tallow, or animal fat, dipped candles go back a long way and the one thing they have in common is the amount of soot they produce while lit. I will say it has the “look” of an original and that is why I have left it in place, ugly or not.
I recall seeing gang moulds used to make tallow candles which made the manufacturing of them much quicker. Wax candles that came later were more expensive but gave off less smoke and soot.
If you have ever had a power shortage and had to put a candle to use for light you can appreciate that the amount of light thrown off by candle burning lanterns must have been more of a soft glow than a true beam of light. I will say that I am confident that the oil burners emitted more light than candles and in his book, “The Policeman’s Lot”, (pages 99 & 100) Mervyn tells of conducting an experiment to see how much light the oil burners produced. He reports, “I have tried lighting one of the older ones [oil burners] and found that its magnified beam was approximately half the strength of a modern 3-cell torch”.
 0
0 -
Hi Monty,
None of mine have the room for a can of tea. I would think anything placed in the chamber would only serve to extinguish the flame.
It must have been yet another joke at the expense of the Bobby.
Regards
Brian
0 -
Earlier we were talking about certain features being used to indicate age and while it seems to make sense (to me at least) it may not be the best method of dating. We have just looked at the devices used to deploy the blackout feature and one would think that the specimens requiring the officer to turn the internal cylinder by hand would be the oldest. However, I have a candle burner with the external knob which seems to fly in the face of what I would have thought as a good method of dating, or at least placing a relative age to the lantern in question.
The concept of having next to no budget for equipment is nothing new. I swear that if I hear one more politician say, “We need to tighten our belts” or “We need to find way to do more with less” I shall scream! Anyway, budgets vary and rural constabularies may have used candle burning lanterns well after the cities were using oil burners. I’m sure that if there was a way to know for sure we would find candle, whale and coal oil burning lanterns all being used at the same time in different municipalities around Britain.
The next topic we will take a look at is the different burners used in the lanterns.
Regards
Brian
0 -
The next advancement in operating the blackout feature was to provide an external adjustment knob. While the principal of an internal cylinder with a light emitting hole cut out of it remains the method of turning this internal cylinder was improved. A handle in the form of a simple steel pin, a flat piece of metal with a rolled curl or a turned brass knob was installed at the base of the lantern. A slot that ran across the bottom of the lamp, about ½ of the way around allowed the officer to turn the internal cylinder more easily. I’ve never seen one of these mounted at the top of the internal cylinder and can only guess they don’t exist because I would think they would be prone to binding during operation. That’s only speculation on my part and if any of the members have any further information on this, or any point, I would welcome it.
Two examples of the external handle, or knob, are shown below.
 0
0 -
Today’s flashlights can be turned on and off in ...well... a flash, thanks to battery power. We’ll get into the age of battery power a bit later. The early lamps had to be ignited whether they were candle or oil burning and extinguishing a flame so that the police officer was not giving away his position and then re-igniting the flame when required was not a practical option.
I have no examples of lanterns that do not have a black out feature so I can’t say they ever existed. However the lanterns I do have go back to the candle burning era, which I am confident, in the case of my specimens, would be early Victorian and even perhaps a bit older. All have manually operated black out features.
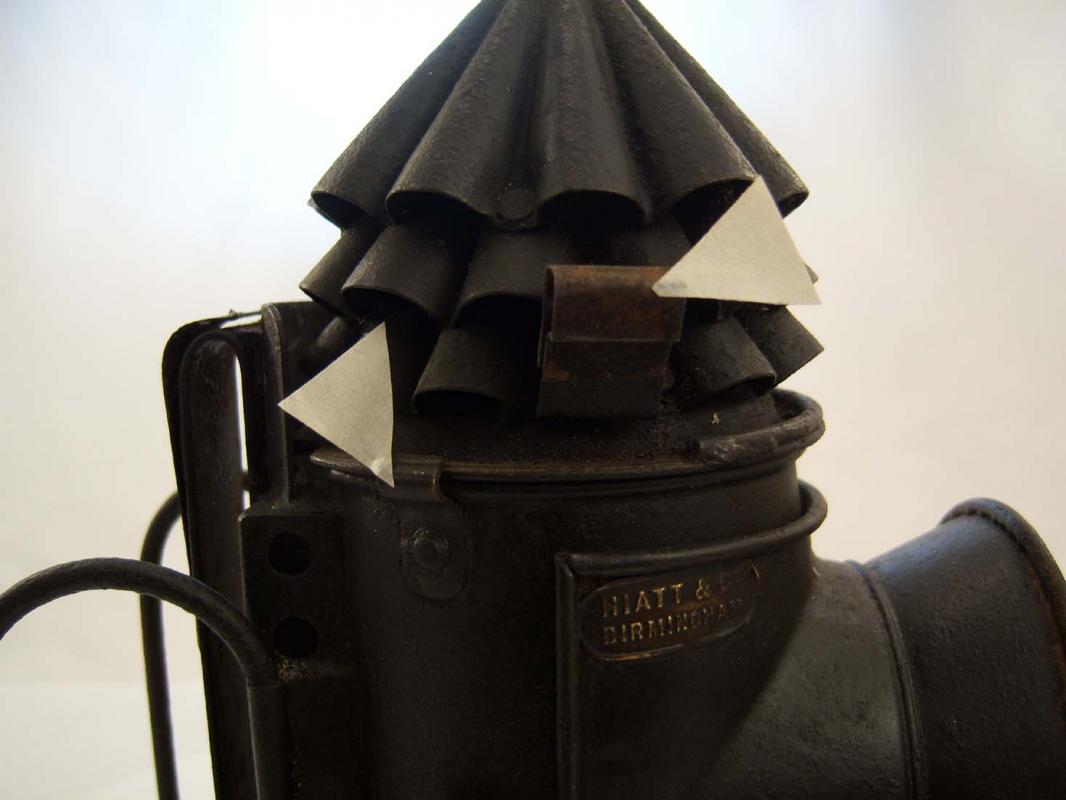
In the case of the example shown to the left below there is a cylinder with a circular opening cut out of it. This cylinder fits into the main body cylinder and the burner rests on the bottom of the lamp separate of the blackout device. In order to block out the light one would turn this cylinder by grasping the vent, or chimney, and either block out the light or turn it the other way to once again have a light beam. This, of course, supports the theory that the additional cone allowed a cooler surface to prevent burns to the officer’s hand. You can imagine how hot a single cone would become very quickly.
The specimen to the right below was made by Hiatt and while having the basic same method of blacking out the light has taken a further step in adding an adjustment “handle”, indicated by the arrow. In addition this particular specimen also as a small guide that keeps the inner cylinder from being removed. While this may have worked well in the past I find that it tends to bind when you are operating the handle in an attempt to block out the light, or re-establish it.

 0
0 -
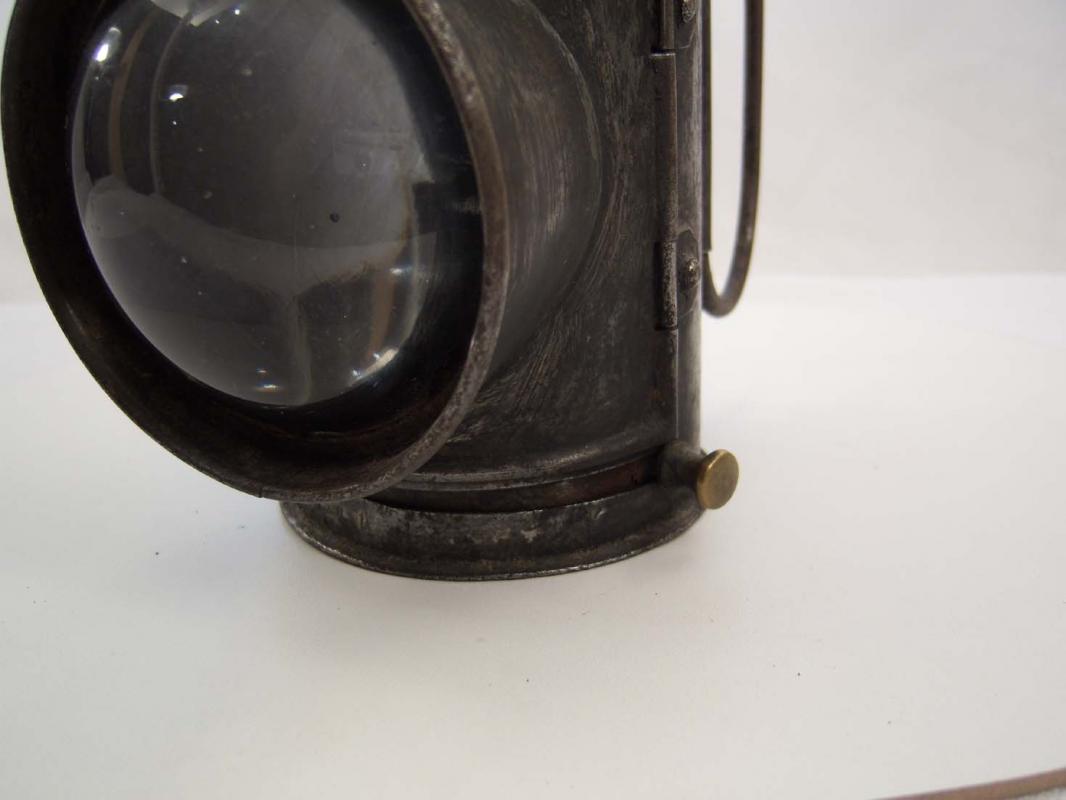
There has been mention of the “protecting rim for the lens” and I thought I would show an example here. I have read that this may also have been an attempt to direct the light forward by preventing it from spreading out from the sides of the bulls-eye lens in all directions. These lens protectors came in different patterns but the one shown is fairly basic in design and they all serve the same purpose.
 0
0 -
Because my interest in German medals is pre WWII I like the look of a bar without the TR medals, however, I agree that it shows that the recipient served his country once again after his WWI service. I know some collectors here who think that the British WWII Defence Medal worn with the WWI Trio somehow looks wrong and I'll admit that I do like the trio on their own.
Regards
Brian
0 -
Fascinating Brian,
Many thanks for the education.
Do you do many repairs?
Monty

Hi Monty,
I try to do as many repairs as possible though many specimens (even beyond lanterns) in the collection are left as is. I've repaired broken medal hangers, leather scabbards and a few of the lamps. I'm fortunate to have held several profession in my life time, including cabinet making and stained glass work and since I still maintain my shop I can "play" witrh such repairs.
Regards
Brian
0 -
Hello Ayedeeyew,
That is some fasinating information and I am thinking that it would make a great project for the New Year. Your first image shows the ARP lamp and I was very interested to see one of these in actual use. I have one in the collection but never seen one in use. Thank you very much, it's just like getting a Christmas present to my way of thinking .
Regards
Brian
0 -
Hello Ayedeeyew,
Thank you for your contribution to this thread. Your observations are most enlightening (bad pun). I suppose there would be enough air movement between the conmbustion chamber and the outer body of the lamp to keep it from over heating. That makes complete sense as otherwise the lamp itself would get too hot for use. Your observations on the additon of and extra cone or two also makes a lot of sense and I thank you for that observation. With such input this post is becoming a valuable research tool.
I have more examples of the features you mention which I will post later. I agree with your suggestion that as time went on the improvements were made. I have a candle burning lantern with an external switch for the black out feature so it may be more of an individual manufacturer's design or a cost control as to how, if at all, the light was hidden.
I would not be concerned that your lantern has been repainted as many collectors do not see this as a detriment, on occasion I've done it myself. In one case the seller, or someone else, removed all of the original finish and left it as bare metal, of course I repainted it to resemble the original.
Thanks again for your post.
Regards
Brian
0
British Police Lanterns
in Great Britain: Mervyn Mitton's British & Colonial Police Forces
Posted
I forgot to add another image of the secondary hook device so I shall do so here.