


Brian Wolfe
-
Posts
6,486 -
Joined
-
Last visited
-
Days Won
10
Content Type
Profiles
Forums
Blogs
Gallery
Events
Store
Posts posted by Brian Wolfe
-
-
Brian, You have made a superb job of repairing the scabbard.If I need one repairing I know where to send it. One of our club members uses shim brass for his repairs. Ian
Thanks Ian, the Stafofrdshire scabbard seems to have been repaired using brass shims and the sword gets stuck behind one side of the shim if a lot of care replacing it is not exercised. This is not to say brass shims are a bad idea as this problem can happen with any material used.
Regards
Brian
0 -
Here are a couple of photos of a curved sword scabbard that was repaired a long time ago, probably when it was still being used. I would not be surprised if they have used thin pieces of wood or perhaps leather in the repair as the sword must be put into the scabbard in just the right way otherwise it is stopped by some obstruction. The sword for the repaired straight scabbard encounters no obstruction and one would never know it had been broken without an inspection of the exterior of the scabbard itself. I’m not bragging (ok, perhaps a little vanity has sneaked in) but I mention it in support of modern materials opposed to the old methods available “back in the day”.
In the case of a curved scabbard I would use a similar approach as the straight scabbard except I’d use two pieces of flat plastic cut to the same curve as the scabbard to be repaired and one glued to each flat surface. This should provide sufficient support.
I hope this article encourages others to attempt repairs of their own, most of the time it’s just a matter of thinking about different options and having the nerve to give it a go. Just remember almost everything can be repaired with the exception of the weather and government.
Regards
Brian
 0
0 -
I'v got a French 1832 pattern infantry hanger (or possibly Russian Crimean I suppose), it has a damaged leathger scabbard which somebody's repaired.
The leather along the seam had rotted / broken off for the full length of the scabbard and it's been repaired by gluing on a length of narrow leather trouser belt complete with impressed imitaion stitching, and if you try to peel the belt back, bits of the original leather come with it........
Could always try to sort out the rubbery adhesive with a solvent I suppose.
Now there's a challenge! I've seen some really bad repairs over the years on dealers' tables. The worst was a broken scabbard that had the broken area only simply wrapped in electrical tape and then the whole scabbard sprayed with black paint.
Lets us know how this progresses if you decide to restore the scabbard.
Regards
Brian
0 -
Brian,
Great work and an excellent guide. Thanks for posting it.
Tony
Thanks Tony.
Regards
Brian
0 -
I almost hate top admit it, but, to me, this is exciting stuff! Perhaps I need to get out more.

It's not often that something like this comes along; to be able to see two perspectives of the same event in pre-war history especially at the same location.
I'm looking forward to your scan.
Regards
Brian
0 -
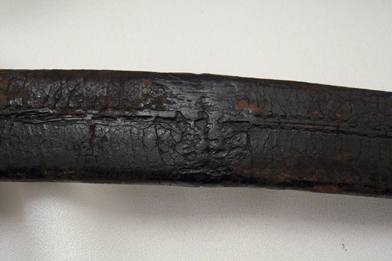
Here's the other side.
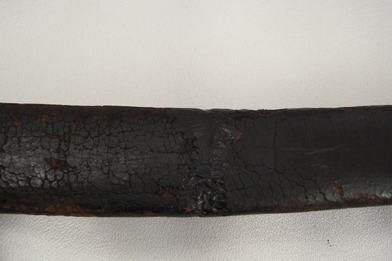
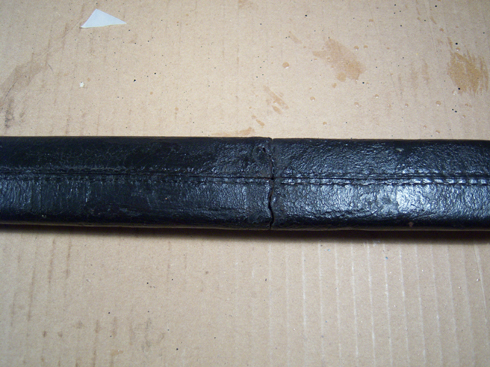
I'll run a couple of photo of that Staffordshire sword scabbard repair I mentioned earlier that I believe was done many years ago and possibly when it was still being used by the police.
 0
0 -
Here's a closer view of one side of the scabbard repair.
Note the "hook" I mentioned earlier.
 0
0 -
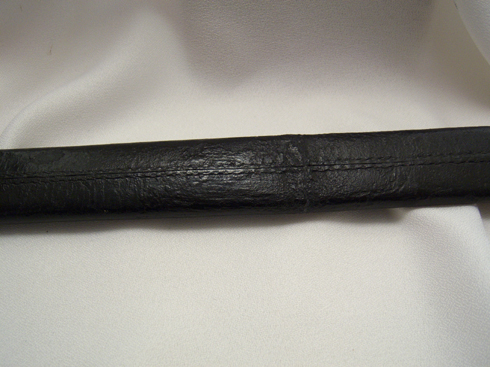
This next series of photos shows the finished project.
In order to “blend” the repair into the rest of the scabbard take small drops of Super Glue and place them in the area where the two pieces form the join. This takes time and patience but with perseverance you should achieve some good results. Once any groves are filled you can take a small piece of paper towel and lightly brush the partially dried glue to feather it out.
After the glue blending is all done and set up take black shoe polish and blend out the repaired area some more. A final coating over the whole scabbard should complete your project. If you still need to blend the area out I would suggest a layer of melted bees wax then when dry use a stiff brush and gentle work the area you want to blend.
You will always see the repair but it should be at least hard to see.
 0
0 -
Now it’s time to glue the insert in place along with the seam edges. It’s always good to dry fit the insert and check to see that the sword goes in and out of the scabbard freely.
If all works as it should then glue the insert in place.
Several clamps were used to hold everything in place and maintain the shape. This is important because when the Super Glue is set, if there has been any distortion of the scabbard, you will be stuck with it (no pun intended).
The photo is of the glued scabbard as it looked right after the glue had set up. You can see the repair quite clearly as no blending has been done at this stage.
 0
0 -
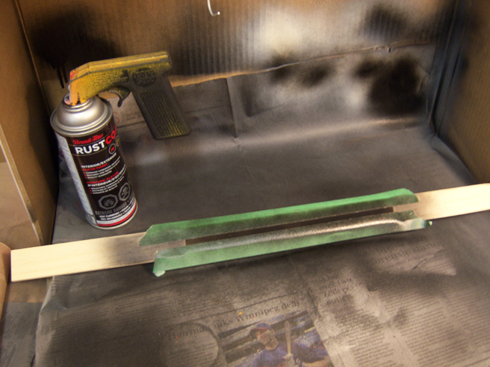
If you recall I mentioned that the open side of the “C” shape was there to allow the suspension hook to go unhindered. The wide back side of the “C” goes along the seam of the scabbard. In this case the seam was split open. Normally I would sew this back together using sail makers cord, why I have that in the shop I have no idea, however this particular seam was not of the type I have worked with before being completely flat. This meant that I would have to glue the seam very carefully and hope it held. The insert would also be glued which would also help hold the seam closed of course.
Being slightly paranoid I decided to paint a black strip along the insert in case the seam didn’t hold as I would not want the white insert to show. I have a small spray booth area set up for such projects so it was a simple matter of some masking tape and a can of black spray paint and, Bob’s your uncle, a potential problem was averted.
 0
0 -
Here’s where the fun starts. Bend the plastic around the piece of soft wood and secure it with tacks etc. I have used metal push pull pins, do NOT use the plastic topped style as they may tend to melt. I had these in the shop because we also do stained glass and the metal pins won’t melt if touched by the soldering iron. You can use metal thumb tacks just as well. Once pinned in place I used a hot air paint stripper to soften the plastic and get it to hold the shape I was going for. I found out that a hot air hair drier would probably work as well. My first attempt completely melted the plastic sheet so I had to start over. Warning, hot air paint strippers are extremely hot, which I knew, but I didn’t take into consideration the melting point of the plastic I was working with. Live and learn.
 0
0 -
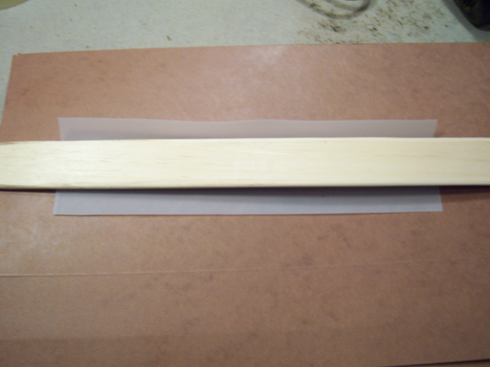
This is a photo of the piece of wood over the piece of plastic. The plastic will be bent around this wood form.
 0
0 -
Now for the tricky part; you want an elongated “C” shape for the brace, or insert. This shape is strong and once glued in place will resist bending in all directions. The width of this piece can be determined by taking a strip of the plastic scarp, if you have no scrap to this point then make some, and checking the shape of the inside of the scabbard. These swords have a long hook below the frog stud and this needs to be avoided by the insert. If you don’t then the plastic may deform out into the space where the sword will go and prevent the sword from being placed in the scabbard. The elongated “C” allows the hook device to sit between the edges of the plastic insert.
To get this flat piece of plastic in the “C” shape mentioned you will need a piece of soft wood sized such as it will fit into the scabbard. This needs to be a bit small so that the plastic which will be formed around this piece of wood will also fit into the scabbard. You need to measure the scabbard where the ends are broken and NOT at the brass mouth piece as you want the plastic which will be formed around this piece of wood to fit snugly into the scabbard.
 0
0 -
The length of the piece of plastic will depend on the sword but an eight in long piece should be sufficient. In this next photo I have set the piece of plastic against the scabbard to indicate where it will go in this particular case. You have to stay below the brass mouth piece of course.
 0
0 -
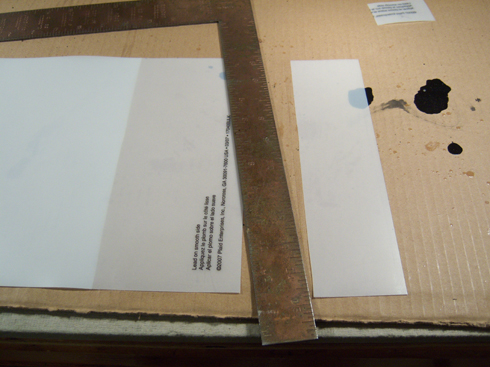
I like to have everything cut straight and square (obsessive personality) so I have used a framing square but any straight edge will do.
 0
0 -
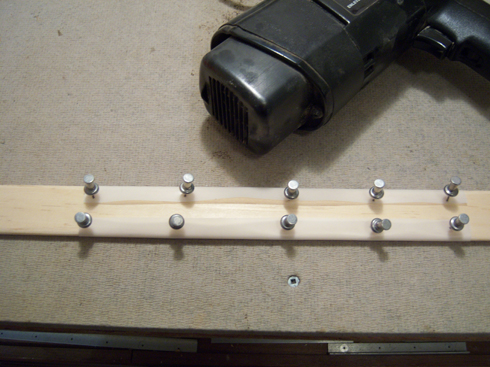
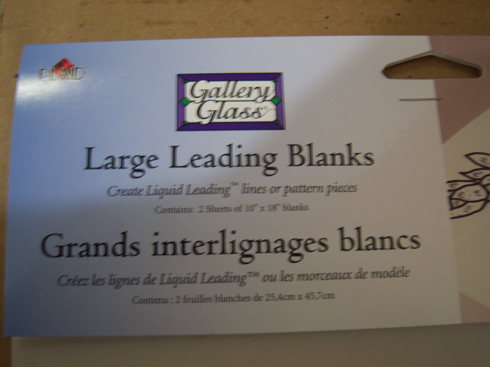
The method of repair I chose was to insert a plastic brace into the scabbard so that both sides of the break would be supported. You can’t just glue the two halves together as the joint would not hold up to any degree of movement as might be experienced when showing the sword or when removing the sword for inspection. Something must be glued in that area on the inside. You could use two flat pieces of thin leather but this might not give you the support you really need. I chose a thin sheet of plastic. This is used for glass stenciling and can be found in hobby stores. In case I don’t mention it as we go through this I used glue called Super Glue with a needle point nozzle. Use the gel type as it is easier to control. Wear latex gloves and be very careful as this glue will stick skin together instantly. I’ve shown the brand name of the plastic sheet but any thin plastic will do. I don’t worry about what might be in the plastic as I always keep my swords waxed but I don’t believe this particular plastic should present a problem any way.
Cut a piece the correct width off the sheet using a box cutter or some other very shape knife. I’ll get into how to determine the width later in this article.
 0
0 -
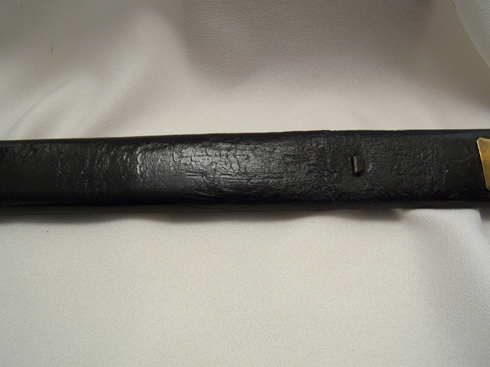
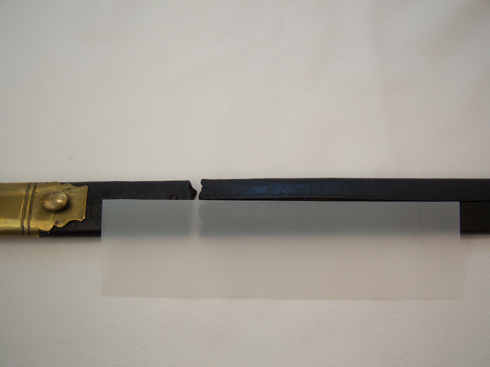
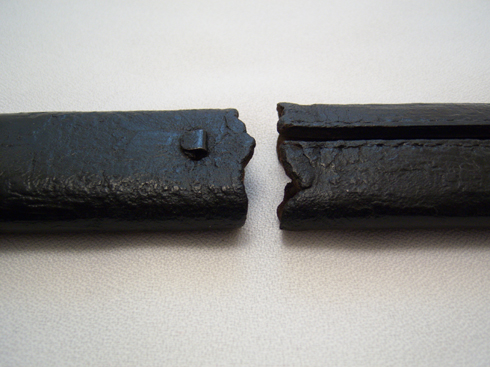
This is a closer view of the break. Because this was an old break the edges tended to be swollen a bit. This could be ground down with a very small wire wheel in a Dremel moto-tool. If the swelling is too much your repair will show. It will show a bit anyway but removing the high ridge helps to hide it somewhat. In the case of this scabbard the edges were not too swollen so I decided not to grind any leather away.
 0
0 -
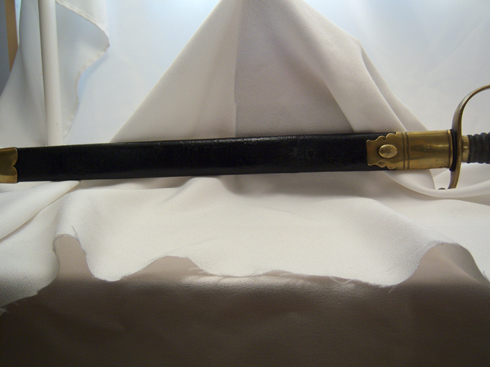
Repairing a Broken Scabbard
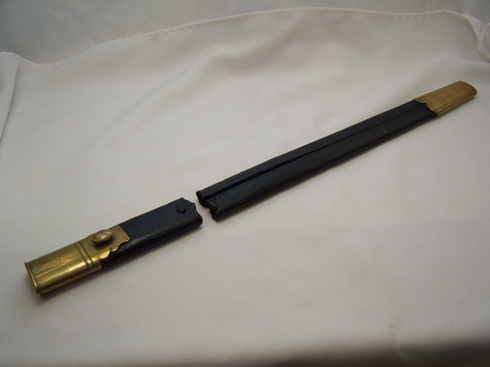
A few weeks ago I came into possession of a police sword to the Berks Police force; a nice artifact and quite rare. As sometimes happens the scabbard had been broken, rendering it in two pieces. The process to repair the scabbard is one that I prefer and one I am sure would make a museum curator or conservator cringe. My attitude is that a broken scabbard would have been repaired “back in the day” so why not now. If this was to museum standards the title would have been “restoring or conserving a broken scabbard” but it’s not and so this is considered a repair.
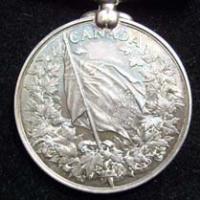
At the end I will show a curved scabbard to a Staffordshire sword that was repaired, I believe, back when the sword was still in use. I offer this photo as a comparison with the one I am repairing for this post.
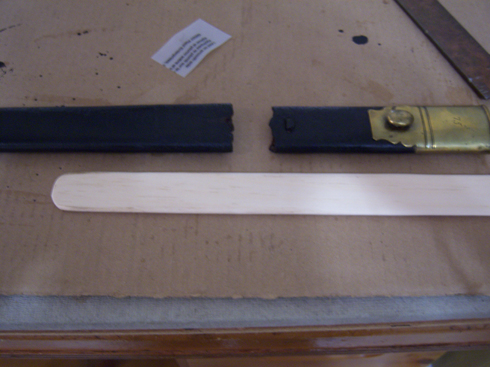
The first couple of photos are of the scabbard as I received it.
This may take several posts as I will attempt to cover the subject step by step so please be patient and “stay tuned”.
Regards
Brian
 0
0 -
That's interesting, Leigh. It would be great to see if the "other" fellow was in one of their photos. A photo of a photographer taking a shot from the other side of the street. If you still have the catalouge any chance of posting a photo on the form from the other view?
Regards
Brian
0 -
Re: AK 47s
Amen Peter, amen.
I too sold off my firearms collection and with it my Lewis Gun, I have regretted it ever since.
Regards
Brian
0 -
Hi Eric,
An interesting piece with the look of age. If it is a tourist item I would think it is indeed a very good one,
One of the things that is instantly evident is that is looks to be complete, that is to say it has no missing parts such as the hand guard. Considering the point has been lost due to what one would have to assume as years of wear I'm somewhat surprise to see the hand guard intact.
That's not to condem this specimen to the reproduction "file" as quite often an intact genuine artifact draws suspicion from the sceptics. I looks to me like the lines along the blade, which I would assume to be "fold" lines left from the forging of the weapon have been added after it was forged as decoration. Again that is not to say this is not an original or even a very old tourist item.
I suppose I could have summed this up in one sentence by saying "I don't really know"

It would be nice to have it in hand to look at it more closely but that is impossible so we'll have to hope another member has more information on this artifact.
Bottom line: I like it, regardless of its origins.
Thanks for posting it.
Regards
Brian
0 -
Hello Stephen,
Thank you for posting your medals here in the "Specials" section, they are a great group of medals and one can see that you are rightfully poud of them and your service.
I agree with you on your comment regarding those who sell their medals some day regretting it. Even if they themselves never live to regret their decision you can bet family members, be it children or grand children, will lament the decision.
Please do follow Mervyn's suggection and post your group under the "Post your own" section as many members will never see them under the "Special Constabulary".
Regards
Brian
0 -
Hi all
My name is Paul Newton and I work for the Public Relations department of Staffordshire Police. We're beginning to work on a new project, where we'll be celebrating the 170 year anniversary of the force in October by posting our history on our Facebook timeline.
We currently have 25,000 fans on Facebook (the most of any force in the country) and are continually finding new ways to engage with the community. We hope that by posting the history on Facebook, we'll attract new fans, and make those already fans interested in our history.
I came across this post on your forum, and wondered if you would like to work with us on our project. I'm especially interested in your photos of old helmets, uniforms and crests, etc.. to re post on our Facebook site. If we did this, for each photo we would thank the owner of the material, and also this forum.
Is this something we could look at?
If a forum moderator would like to contact me, my email is paul.newton@staffordshire.pnn.police.uk or call me on 01785 232334
Thank you for your time
Paul Newton
Hello Paul,
Welcome to the GMIC. You are more than welcome to use any of my material you find fitting.
I'll contact you via email a bit later.
Regards
Brian
0 -
A real treasure to be sure.
Thanks for sharing them with us, very interesting.
Regards
Brian
0
Repairing a Broken Scabbard
in Preservation & Restoration of Military Artifacts
Posted
Many thanks Mervyn, as usual you are too kind.
Regards
Brian