


Brian Wolfe
-
Posts
6,486 -
Joined
-
Last visited
-
Days Won
9
Content Type
Profiles
Forums
Blogs
Gallery
Events
Store
Posts posted by Brian Wolfe
-
-
Hi Tony,
Interesting results and a process that is well worth keeping in mind for other members to attempt in the future.
Thanks for posting the outcome of your experiment.
Regards
Brian
0 -
Excellent communications equipment find, congratulations and thanks for sharing it with us.
Most interesting.
Regards
Brian
0 -
Hi Gordon,
Very nice and from what I have been told quite rare to find them with the carrier. At a show near here I saw one on a dealer's table. I don't think it was a nice as yous, and during the conversation that was being held between the dealer and a possible buyer it was said that the carrier is harder to find than the drums. I suppose this makes a lot of sense considering in the case of those in carriers it would be a 3 to 1 ratio.
Thanks for posting this interesting and rare item, it is greatly appreciated.
Regards
Brian
0 -
A great find and the additional history together with the sabre makes this an exceptionally informative and interesting post.
I tend to think the last Spanish sabre issued was a far better sword than either the British or the American issues as far as being a good all all around sword.
Regards
Brian
0 -
Some very nice truncheons to be sure. As always you have not simply stopped that the "look at this" stage and added some excellent information regarding replicas. You may have saved some members (me included) from making a very expensive mistake in purchasing one of the Indian copies as an authetic specimen. When we are at militarial shows it is sometimes hard to look at a specimen and relize that something is wrong. The image of a British police officer holding one of these out at arm's length, as identification, should stick in our heads for future reference.
Many thanks Mervyn.
Regards
Brian
0 -
Never write off the Canadians as being kind and gentle, that's just what we want you to think.
")
Back in the 1960s they used these "Zaps" as well as a small truncheon that comprised of a flexable metal spring-like shaft with a larger handle with a weighted cylindar afixed to the tip. The whole thing was covered in heavy black leather. The OPP used to carry these in their back pockets with a leather loop hanging out for quick retrienal. These were about 7 or 8 inches in length.
I suspect they stopped using them as they could be real skull crushers.
Regards
Brian
0 -
When I decided to move my office downstairs to a room next to the collection room I thought I had the space problem solved for years to come by using the office for part of the collection as well. After unpacking the stored items I find myself in need of more room and it has only been four months!
We are all doomed I tell you...DOOMED!

Regards
Brian
0 -
Hi Mervyn,
These were also used in Ontario, Canada by the Ontario Provincial Police in the 1960s.
Regards
Brian
This is an American Police pocket club - known as a 'ZAP'. 8 1/4 inches (21cm) it weighs 6 1/2 ozs.(205gms) and is filled with lead.
0 -
Astrophysicists who tell us space is infinite obvious are not collectors. Well done in finding a solution to the problem Chris. I’ve often said that just about the only space I have left in the collection room and the office is on the ceiling.
Regards
Brian
0 -
Hi Chris,
I can't see the attached photos either.
Brian
0 -
Thanks for that information Leigh, very interesting.
Regards
Brian
0 -
Hi Gordon,
An interesting weapon and one well worth adding to any collection. The right mounted clip is indeed unique and I have often wondered why this was done. My collection of sub machine guns are all mounted facing to the right so my Stens have to be displayed without the mag in the weapons.
Thanks for posting this interesting and historic arm.
Regards
Brian
0 -
-
Yes, I believe you are correct. Upon checking ER is in printed form on any photos of the gurads and in script for the George series. I shuold have remembered that but like eye sight memory wanes with years as well.
Regards
Brian
0 -
It looks like ER to me. I held up my Geo V specimen as a compairison against the x-ray of yours and noticed there seems to be neither a "V" or "VI" for one of the King Georges and there would appear to be an "E" in the scroll. From the photo it looks like the King's crown which seems odd to me. I hope others, perhaps with better eyesight, will comment.
Regards
Brian
0 -
Hi Leigh,
Very intertesting sword.
What did you use to get the last photo was the sword guard X-rayed or some sort of Untra-sound used?
Regards
Brian
0 -
I always figured those Canadian Geese were doing something more than simply crapping in my yard.
Actually those are some of the drones we have developed. We offered them to the U.S. Government for trials in the Middle East but they were not all that successful. I suppose making then all look like either a Canada Goose of a Northern Loon may have been a slinght error.

Back to the drawing board.
Brian
0 -
The sword has never seen combat as it has never been sharpened even though it is a Geo.V era sword. These had the bumb-bell shaped blade and only the last 4 inches would have been sharpened but this one was not and was no doubt used for dress parads etc.
This type of damage is common to mis-handling by either the owner's heirs or a careless dealer. Due to the weight of the sword if it is held by the scabbard upside down and is bumped the guard can be damaged if it strikes something hard. This type of damage is not what you would normally find if used in battle, that and the short time swords were still used during the First World War makes this likely damage through carelessness.
Hmm, I never thought of you being put up to your harassment by my wife. You are now on the "watch list" and I'll assign a staffer for the Home Office to monitor your communications. Unlike your FBI we enjoy immunity from prosecution for unapproved surveillance, mainly because we are so secret we don't exist...or do we.

Regards
Brian
0 -
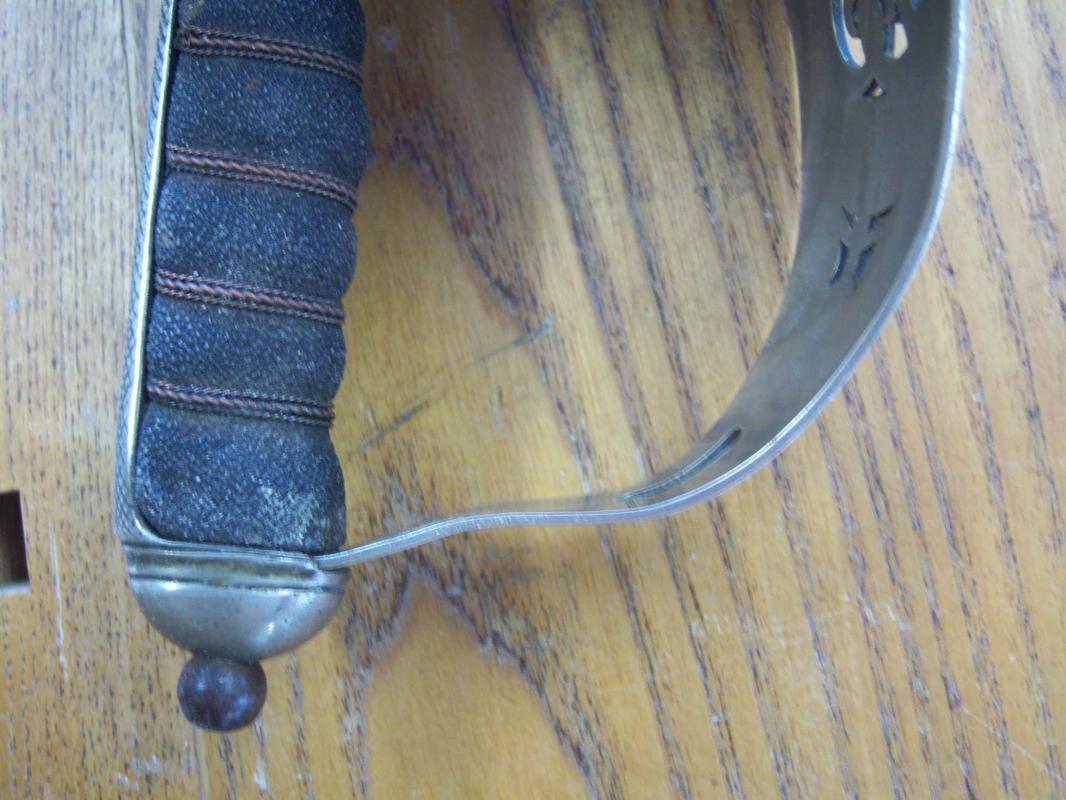
Repairing a Sword Guard
When I am running the shop I like to have several projects on the go at one time when possible. Many times I find myself with all of the projects that absolutely must be completed as soon as possible in a stage where everything is “in clamps†waiting for the glue to set up. It is during these “down times†that I will tackle some repairs to the items that need it from the collection.
Today I am showing how I repaired the bent hand guard on a pattern 1895 Infantry Officer’s Sword. A common injury to swords stored in their scabbards often occurs when the sword is moved from place to place by people unfamiliar with edged weapons. The sword is either carried or passed to another person with the grip downward allowing it to slip from the scabbard and bending the guard upon striking a hard object, usually near the narrow part of the guard near the grip.
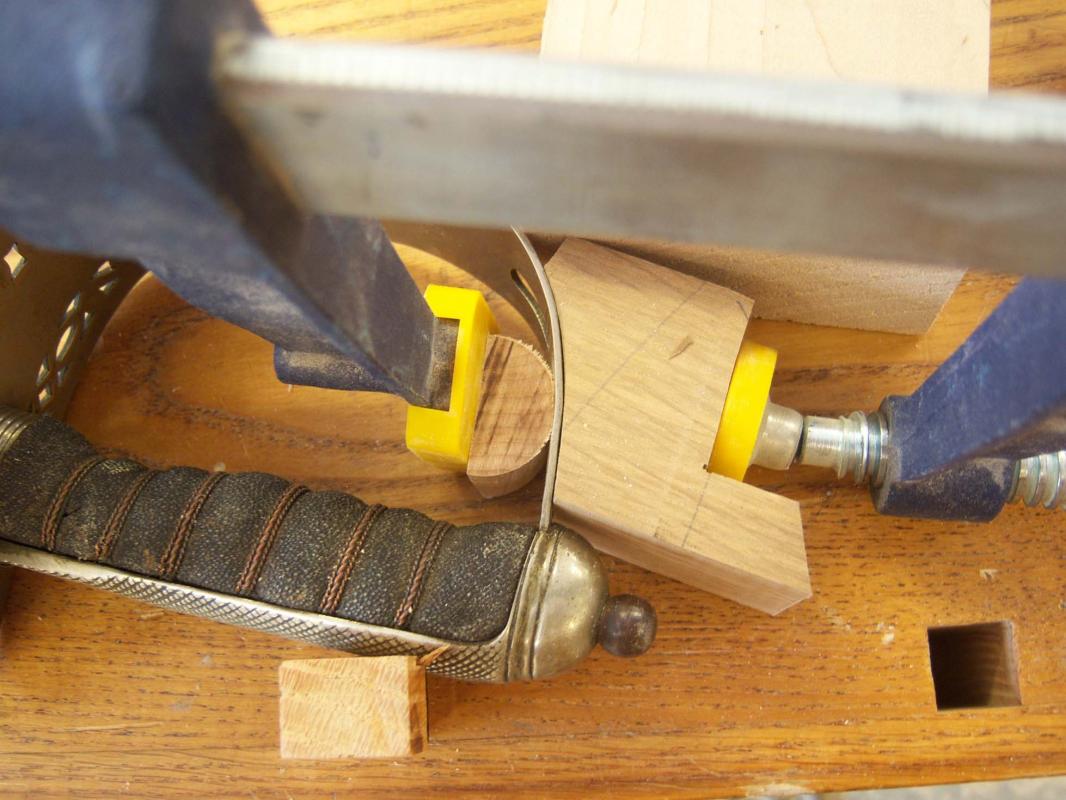
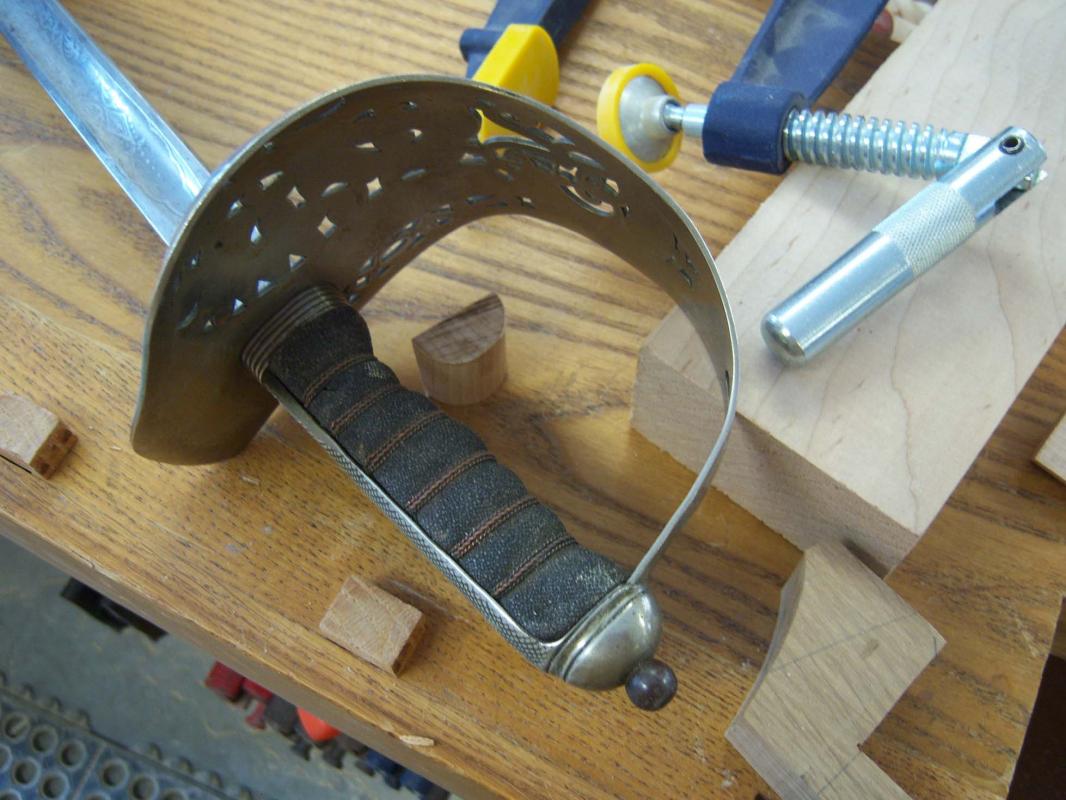
The first photo shows the damage. While not drastic it does distract from the overall appearance of the sword and should be repaired.
The first thing you will need to do is to determine the proper curvature of the guard in its undamaged state. Once you have done this take a hardwood block and cut that curve so you have something close as possible to the correct shape to bend the guard to. You will also need a large hardwood dowel cut in half which will be used to force the guard into the curved piece. As you can see in the photos below you will need to cut the hardwood block, in this case white oak, so that the clamp you will be using isn’t going to slip off the block when you start to tighten it down. Set the hardwood dowel aside for now. Use a screw clamp and not one of the quick-clamps you may have seen in some of my other “how-to†posts because you need lots of pressure to bend the metal and quick-clamps will not do as good a job (and they “kill†your wrists when trying to squeeze them hard enough). The jaws of the clamp should have protectors on them to prevent damage to the sword guard.
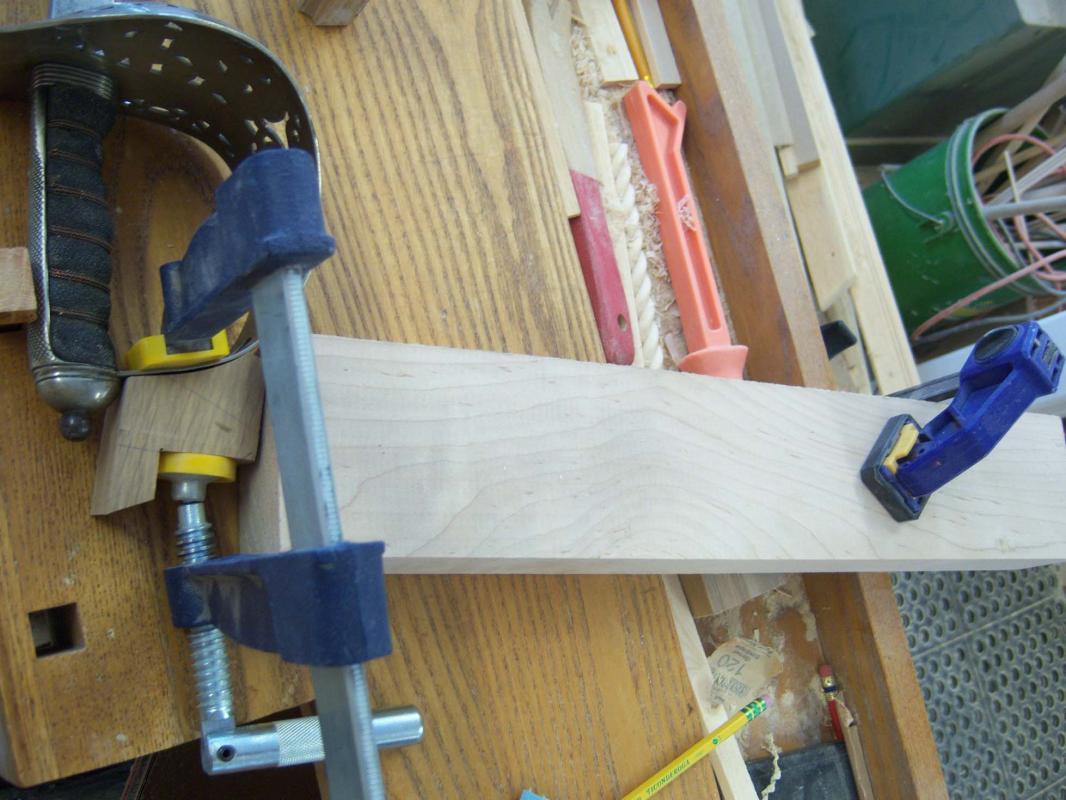
This will bring the guard close to the correct shape. Next re-clamp using the ½ dowel which will bring the metal further into the curvature of the hardwood block. Note that the sword will have to be secured to the table of workbench as in this case. I was able to use the bench dogs or vise clamp pins to secure the sword handle in place. My “dogs†are made of red oak and will not scratch the sword, do not use steel dogs...for anything...ever. If you can’t find wooden bench dogs then make your own; you’ll thank me later. Most people will not have a workbench and may only have a work table so you can use blocks clamped to the table to hold the sword as well. You’ll notice I’ve also used a large block clamped to the bench at the back of the sword in the photo that serves to hold the sword in place.
Tighten the clamp again using the wooden ½ dowel as shown to bring the guard to its correct shape.
You should now be finished and your guard should also be back to near original condition, or as original as you can get it. If it needs further “bending†you will have to cut the curve of the hardwood block a bit deeper and using the ½ dowel bend the guard using the clamp and see if that is enough. I was happy with the way mine turned out and I hope you will try some repairs of your own as it greatly increases the overall appearance, the collectability of the item and with it the value.
Happy restorations.
Brian
0 -
Thank you Peter for providing the information regarding the authentic product.
Of course I wanted to avoid getting any white residue all over the place and knowing me it would even end up on the walls.
Thanks again.
Regards
Brian
0 -
Wall rack – helmet
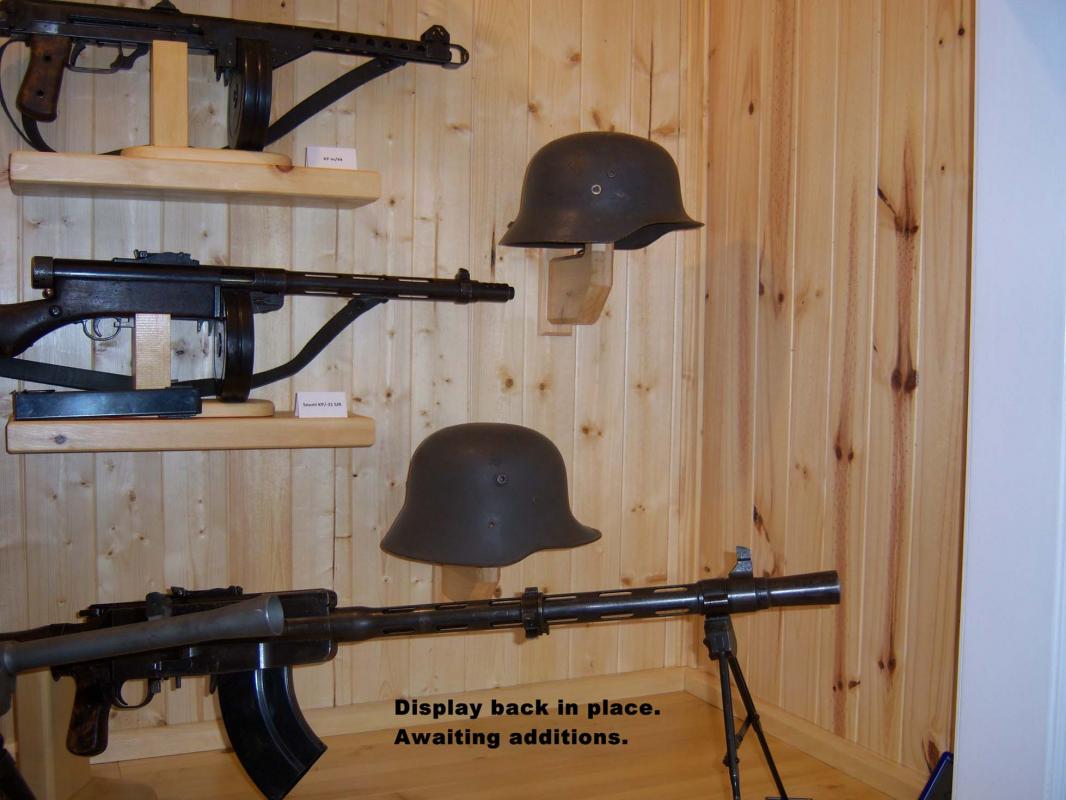
After noticing that the helmet stands I featured above were much like many other such stands on the internet I wanted to make something a little different. Upon looking around the collection room I had the realization that most of us either fill up our wall space or our counter top display first. I must admit that I have little space left on either the walls nor the counter top display areas. That aside, there is usually room in one of the two areas that have not yet been occupied.
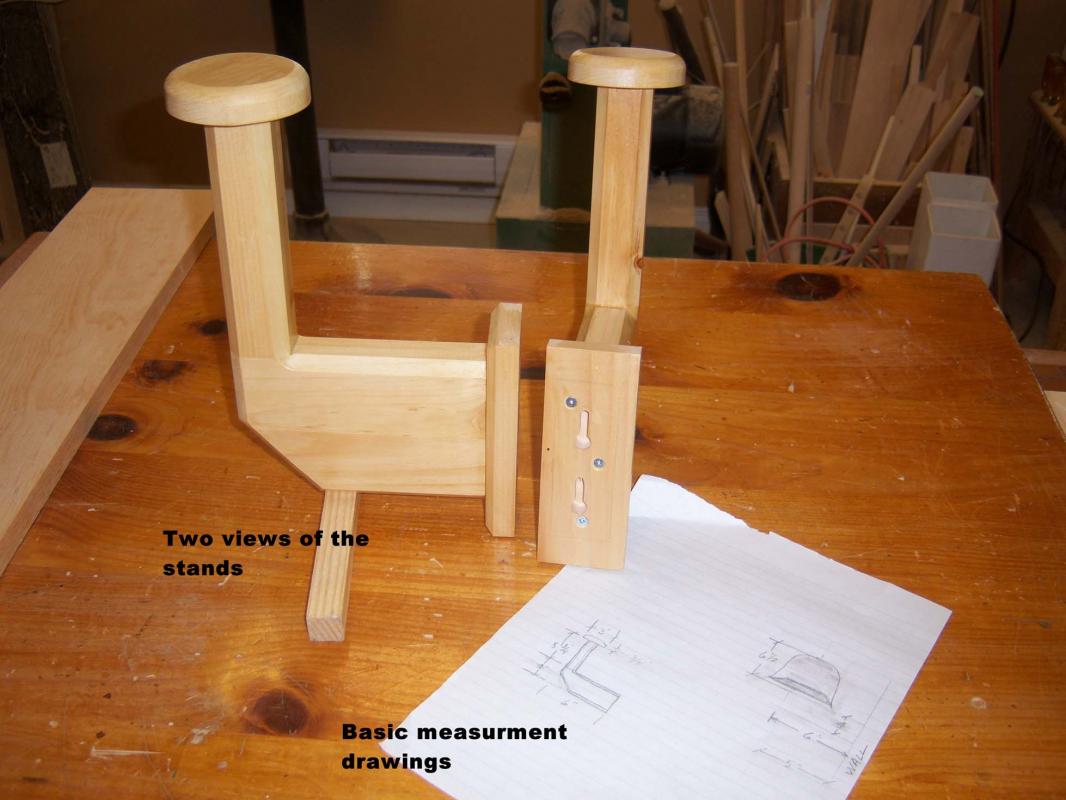
I have put together two wall mounted helmet stands which might be of interest. They are made of pine and held together by glued dowels, with the exception of the wall mounting bracket which is held on with long screws.
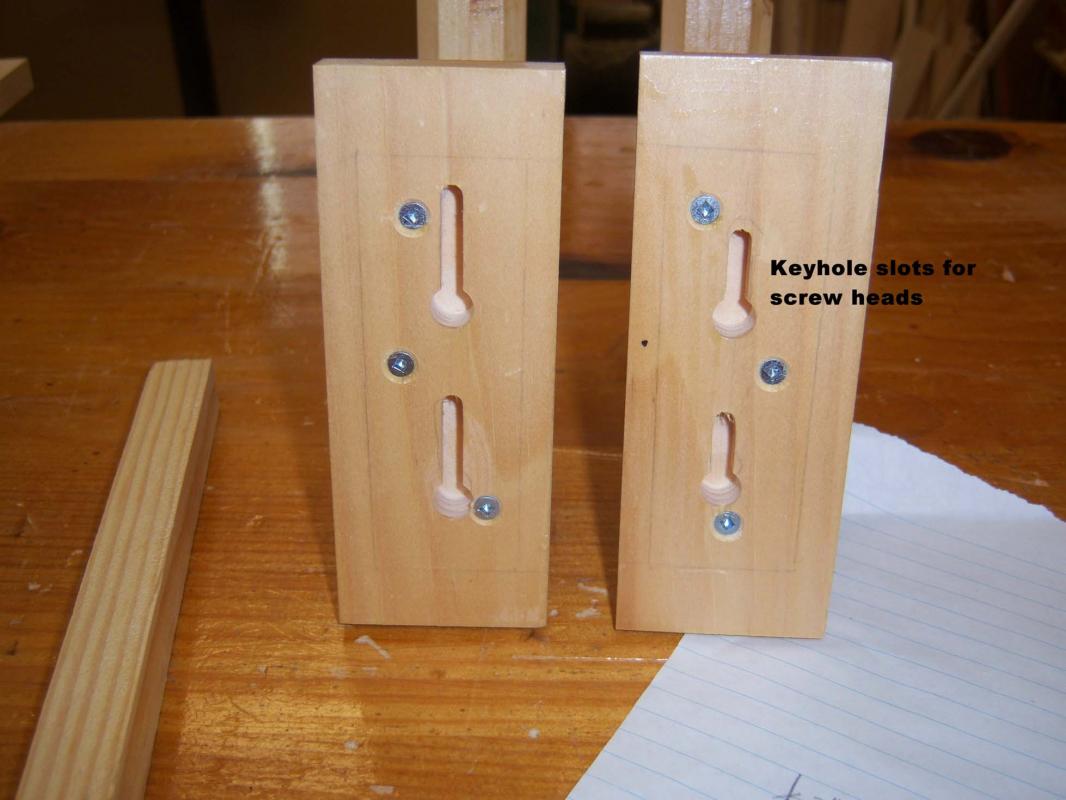
I used long screws to install a wall mounting plate which had two “keyhole†slots using a router bit cut in the back for the screws. These fit over screws in the wall affixing the stand without any visible means of attachment. I really like using this method as it not only looks neat it can also keep the uninitiated guessing as to how you achieved the mount without screws; or at least looking like you didn’t use screws. You may wonder why I didn’t simply use the router on the horizontal piece that holds the helmet stand column to the wall. Because of the way the grain runs any use of this method would not be strong enough and the weight of the helmet might just tear the screw heads through the stand support.
http://gmic.co.uk/uploads/monthly_02_2015/post-1801-0-26381700-1424805558.jpg
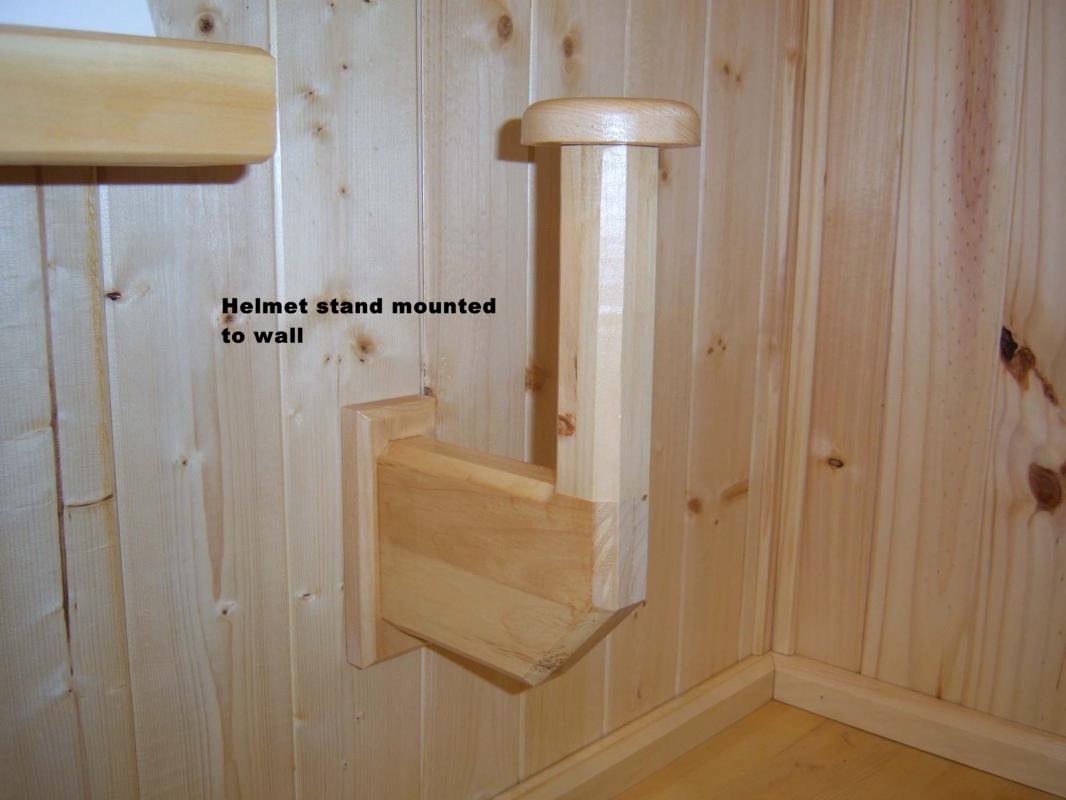
I won’t go through a lot of description of the stand’s construction other than to say I glued up thinner boards; using two ¾ inch pieces to make 1½ inch thick stock. I may have gone a bit too heavy and any other wall mount stands I might attempt will be constructed using thinner stock.
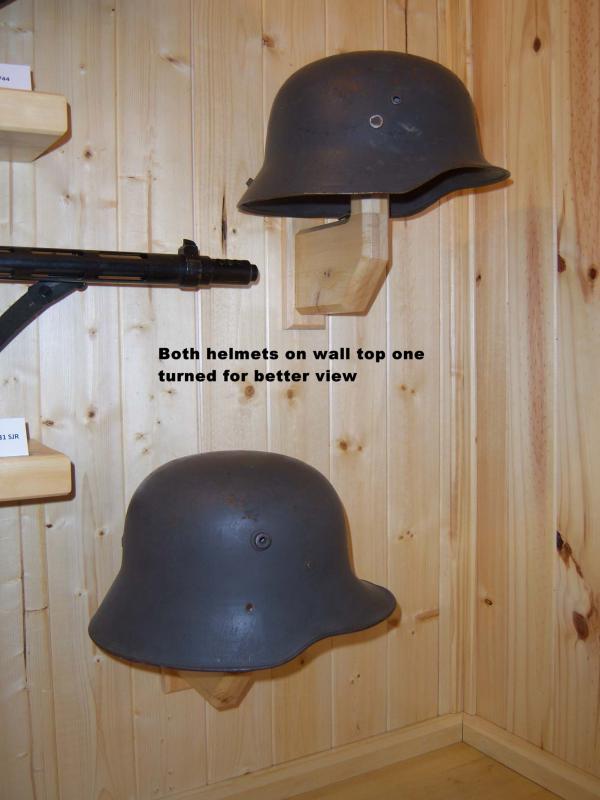
The great thing about the round top that the helmet rests on is that you can turn the helmet to allow for the best view. I have done this as the helmets in my display are close to the corner and I wanted their profiles to show as well as possible.
http://gmic.co.uk/uploads/monthly_02_2015/post-1801-0-78931600-1424805628.jpg
I hope you like my latest shop project and will try this yourself sometime. If you have any questions please feel free to leave it in a reply to this post or contact me directly through email or a PM.
Regards
Brian
0 -
There is something unfinished about any long firearm such as a musket or modern rifle that is without its sling. To me it is not properly “dressedâ€. Many of the muskets and even rifles and their accompanying kit of the British Empire were white. Many times these were coated with what was known as Blanco and therefore the finished kit and even including the Wolseley-style helmets were said to have been Blancoed.
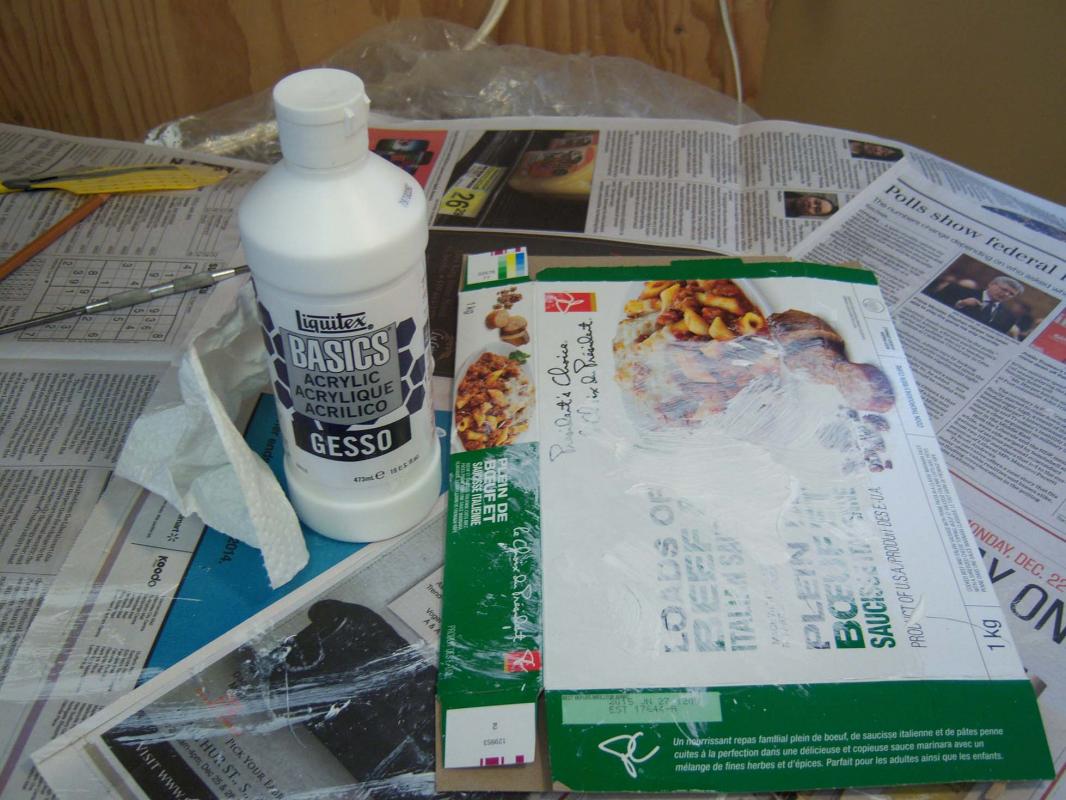
A search of my small area of the world revealed that the product know as “Blanco†was unavailable; so what to use. Further reading suggested that I try what is called “Gesso†an acrylic compound that artists use when preparing their canvas to accept the paint they will be using. So it was off the art store in a neighbouring city with the faint hope of finding Gesso. I say “faint hope†as I have found that trying to locate some much needed materials here in my part of Ontario quite often ends in disappointment. The young lady at the art store was very helpful and if I were fifty years younger... Who am I trying to kid, I would have left with the Gesso after having been too scared to strike up a conversation with the young lady. Even at sixteen I was constantly engaged in such projects, which as my wife likes to point out, is why I have no friends from my youth.
Original nerd!
http://gmic.co.uk/uploads/monthly_02_2015/post-1801-0-84725900-1424544261.jpg
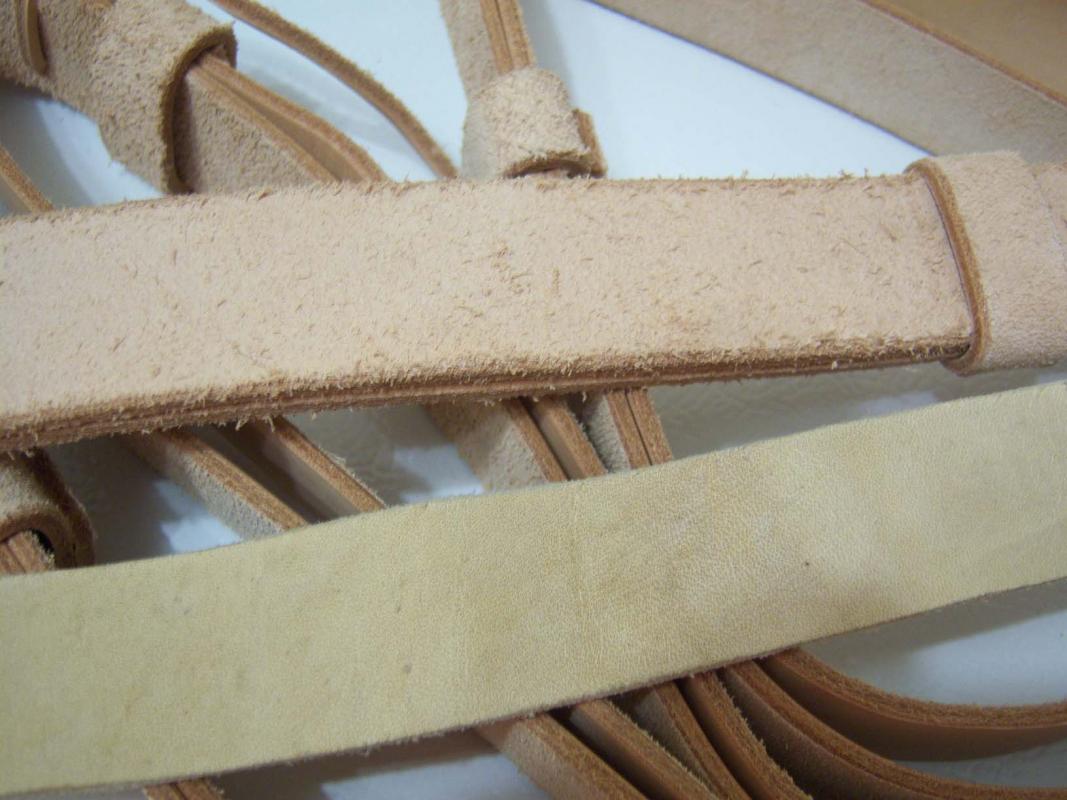
Quite a while ago I had several leather slings custom made in England for my muskets and black powder carbines. I say “custom made†only in the sense that I had contacted a gentleman who produces these slings and asked that he make mine “inside outâ€. That is to say with the rough unfinished leather on the outside and the smooth side inside. I could have simply used smooth sided slings and turned them around but the fastening rivets would have also been the wrong way around. There is a section of an old possibly original sling shown with the newly made slings so you might get an idea of how older slings look after several decades.
Gesso is a thick liquid not unlike acrylic paints used in art work, so in a sense I suppose this is actually an acrylic white paint used as a base coat on canvas. At first I thought to use a small tin can to hold the Gesso but soon found out that applying a “gob†onto a piece of cardboard, much in the manner of a artist using a paint pallet worked best. I use a lot of disposable brushes in the shop and decided to try one of these in my first attempt; first big mistake. The Gesso is thick and while disposable brushes work well when applying pre-stain and then stain to a piece of furniture I found the black bristles tended to pull out of the brush at an alarming rate. Since I also found that the water cleanup worked very well on the brush the second sling was painted using a good quality brush. The second big mistake was not taking the sling apart. I thought to coat all of the areas I could get at and any areas under the leather loops could be done at a later time after the first coat had dried. Not only did the Gesso tend to stick all of the moving parts together the areas where the Gesso had not been applied presented a problem that in hindsight I should have anticipated. The second coat left the formally untreated areas quite visible, so a third coat was necessary to blend everything together.
The second sling was disassembled and even the first coat was a vast improvement over the first experiment. A second coat may not have been absolutely necessary but a second coat was applied anyway. I should mention that Gesso is non-chalking and by that I mean it will not rub off onto the musket or your clothing once it is dry. I purchased a couple of Martini Henrys a number of years ago (since sold) that had slings that were coated with liquid white shoe polish. This did “chalk†and where the sling touched the stock a white mark had been left. If you rubbed your hand over the sling the white chalk-like residue came off. I would never recommend the use of liquid white shoe polish on any piece of military kit, unless you know of one that will not leave a chalky residue.
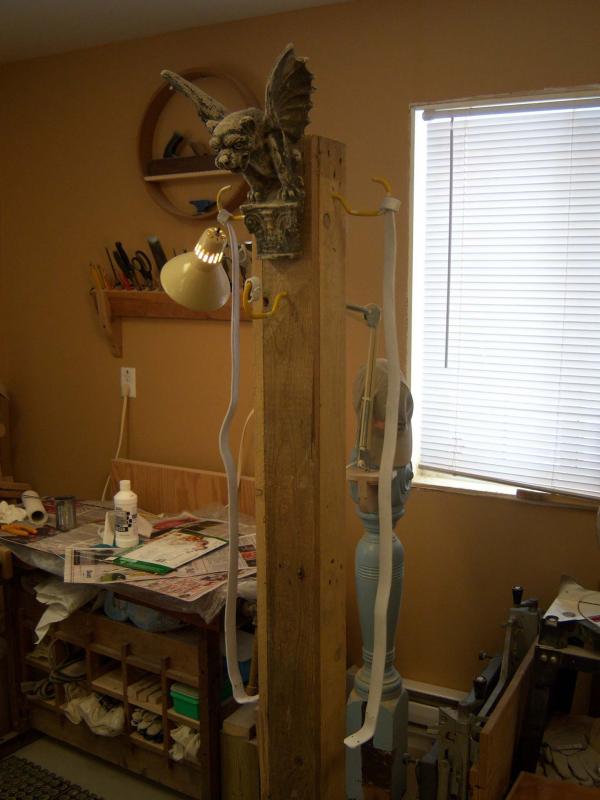
I am fortunate to have a shop where I can do just about any project that my humble talents will allow. In the shop I have a drying pole (see photos) where smaller projects that would not dry well on a bench are suspended. The pole, especially with the gargoyle at its top, probably looks like something that would be better suited to a medieval torture chamber but take my word for it this is indispensable when working with smaller projects.
http://gmic.co.uk/uploads/monthly_02_2015/post-1801-0-44926800-1424544362.jpg http://gmic.co.uk/uploads/monthly_02_2015/post-1801-0-07514600-1424544385.jpg
If you want to attempt this but lack areas in which to work you can put down some news papers on the kitchen table, coat the sling and suspend it, using some coat hanger wire, from your shower curtain rod. Gesso is thick and it dries very quickly therefore there is no problems with it dripping onto the floor or bathtub. Being water clean-up any accidents you might have can be cleaned up quickly and easily (before your wife returns from shopping). I would suggest wearing latex gloves when working with Gesso or any liquid finish even though they may be water soluble. Any colouring tends to get under your fingernails or in the creases of your hands so gloves are a good idea.
You will find that the Gesso has made the sling slides harder to “slide†and the installation is somewhat of an ordeal. Be patient and keep working the sling strap through the slide loops, it will eventually go where you want it. If you find that the musket or rifle sling loops were not as clean as you thought them to be and this has left some dirt or grease on the sling I would not get too concerned. I don’t like additions like a sling looking like it just came from the factory as it doesn’t match the weapon, most of the time. A little grime simply ages the sling and makes it look more authentic. There are aging tricks you can do to make your sling look absolutely “period†but that is something that would be better left for another post at a later date. Just keep in mind that a little dirt and grime is your friend, if you are looking for an authentic look to the sling.

This may be a little work compared with purchasing a ready-made and pre-coloured sling but I am sure anyone can pull it off. The reason I have posted this project is, as always, in an attempt to encourage you to try this yourself.
Regards
Brian
As a postscript; if you want to have an authentic look to your musket sling then try my method. If this is not all that important to you simply purchase a pre-coloured white sling; it is a lot easier, though a lot less satisfying in the end.
0 -
I suppose the military thinking of the time didn't rule out the sword as an effective weapon.
Great photos, thanks for posting them.
Regards
Brian
0 -
Well worth saving Jock.
Well done.
Regards
Brian
0

Luftschutz 3 piece Gladiator
in Germany: Third Reich: Uniforms, Headwear, Insignia & Equipment
Posted
Hi Jock,
A nice helmet indeed and it is a shame about the defacing. As if that will make what occured in the past never happen again.
Regards
Brian