-
Posts
6,486 -
Joined
-
Last visited
-
Days Won
9
Content Type
Profiles
Forums
Blogs
Gallery
Events
Store
Posts posted by Brian Wolfe
-
-
I am not totally convinced either way, regarding to digging up artifacts. My concern would be that to leave these artifacts alone, undisturbed, sounds like a good idea however I think the action of the acids in the soil and the dampness will soon deteriorate whatever might otherwise by preserved and studied to the point of just being stains in the soil.
As far as comparing battlefield artifacts to a crime scene, as soon as the evidence is deposited it starts to deteriorate, either through the actions of nature or human contamination. The documentation and preservation of evidence (in a crime) is of paramount importance. To suggest that evidence should be left undisturbed until everyone is certain that nothing that will be done will harm the evidence, no matter the length of time required, and would certainly make the guilty parties quite pleased.
Perhaps I have just convinced myself as to my stand on this issue.
Regards
Brian
0 -
Hello Bernhard,
Thank you for bringing this sad anniversary to our attention.
Looking back on events with calmer and clearer minds it is hard to imagine why such events took place.
Regards
Brian
0 -
Oh my.

If it is a genuine artifact then it would certainly be a propoganda piece.
Regards
Brian
0 -
Well done and a fitting tribute to a brave soldier.
Thanks for showing your excellent work.
Regards
Brian
0 -
0
-
I missed this post when you first entered it but I'm glad I saw it this morning.
Thnaks for an interesting post, Mervyn.
Regards
Brian
0 -
It looks like a field take down tool. I've been looking all afternoon for a photo of the one I'm think of but with no luck.
Regards
Brian
0 -
We're not cheap we just like to get our value out of our equipment.

Regards
Brian
0 -
An excellent specimen and thank you for posting the sword along with the history.
A very interesting and informative post.
Regards
Brian
0 -
Hello Andreas,
It is really hard to tell from the photos as you really need to hold a sword in your hands to tell if it is the real deal or not. I would be very careful about purchasing this sword as it is telling me that it is a Chinese made reproduction. The horse motif bothers me but the Fuchi (medal ring above the Tsuba or hand guard) looks to be about twice as wide as it should be. I also worry about the shibabiki (metal decoration) and the Ishizuke (the chape on the scabbard's end) in design and the way they fit. To my eye it lacks the usual attention to detail in the match between them and the saya (scabbard).
I hope other members will weigh in on this with their opinions.
Thanks for posting this.
Regards
Brian
0 -
Hi George,
I have a fair collection of these and yours certainly look authentic to me.
From what I understand there are so many sake cups on the market due to their popularity that reporducing them would not be profitable.
Thanks for posting them and I hope others with more knowledge than I have will respond.
Regards
Brian
0 -
Hi Tony,
I was afraid you didn't have any left and was really happy to see them featured here today.
An excellent job and very creative. Made from the scrap bin? Now that is near and dear to my heart.

Regards
Brian
PS, Just to show you how impressed I was, I NEVER use the
 icon.0
 -
Hello Miles,
Welcome to the forum.
While I can't help with any more information than you already have I wanted to say that you have a real family treasue and well worth keeping safe for generations to come.
Regards
Brian
0 -
Hello Lambert,
Excellent job on the mounting, well done.
Regards
Brian
0 -
Thanks Tony.
The other day I thought that I would "Google" "helmet stand images", which I had never done before, and was surprised at how much mine looks like many on the internet. So much for originality.

Too bad your stands are all gone, I would have liked to have seen them.
Regards
Brian
0 -
Hi Eric,
It`s been a while since I sold my example of the Australian Machette Bayonet Mk. I, but if memory serves me well the one side is flat with the other side having the sharpened edges. This allows the bullet to pass along the side of the blade rather than passing over it as in most other bayonets. The blade edge on the bottom is sharpened as is 4 inches of the top edge, the idea was to make this a better thrusting weapon. Some bayonets used in other countries are mounted with the sharp edge upward allowing for a slashing injury when withdrawn with a slightly upward action. This Australian bayonet was developed in 1944 for jungle combat and was originally developed for paratroopers. As the name suggests this bayonet did double duty as a machette. Sorry, I don`t have any photos of the bayonet in use.
Regards
Brian
0 -
Hi Eric,
I like the low profile stand as well though I do make some much taller, it just depends on where they will be displayed and if I want to display something else beneath the helmet, a badge for example. The great thing about the low profile is that you can always make some more disk shaped pieces and put them on top of the helmet support piece to give it a higher profile. That is a lot easier than trying to shorten a tall one after is has been built, I know. I have done it.

Regards
Brian
0 -
British Pepper Box Pistol
Maker: Charles Osborne 1830 – 1850
Cal: 9mm (measured, research show these could be 13.9mm as well)
O.A.: 8 inches
Barrel: 2 ¾ inches
Ever since the days of the first pistol one of the main problems was in having only one shot before the need to reload was necessary. In the case of multiple adversaries the only answer was to carry more pistols; two being the most practical considering the size of the pistols of the day. Attempts were made to add a second barrel and smaller pistols were developed, still there was a need to be able to deliver more than one or two shots before reloading. Also until the invention of the percussion cap any pistol with more than two barrels was a design nightmare, not to mention the cost of such an engineering marvel.
http://gmic.co.uk/uploads/monthly_01_2015/post-1801-0-48891100-1422374393.jpg http://gmic.co.uk/uploads/monthly_01_2015/post-1801-0-77441100-1422374424.jpg
Around the mid 1850s revolvers were becoming popular; the biggest drawback was the price tag for one of these multiple round weapons. Another problem with early revolvers was the loss of propellant gasses due to the gap between the cylinder and the barrel. In answer to these two problems the multiple barrel pistols were born. The example here is a bar-hammer pepper box pistol c.1849. This is a six barrelled percussion cap pistol with the hammer mounted on the top of the pistol in the form of a bar. The pistol ammunition, in this case measuring 9mm, was loaded from the muzzle of each barrel as one would any black powder pistol preceding this design. A percussion cap was pressed onto each percussion nipple and each time the trigger was pulled a freshly loaded barrel was presented for firing. On the edge of each muzzle you will see groves filed into the metal used to indicate which barrel had been loaded and which ones were empty. This, of course required the person loading to start with the barrel with one filed mark and progressing through each one until the one with six groves was reached. These pistols were not designed to be loaded “in the fieldâ€, more accurately, on the street, and were “charged†at home before leaving.
http://gmic.co.uk/uploads/monthly_01_2015/post-1801-0-97947000-1422374476.jpg http://gmic.co.uk/uploads/monthly_01_2015/post-1801-0-73601700-1422374504.jpg http://gmic.co.uk/uploads/monthly_01_2015/post-1801-0-02418200-1422374536.jpg
The biggest advantage of the pepper box over the revolvers, in the day, was cost. These were a lot less expensive to make and therefore cheaper to purchase. The biggest disadvantages were the difficulty in reloading when outside the home and accuracy. These were smooth bore pistols and suffered from the same inaccuracy problems of all smooth bore muskets. The pistol, especially the British made Colt pistol of the time, was “rifle bored†giving them greater accuracy because they shot a bullet-shaped projectile through a rifled barrel rather than a ball through a smooth bore. It should be noted, however, this six barreled pistol had the same accuracy of any smooth bore pistol of the same barrel length of the time period and of those that preceded it. All short barreled pistols, of any time period, including today, are suited to close range use.
Certainly the short time period in which these were made makes them one of the rarer types produced; a foot note in the time line of handgun development.
Regards
Brian
0 -
I'm with Mike on this one. I've purchased groups from dealers and they often do this when sending the medals in the post. It's simple, quick and works really well.
Regards
Brian
0 -
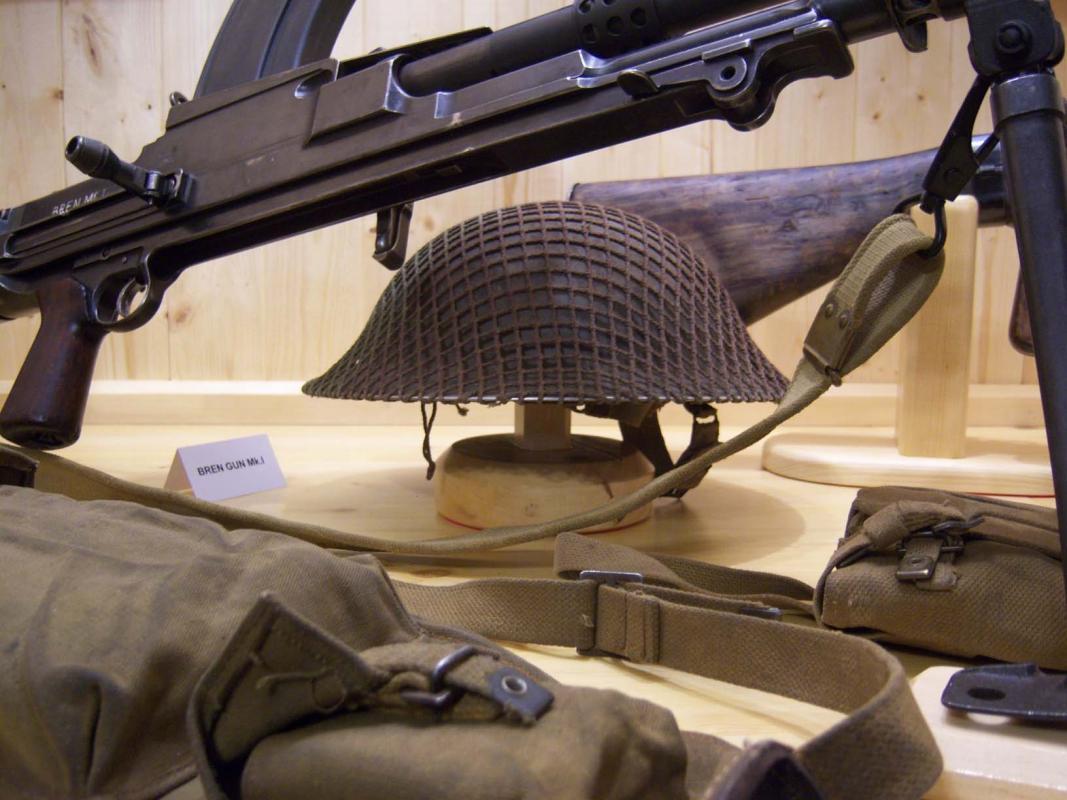
I missed a photo and figured since I've put this much work into the post I might as will post the last photo as well.
Regards
Brian
0 -
DIY Helmet Stand – Tutorial
A number of years ago a friend of mine who is a police officer in the UK sent me a Bobby’s helmet as a gift. I did not want to display the helmet with the weight resting fully on the rim and peak so I decided to make a stand to support it in my shop. This worked out so well that as I added more and more helmets, both police and military steel helmets, I continued to make more stands. I was unsure of just how many I had made that when I was writing this piece I was going to take a guess at a couple of dozen. Then I thought that this would probably be an exaggeration and that you deserved to have an accurate number so I counted them. To date I have made 41 stands for my helmets and hat collection. Not really that many if I were a collector of head gear, however quite a few considering I didn’t consider myself as a collector of helmets. Anyway, I thought that I would share with you how I go about making stands for my helmets.
Normally I work in hardwoods such as red and white oak, walnut, maple and so on. However I needed four stands for some helmets that were being shown in a display that had been lined with knotty pine. Because of this need the stands I will be showing are made of pine. I made eight altogether and stained the four not going into the display a darker colour using Minwax English Chestnut stain followed by four applications of clear coat.
><
The first step is to get some material. I used 1½ inch thick by 6 inch (5½†actual dimension) wide pine for the base and ¾ inch thick by 6 inch wide pine for the helmet support for the top. The column is made of 1¼ inch wide stock but you can use some of the 1½ wide material as well; I just happened to have some 1¼ inch wide material in the shop scrap bin.
I have tried to make sure that I didn’t make use of machinery in the shop that most people wouldn’t have at home and when I did I made sure to mention the other tools that you can use that might be more readily at hand. I’ll suggest alternative tools as we progress.
The first step is to draw a 4 inch circle on the 1½ inch board, make sure you mark the centre well as you will need this mark to locate the position of the holes that you will be drilling later. I would suggest using a compass to draw the circles as the sharp point of the compass will leave a location hole for the drill. Once you draw the circle cut it out using a band saw or a jig saw. You can use a regular saw and just take several cuts around the circumference. Don’t try to cut on the line, leave a little “waste†which we will sand off later. If you are using a regular straight cut saw you will probably have a little more sanding ahead but this is not a race so take your time.
Shop safety tip: Do not go into your shop or start a project if you are upset or tired. No matter what the tool supply companies will tell you a shop is NOT where you go to unwind. They are in the business to make money; you are in the business to keep your fingers where they belong.
A word about warping:
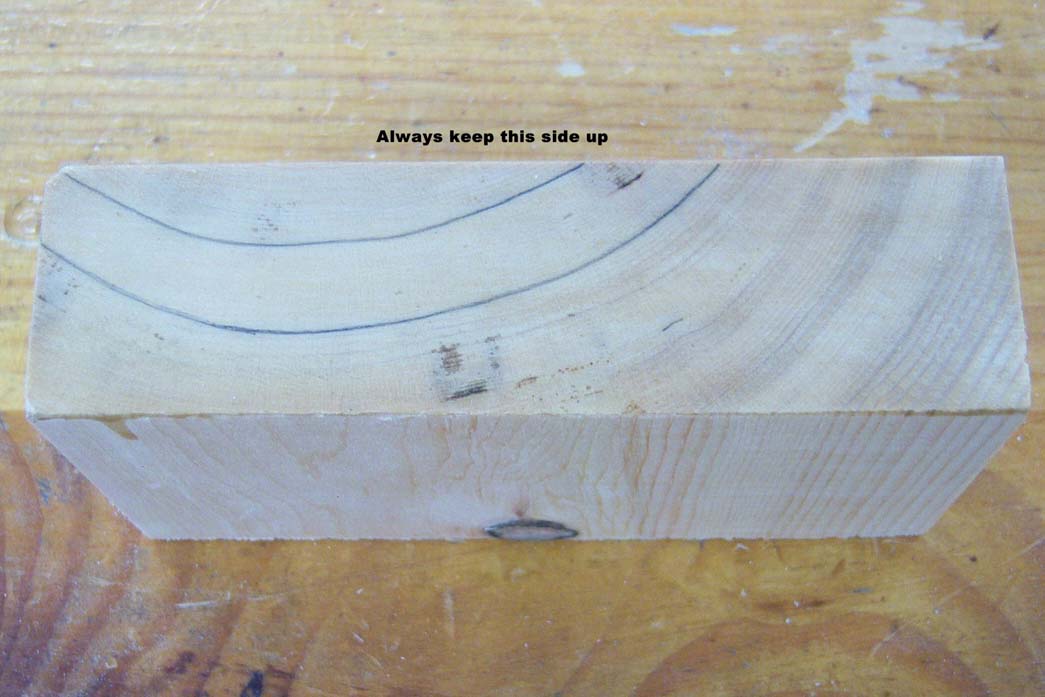
Wood likes to warp, that is in its nature for several reasons I will not discuss here. When you look at the end of a board you will see growth rings, or a segment of those rings. Most of the time they will appear like the letter “C†or “Uâ€, but not quite that drastic. Always orientate the board with the top of the proposed project as if it were on the top of the letter “Uâ€. The rings always try to “straighten out†as the board starts to “cupâ€. Remember this if you are building a deck or helping a friend on the weekend to build his. If you follow my advice the board, when it cups and it will, will not act like a trough that holds water but like a vaulted roof that sheds water. This is your chance to really impress your brother-in-law.
See the example of the end of a board with the rings I’ve highlighted with a pencil line.
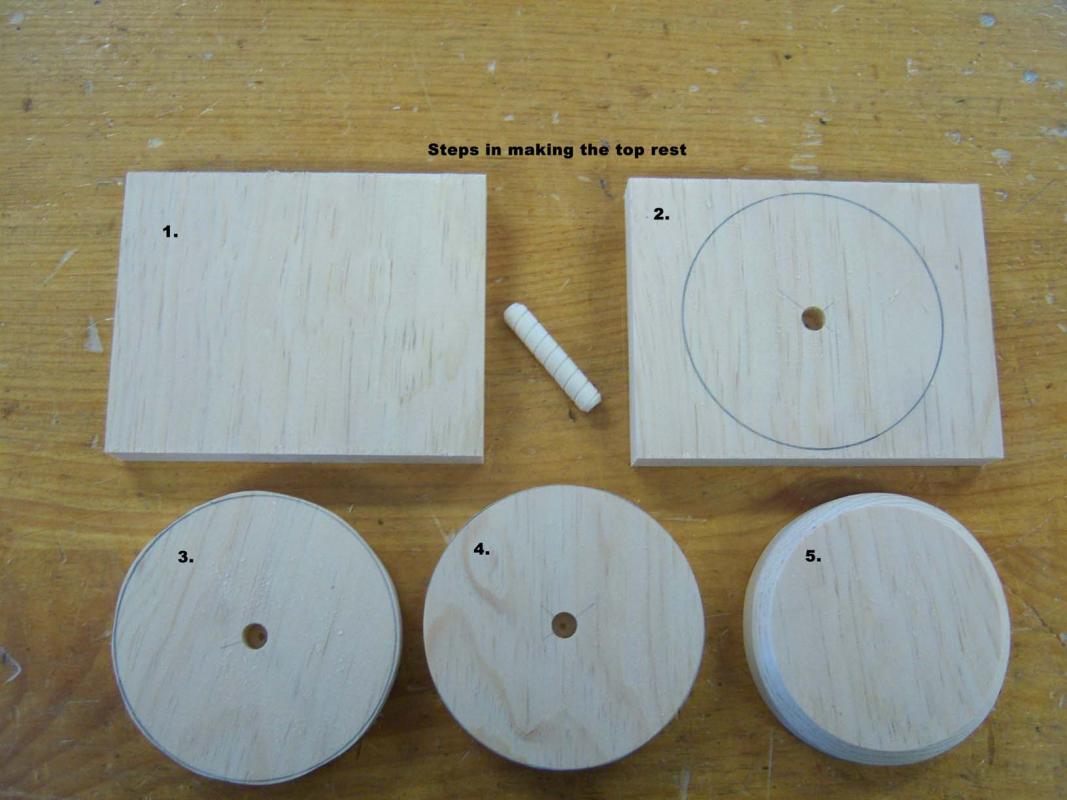
Next take the disk you have just cut and sand to the circle’s mark. You can use a hand sander or a belt sander held tight in a vise of clamped to a bench for this task. Once this is done you may want to chamfer (bevel) the edges of the disk. I used a router table but it can be done with a belt sander if you are steady enough. Is this even necessary? Not really it just looks better; having said that, if you are making this for a softer helmet such as a Bobby’s helmet you should probably round the edges. This will assure that there are no sharp edges that might cause damage to the helmet over time. There is another alternative that I will cover later regarding the use of small pillows. Remember to bevel, or chamfer, the edge on the surface that is opposite to the surface with the compass mark as that will be the underside of the top and where you will be drilling a hole for assembly later. These steps are shown in the photo below.
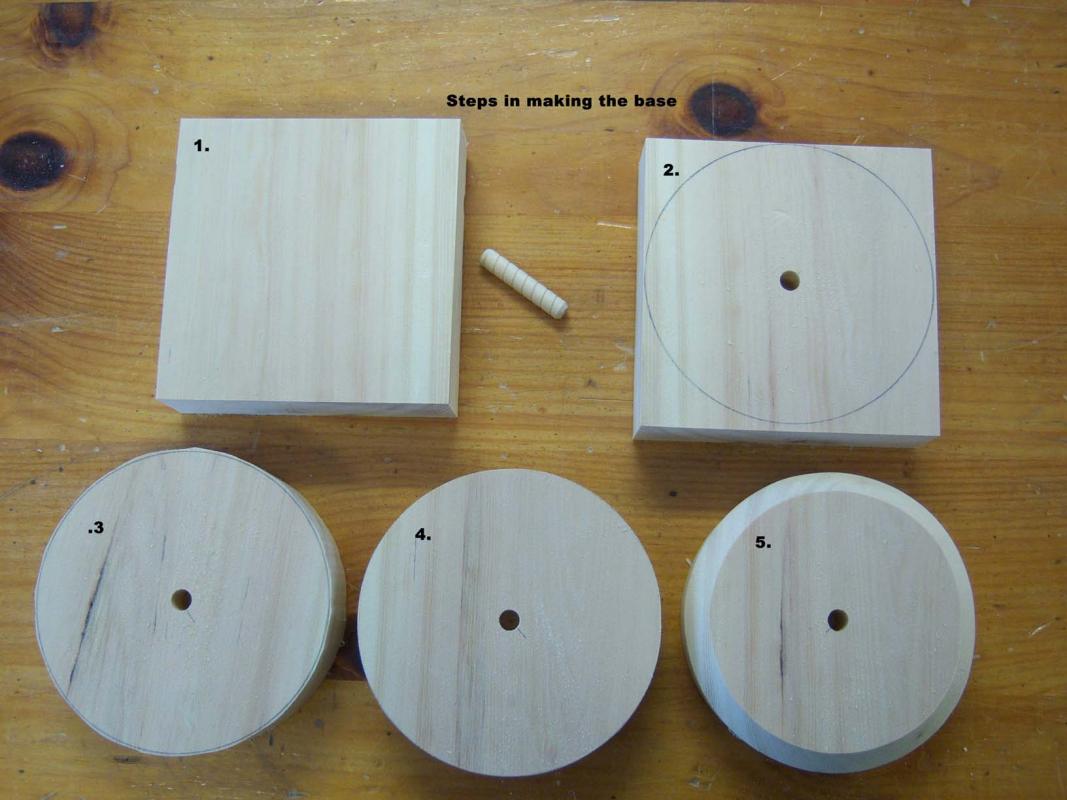
The base is made using the same steps as noted above. In this case that bevel you cut in the top also needs to be repeated on the base. The difference is that the compass mark needs to be on the surface that will be up in the finished project. The hole in the top is in the underneath surface but the hole in the base is in the top surface. To save money you don’t have to use thicker material for the base you could use the same thickness board for both the top and base, and even for the column if you like. The steps for making the base are shown below.
For the column, cut the material to the length at which you like your helmet to be displayed. I have made a short column at four inches for the British style helmets and longer ones at six inches for the German helmets. You may want the helmet to be displayed at a higher level than I have suggested, it is all a matter of taste. You may also want to take the edges off the column to make it look a little slimmer but that again is just a matter of taste. I have included some photos later on of the different column designs you might want to consider. You can also purchase spindles that are used in railings and cut them for this purpose as well. I have done this when I want a fancier column and photos of those are shown later on.

If you want to use wooden dowels to connect everything together as I have you will need to drill holes as shown in the above photos. There is no reason that you can’t use wood screws to achieve the same goal; I just like to glue things together.
Now that you have everything cut, shaped and sanded you are ready to assemble the stands that will not be stained. If you have elected to stain your stands, as I have done with half of the number I have made, I suggest that you do your staining of the parts before you try assembly. This gives you a much better finish. Glue or screw the stands together before you apply the clear coats, I used four coats of Minwax Oil Modified Polyurethane. Do yourself a big favour and purchase only low odor and water cleanup finishes. You could also paint your stand if you like, it’s yours so it’s up to you. If you elect to glue your stands together wait at least 12 hours for the glue to set properly before trying to put on the finish coats, regardless of what is written on the side of the glue bottle. Always apply glue into the hole and NOT on the dowel as any glue on the dowel will simply be scraped off as you are trying to insert it into the hole.
http://gmic.co.uk/uploads/monthly_01_2015/post-1801-0-28136500-1421963222.jpg http://gmic.co.uk/uploads/monthly_01_2015/post-1801-0-33208400-1421963262.jpg http://gmic.co.uk/uploads/monthly_01_2015/post-1801-0-52190400-1421963294.jpg
The final thing you should do is to glue some felt on the bottom of the stand to protect the finish of whatever you sit the stand on.
Rare good marital advice:
Taking marital advice from me is usually an unsound move but this one is solid. Putting felt on the bottom of the stand keeps the stand from having that “clunk†sound when you might set it on a nice cabinet in the living room. The soft dull thud makes the project seem much classier and since it doesn’t sound like it has caused any damage you might get to leave your helmet displayed somewhere nice. What other military forum can you belong to where you get military history plus marital advice? You have to love the GMIC.
Earlier I mentioned the use of “pillows†with the stand to prevent wear on the inside of the police helmet. These are small pillows that I make out of black velvet and fill with fine gravel that is used in aquariums; make sure the gravel is clean and dry. Either do this yourself or have someone help with the sewing. Make a bag out of the velvet with it being inside out. Leave one side open. Next turn it the so the velvet is now on the outside and add the stone. You’ll have to hand sew the last edge. This allows the helmet to rest on a surface that will not mar the inside if the helmet. Another use of these is in the off chance you miscalculate in the length of the column and need the stand to be taller. One of even two of these pillows can be used to adjust the height. A photo of one of these stands with a pillow is shown below.
http://gmic.co.uk/uploads/monthly_01_2015/post-1801-0-74096600-1421962824.jpg
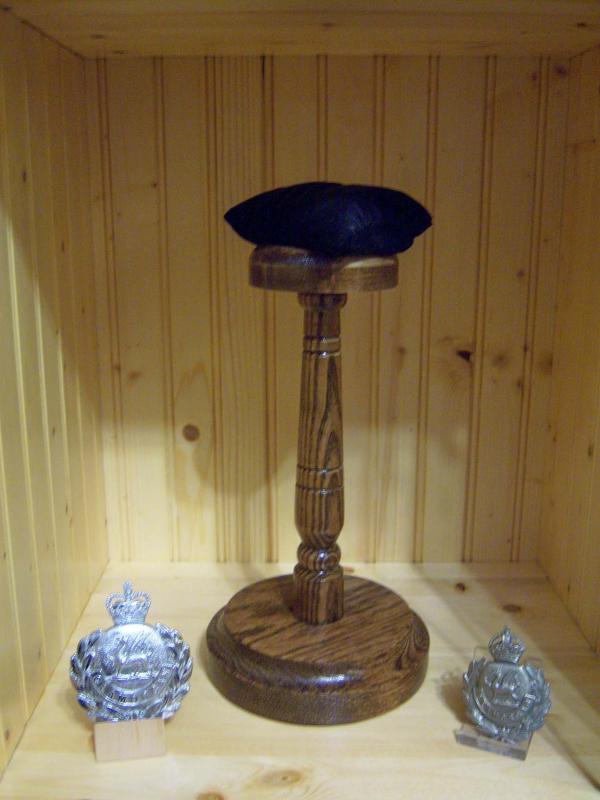
Another variation on the helmet stand is the stands I make for hats. The only difference is in the top piece. I make it the same size as the hat size so that the shape of the hat is maintained and even the peak has a natural curve as in normal wear rather than getting flattened out when displayed for a long time on a shelf and the weight is on the peak (similar to the Bobby helmet scenario at the start of the tutorial). You’ll notice in the photo below that I put a bit larger 1/8 inch of hardboard on the underneath of the top to support the rim. This keeps the hat resting nicely and prevents it from sliding down on the wooden “plugâ€. I paint the top, or “plug†black so that it doesn’t “jump out at you†when you view the hat.
http://gmic.co.uk/uploads/monthly_01_2015/post-1801-0-95035000-1421962987.jpg http://gmic.co.uk/uploads/monthly_01_2015/post-1801-0-64108300-1421963043.jpg http://gmic.co.uk/uploads/monthly_01_2015/post-1801-0-61216900-1421963080.jpg
Below are some random shots of different stands and helmets in the collection. A couple of photos are a bit dodgy, please forgive their poor quality.
http://gmic.co.uk/uploads/monthly_01_2015/post-1801-0-94095300-1421963396.jpg http://gmic.co.uk/uploads/monthly_01_2015/post-1801-0-21224400-1421963428.jpg http://gmic.co.uk/uploads/monthly_01_2015/post-1801-0-86749900-1421963466.jpg
http://gmic.co.uk/uploads/monthly_01_2015/post-1801-0-91345400-1421963579.jpg http://gmic.co.uk/uploads/monthly_01_2015/post-1801-0-09242300-1421963616.jpg http://gmic.co.uk/uploads/monthly_01_2015/post-1801-0-80228100-1421963649.jpg
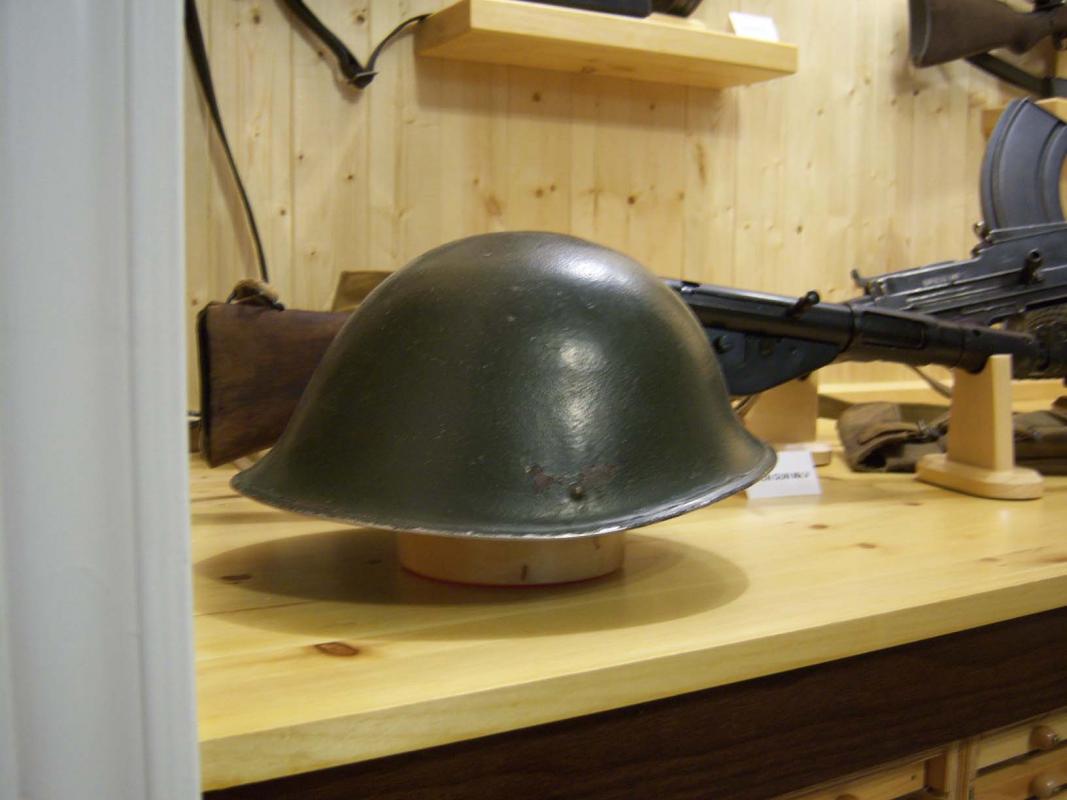
If you have any questions about making these please send me a PM or email me at brian.wolfe@bell.net
I would like to hear from other members as to how they display their helmets and hats, as I know there are more methods out there than the ones I use. Please feel free to expand on this tutorial.
Regards
Brian
0 -
I just recalled that the one I had was marked by someone on the handle. One side had two groves running across the handle, the other side had two initials (owner's?) separated by a large "X".
I believe the ones made for use in WWI had a handle that had a shape that led to them being referred to as "coffin handle" knives. I suppose these could have found their way into use during WWII as well.
I was not aware of the copies, though also not surprised. It has been a long time since I collected edged weapons so a lot of fakes are now probably much more common. Several decades ago you didn't have to be as knowledgable about many collectables as there just wasn't that many fakes out there.
Regards
Brian
0 -
Yep WWII, I have a photo of one of these being worn and if I can find it I'll post it. The clip allowed it to be worn on the belt, thrust into a tunic or in a boot, the clip keeping it in place.
The one I used to have also had original black paint on the sheath. There should be a mark on the other side of the blade down by the hilt as Paul suggests.
Regards
Brian
0 -
That's sad news, sorry we could not help.
Regards
Brian
0


What lies beneath Waterloo Battlefield?
in Napoleonic Wars
Posted
Hi Les,
Your point is well taken; this could very well be an attemt to generat PR prior to the 200th anniversary.
Regards
Brian