


Brian Wolfe
-
Posts
6,486 -
Joined
-
Last visited
-
Days Won
10
Content Type
Profiles
Forums
Blogs
Gallery
Events
Store
Everything posted by Brian Wolfe
-
 Good one! I too was thinking, "What the ...?" Thanks for posting this unique and interesting artifact. Regards Brian
 -
Hello Jim, Welcome to the forum. As you can see we have a small number of people interested in firearms here so that the addition of another of the same interest is really good news to me. I agree with you in the sense that reproductions of the level we see today are often passed off as authentic which is a true moral "crime". At the prices of authentic pieces today one can ill afford to learn only through one's own mistakes. The one saving grace for these types of black powder revolvers (note I didn't use the term "handguns", being Canadian ) is that they can be fired without risking damage to an authertic specimen. While almost all, if not all, of my collection is in working condition I would never fire one for fear of such damage. In the case of the weapon presented here, Mervyn, being the gentleman he is, has made it clear that this is a reproduction and not an authentic piece. That's all any seller can really do as what the next owner will do is beyond the control of the initial seller. We must educate ourselves, as indeed you have, in order not to make expensive mistakes. When it comes to any collectable, like investing capital, never risk more than you can afford to lose. In the case of firearm collecting the lessons can be expensive so unless you can afford to play one should stick to books on the subject. I look forward to your future submissions on the subject and perhaps some images of your collection. Regards Brian
-
My Early Police Days................. Part 4
Brian Wolfe commented on Mervyn Mitton's blog entry in Mervyn Mitton's Blog
Another very interesting article in your series, Mervyn. In our First Aid training I recall being told that if someone is screaming due to injuries suffered in an accident at least you know right off they are still breathing. The second point was that the dummy they used for the course was there missing his head and we were instructed that this was probably one fellow who no long required any Aid and we should try not to trip over the severed head as it was bad form in front of the crowd that would surely be there watching. Our instructor was a sick sort of so-in-so. One point that is very important is that when you send anyone to call for help (911 etc.) either on a land line or cell phone you are always to instruct them to return and report to you. Sometimes the person will leave, not call, and just keep walking away. A policeman's lot is, at times, an impossible one. Regards Brian -
Tipstaff question
Brian Wolfe replied to depdogcov's topic in Great Britain: Mervyn Mitton's British & Colonial Police Forces
What a great collection! I have moved this topic to this section so that more of the members interested in tipstaffs might get the chance to view it. Regards Brian -
Tipstaff question
Brian Wolfe replied to depdogcov's topic in Great Britain: Mervyn Mitton's British & Colonial Police Forces
I've been waiting for Mervyn's response before posting my comments on what an interesting tip staff this is. Thanks for posting it and please let us know what is under the leather, if you decide to remove it. Regards Brian -
How German Squads Attack Position
Brian Wolfe replied to speagle's topic in United States of America
Interesting. I always like these old training films, thanks for posting it. Regards Brian -
Hello Michael, I checked with a couple of friends of mine who would be considered authorities on such helmets and they think it is a theatrical prop due to the unusual shape and the lack of ventilation between the head band and shell. I checked this against some in my collection as well as photos in a book on the subject and I would have to agree with them. Though my own opinion is not based of a wide knowledge I do put great store in what I have been advised. Sorry my research didn't produce better news. Regards Brian
-
family medals on ebay
Brian Wolfe replied to a topic in Great Britain: Orders, Gallantry, Campaign Medals
Outstanding! Thank you for showing them to us. Regards Brian -
family medals on ebay
Brian Wolfe replied to a topic in Great Britain: Orders, Gallantry, Campaign Medals
Astounding good luck, well done. Please do show the medals once they arrive. Regards Brian -
My Early Police Days................ Part 2
Brian Wolfe commented on Mervyn Mitton's blog entry in Mervyn Mitton's Blog
A good point has just been made. My father talked and talked about writing down his war-time experiences in the RCAF but never got around to it. On the other hand it is a shame that I didn't take the time to interview him and record his story myself. There are so many aspects of military and police service that goes beyond the "on duty" events such as the training and interaction with ones fellow officers that is lost with the passing of the person. Thank you for taking ths step for recording the events of your service, Mervyn. Regards Brian -
Socket Bayonet Repairs Part 2
Brian Wolfe replied to Brian Wolfe's topic in Preservation & Restoration of Military Artifacts
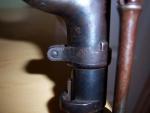
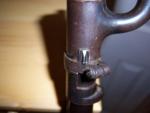
The last photo shows the bayonet I have worked on with the ring against the locking stop block and the rifle on the right shows one that could still use some work. The rifle on the right would function well the way it is as no part of the ring is blocking the view through the sights. These are 1853 Enfield Rifles, that is, black powder firearms that are rifled as opposed to the earlier "Brown Bess" smooth bore muskets, but that is a story for another time. As always I hope you enjoyed this post and it will encourage you to get into a bit of restoration work yourself. Regards Brian
-
Socket Bayonet Repairs Part 2
Brian Wolfe replied to Brian Wolfe's topic in Preservation & Restoration of Military Artifacts
This is what the bayonet should look like with the ring removed. I show this because I have seen socket bayonets being offered for sale looking exactly like this, that is to say, incomplete, without the locking ring. This is something to watch for when shopping for a socket bayonet and if it should have a locking ring and it is absent then walk away and leave it with the seller. It should be noted that not all socket bayonets have locking rings, especially some of the very early ones. These are easy to tell apart from the ones with the ring missing as they lack the little ledge that the rings rides against and there is no "stop block" where the ring rests when in locked position.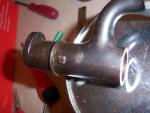
-
Socket Bayonet Repairs Part 2
Brian Wolfe replied to Brian Wolfe's topic in Preservation & Restoration of Military Artifacts
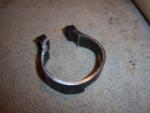
The next two photos show the locking ring off the bayonet. You'll notice the gap that would normally be almost closed, while on the bayonet, has been widened to enable the removal. Being a soft metal without a "memory" (not spring-like) the gap remains open. The first photo shows the ring with the ramp upwards while the second shows the "bottom" where the metal has been removed.
-
Socket Bayonet Repairs Part 2 As socket bayonets developed they went from the early patterns that lacked locking rings through ingenious spring catches to the locking ring styles of the last patterns of socket bayonets. While countries held onto the musket style rifles they tended to retain the familiar long triangular bladed musket-style bayonets. We see several countries that are using the “pig sticker” style even today, however, for the most part countries evolved bayonet design toward the bladed combination bayonet/fighting knife styles commonly known as sword bayonets. This is a much generalized statement and to be more specific, and perhaps more accurate, is material for another post on bayonets and their design better suited to the appropriate section of the forum. The later designs of the socket bayonet with the locking rings are, for the most part, found with much thicker and therefore stronger sockets and not as prone to being deformed out of round as the earlier models. When we find these later styles with the sockets deformed it is almost impossible to correct the defect. When these are encountered on the dealer’s table we must consider them as “leaverites”, that is, “leave her right” where it is (there on the dealer’s table). The most common defect I’ve found, with the exception of a bent blade, is that the locking ring will not turn all the way to the right when locking the bayonet onto the rifle. At times this actually blocks the view of the front sight. The ring is “ramped” on the side facing the bayonet’s tip which allows it to tighten against the front sight and thereby securing the bayonet to the rifle. Most, I find, don’t actually fit to the point where the locking ring contacts the stop that is on the socket’s side. This is not a big problem as the front sight is not obscured and I don’t bother to adjust the ring on these. The problem arises as the ramp on the ring encounters the sight “block” too soon and cannot precede enough to encounter the stop on the side of the socket. I have found that is often caused by a “burr” from an impact against the edge of the ring on the socket that the locking ring rests against. This “bump” causes the ring to advance a little in the open state and when you tighten it the ramp closes on the sight block too soon and binds. The other defect, in my opinion, is that the sight blocks are not consistent in length and therefore are actually too large to allow the locking ring to work properly. On the other hand I suppose the locking ring could also have been manufactured a little big, too wide, resulting in the same problem. I am going to go out on a limb and blame the differences in the sizes of the above noted parts on the British Ordnance System of Manufacture. This system meant that individual parts were manufactured by different contractors and then all of these components assembled by other contractors under the control of the Board of Ordnance located in the famous Tower of London. Many people think that any musket marked “TOWER” was manufactured by the Tower Armoury, which is a misconception as the TOWER mark is simply a regulatory body that assured the quality was consistent with the specifications set out for the contractors and sub-contractors. For the most part this system was a vast improvement over any system, in the world, at the time. Regardless of the reasons for the bayonet not fitting the one “given”, in my opinion, is that we are not about to start to modify the musket to make the bayonet work properly. Value alone would dictate this and as far as an important artifact I believe the firearm trumps the bayonet on almost any day. Since the problem we are discussing is that the locking ring is not advancing far enough we need to remove the ring to inspect the socket for any evidence of why we are having the problem. First remove the attachment screw, and then gently spread the two threaded protrusions apart to allow the ring to be removed by clearing the base ring of the socket. Don’t worry, the ring is made of soft steel and will bend easily, just don’t approach this like you are trying to open the jaws of a saltwater crocodile as you will only run the chance of deforming the ring beyond repair. Slow and steady pressure is the watch word of the day. Keep in mind, if you damage the ring or bayonet you are on your own as I accept no responsibility for unforeseen problems or a Rambo approach to task. Once the ring is off set it aside and inspect the ring that is part of the socket, the ledge on which the ring was sitting. If there is a bump caused by some impact in the past then you need to remove this. This can be as simple task or a destructive and frustrating undertaking depending on your approach. As mentioned earlier, slow and steady is the way to approach this; along with a light touch. No need to murder a 150+ year old artifact because the “game” is about to start on the television in 10 minutes. Using a very fine file remove the bump with care not to file the side of the socket. The finer the file the longer it will take however the finer the finish. Once the bump is removed, if necessary, use a fine emery cloth, wrapped around the file, to polish the area filed; then replace the ring to check the fit. Many times this will be all that is necessary. If the ring will still not work correctly, or the socket ledge had no bump, then you will have to modify the ring. Don’t attempt to remove any metal from the ramped side of the ring as this will leave a shinny surface showing and you don’t want that, also it takes a lot more care and expertise to accomplish than removing a little metal from the straight side which rests against the socket ledge. This can be done several ways, using a file, a piece of emery cloth held onto a flat surface or a fine grinding wheel. I find trying to use a file on this small a part very difficult so I would suggest a course piece of emery cloth held down on a work bench and then work the ring, flat side down, back and forth to remove the required amount of steel. Once you think you have removed enough material use a piece of fine emery cloth wrapped around your finger to remove any filing burrs that may be along the edge of the ring, otherwise this will impede the movement of the ring once it is back on the socket. Now fit the ring back on the socket, install the bayonet back on the musket and see how it fits. If you feel that the ring will fit then use fine emery cloth to finish the bottom of the ring before you fit it in the bayonet. I like to check it first as I almost always take too little off yet I think I’ve taken more. The third way, the one I like, is to use the power grinder. A word of caution; most grinders are used to grind metal away quickly and these wheels are too course to do such fine work as we are expecting to do here. I don’t use my grinder to “grind” but rather to sharpen so the wheels are quite fine. In fact I hardly ever use the grinder as I keep my tools sharp with Japanese water stones and a felt wheel with jeweler’s rouge so they never, or hardly ever, get to the point of needing the grinder. For this step always wear gloves. Even the finest of power grinders or belt sanders can remove flesh from the finger in less time that it takes to blink your eyes. Hold the ring against the flat side of the grinder’s wheel as this should produce a flat surface. Remove a small amount of steel and check the fit, remember to remove the burrs that will be left. Repeat as necessary. The first bayonet that needed adjustment required only the bump on the socket ledge to be removed and I figured it was too minor to bother sharing here but then the second bayonet was the “problem child” and was more involved therefore this post. On the first bayonet the adjustment allowed the locking ring to pass from in front of the rifle sight and I felt this was good enough. Since the second one required more attention I removed enough, but just enough, material to allow the locking ring to make contact with the ring stop and still bind tightly against the sight block. As always I hope this will encourage you to take on some restorations of your own. Good luck. Regards Brian P.S. Don’t forget to scroll down for the photos. The first two photos show the locking ring before the adjustment and how it would interfere with the sight.
-
My early Police days ..............
Brian Wolfe commented on Mervyn Mitton's blog entry in Mervyn Mitton's Blog
I'm glad to see that you are recording your interesting career here on GMIC. Over the years I've come to know a good deal of your background through our freindship outside of the forum and have often thought this would make a great story to be shared with the membership. I look forward to reading more. Regards Brian -
A very nice addition to your collection. This is the first one of these I've seen though inert specimens of the "real deal" seem to abound at local shows. I hope some of the members who know more about this will post. I am wondering if these might be quite scarce. Thanks for posting it. Regards Brian
-
Hello All, I have "merged" the two topic into one post title as they are really the same subject (CD). Having two of more topics only makes this harder to follow once one gets left behind if the other gets a lot of attention and as much information on the CD under one post concentrates the data for future research by others. Regards Brian
-
Thank you Larry and John for your replies and the added information. I actually really like this sword but I must resist starting a new thread in my collection. Oh to be young once again with time, if not money, to burn. Regards Brian
-
Hi JM, Thanks for the reply. I ended up lending the fellow's son some cash to purchase a pistol and then took the sword as payment shortly after, so now it resides with me. The leather washer you mentioned is also missing on mine and I've found that this is often the reason moisture enters the scabbard and causes the damage such as on the one I have. Thanks again. Regards Brian
-
Great find Robin. Ah, back in the day when you got their attention the old fashioned way and no camera phones. Regards Brian
-
EK 1914 Irritates the hell out of me.....
Brian Wolfe replied to Chris Boonzaier's topic in Germany: All Eras: The Iron Cross
Hi Chris, I know this is a pet peeve of yours and rightly so. Everyone has their own opinion about the EK whether it was devalued or not and why or why is was not. You opinion is based on research over a long time so it holds a lot of weight. Other opinions seemed based on the attitude, "because I say so", as their qualifications of fact. Perhaps if the EK had been named the attitude would be different, in fact they would cost many times what they do now. You have just added more validity to your opinion, well done. Regards Brian -
Quite rare indeed, to the point of being a one-of-a-kind. Very nice group many thanks for posting this grouping. Regards Brian
-
LOL. You do know that the title Senior Moderator translates into Senior Janitor don't you. Regards Brian .
-
Hello Gunney and Peter, A topic dear to my heart and I'll post some of my examples, singles and in groups when I get the chance. Until then I have pinned this topic so that others may add to it. After a time if we see that the topic has run out its course I will unpin it. Thanks for starting this thread, Gunney. Regards Brian
-
Now that will get your attention. Regards Brian


