Brian Wolfe
-
Posts
6,486 -
Joined
-
Last visited
-
Days Won
10
Content Type
Profiles
Forums
Blogs
Gallery
Events
Store
Everything posted by Brian Wolfe
-
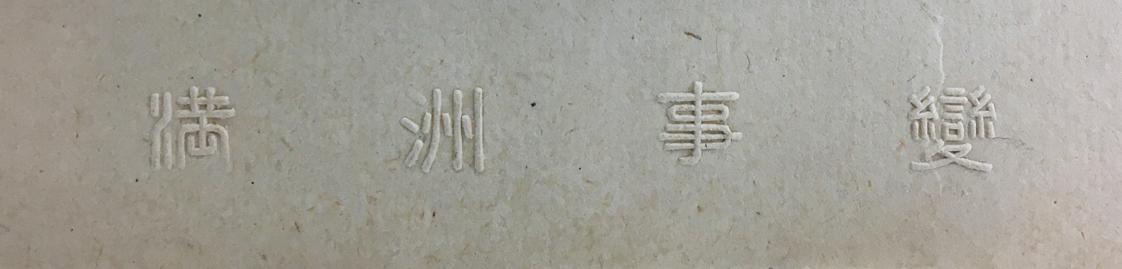
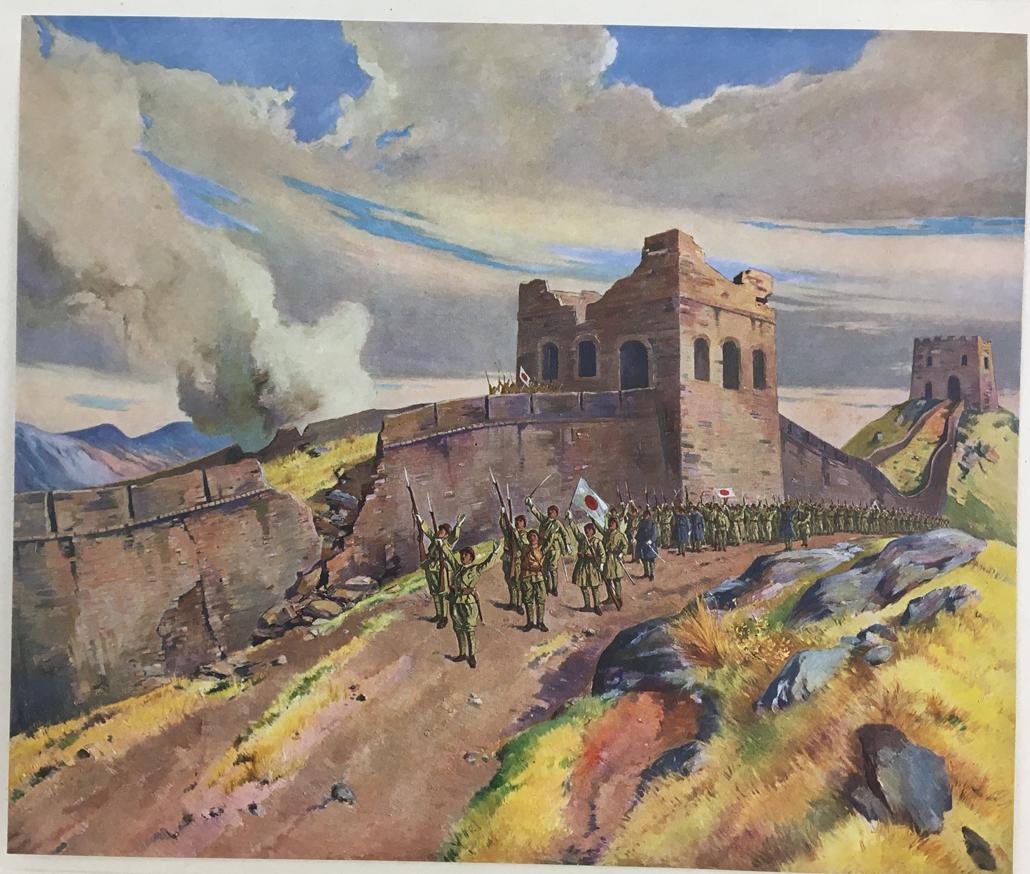
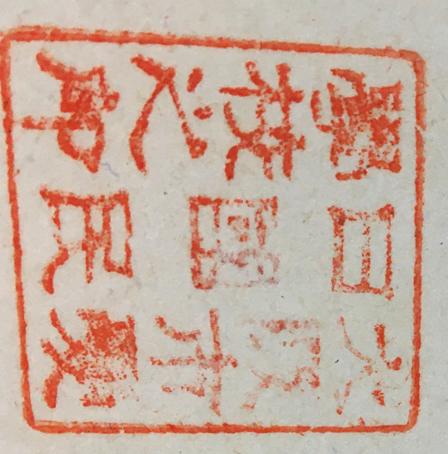
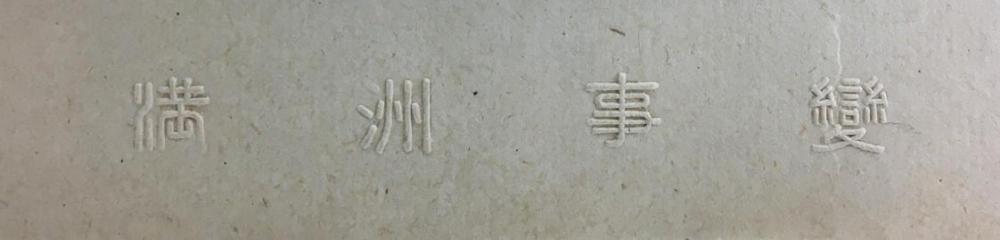
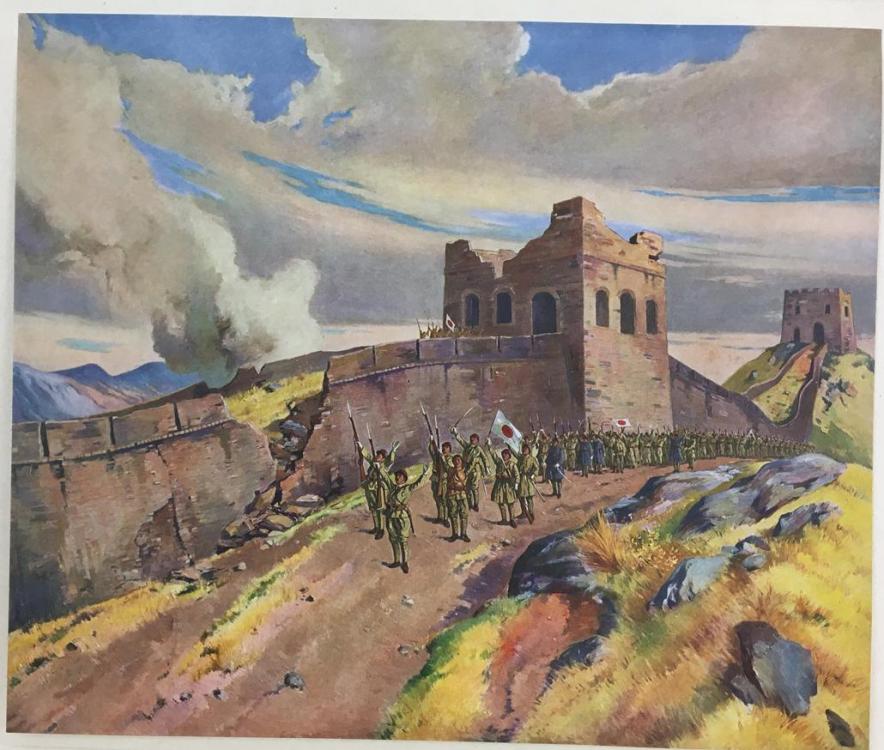
Hello Everyone, While going through a drawer of military prints for an article I am working on I came across this one that I actually forgot I had. I believe it is a commemorative print showing victorious Japanese soldiers beside the Great Wall. On the back is a stamp which I think could have been a mark denoting the piece was authorised by the government, but that is only speculation on my part. On the front and under the picture is an embossed section with a descriptive message. Could someone please translate these two sections for me. It would be most appreciated. Since "finding" this print I have decided to frame it and hang it on the wall in the collection room, which was my intention several years back when I purchased it. Thanks for any assistance you can give me. Regards Brian
-
 Thanks for the post, and to echo Mike's comment, the wonderful link to your collection. Regards Brian
 -
That is very nice work, your wood shop teacher would be proud of you. I especially like the way the edged weapons stand proud of the backing material, the shadowing really brings them to life. Thanks for sharing your work not to mention your exceptional collection. Regards Brian
-
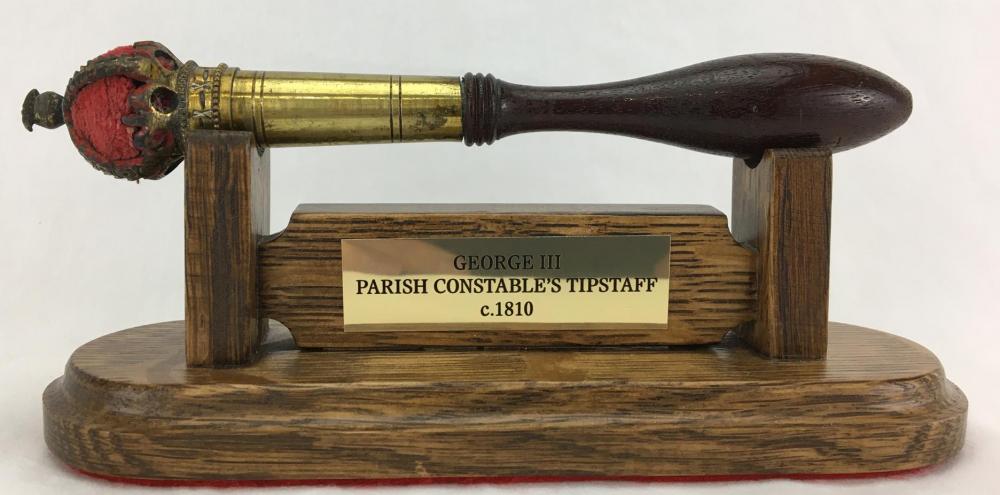
Hello Nightbreak, Excellent tip staffs with very nice display stands. Thanks for sharing them with us. Regards Brian
-
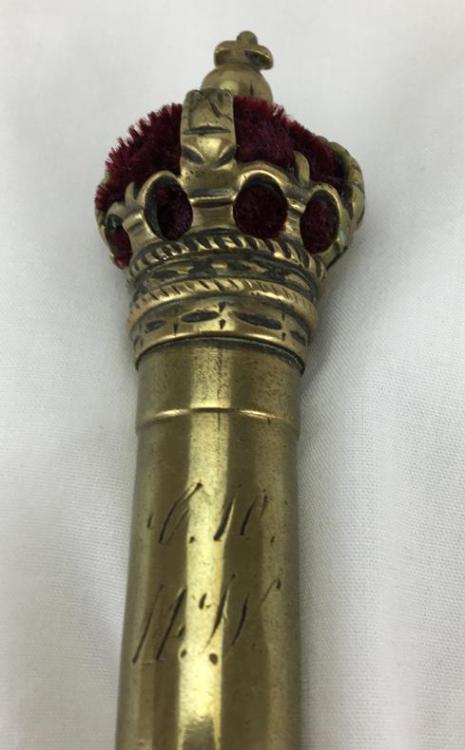
When I'm correct I like to be 100% correct yet when I am wrong I am usually 110% wrong! In close examination the W is in no way a W but the number 10 as you have suggested. I took for granted that it was a W based on what I was told and am embarrassed to confess that I never took a closer look. This post has turned out to be a complete revelation for me . Thank you so much for your assistance and having started this post. Regards Brian
-
Oh, I experienced that on many an occasions, as have a lot of the members hear in the past. He used to say that I could be forgiven, being that I was a "colonial after all".? Thanks for the additional information on my tip staffs. It's not often such news is that good, usually an item thought rare you find out that is is actually common as dirt. Though any tip staff is worth collecting on its own merits, but Scottish and two at that. YOu have made my day. Regards Brian
-
This is the second of the pair I received from Mervyn and I was told it was from Whitstable. There is only an inch difference in the length of the two tip staffs but due to the proximity to the cameras the closest specimen appears to be a good deal larger. There is C.W. and 14.W. in script on the staff and I have attempted to show this in one of the photos. Regards Brian

-
I would truly like my example to be Scottish and would have no hesitation in changing the brass plaque to reflect this information. For me the issue is where this tip staff came from, being Mervyn. If was a gift and in the memory of a close friend I will probably leave it as it is. The problem arises in the possibility the this item will be "moved on" when I "move on" so-to-speak, by my heirs. I would not want to be the one to perpetuate an error in identification. Perhaps I will affix a note on the underneath the stand to reflect this new information. The topic of the police tip staff has little in the way of research unlike my true passion, British military swords and black powder firearms. I have always needed to depend on limited information in the few books available and other more knowledgeable collectors. It would be difficult to pass off misinformation regarding British military swords to me and I could happily argue such points all day long. At the same time Mervyn was only human ( qui novit omnia) and he could have been mistaken, therefore I could never take a firm stand on the identification of the tip staff I posted.The "gift" was of two tip staffs and I will post photos of these a little later today. Regards Brian
-
I do think it has been dropped at sometime in its life. The identification came directly from Mervyn and that's all I had to go by. For the most part unmarked specimens, such as this one, could be from anywhere and other than what Mervyn told me I would have been left with no "title" for the brass plate at all, perhaps "Typical British Tipstaff"? I've made the stands for these a number of years ago when my thickness planer would not produce material as thin as the one I presently use. It has always seemed a little too "robust" simply to support such a light item. At least there is no danger of the stand breaking. ? Regards Brian
-
An interesting bit of history, albeit a sad event. You are so correct in that we tend to collect the life stories of others. Thanks for sharing this and, in that, helping to keep his memory alive. Regards Brian
-
I think Peter has hit on the reason for double issues, two clerks perhaps from different levels in a regiment both sending on their own list rather than a system where the lists all end up on the same desk for ordering. I think it is a case where anything can happen and usually does in India... twice. ?? Regards Brian
-
Oh, to have the sense of humour that Chris has; the title just screams the need for "smart" comments. ? Regards Brian
-
It could very well be the same staff as all of Mervyn's collection went to auction, especially the material that was still in England; he lived in South Africa at the time of his death. A great looking item indeed, thanks for posting it. Regards Brian
-
Thank you for your feedback, it really is appreciated. I should have added in the tutorial that taping the metal rod as it is bent around the pipe helps a lot. Nothing too hard just tapping it a little. When I decided to try this I envisioned blow torches and the hammer of Thor but when I mentioned this to a friend of mine who is really good with metal he just laughed at my exaggerated imagination. Thanks again fellows. Regards Brian
-
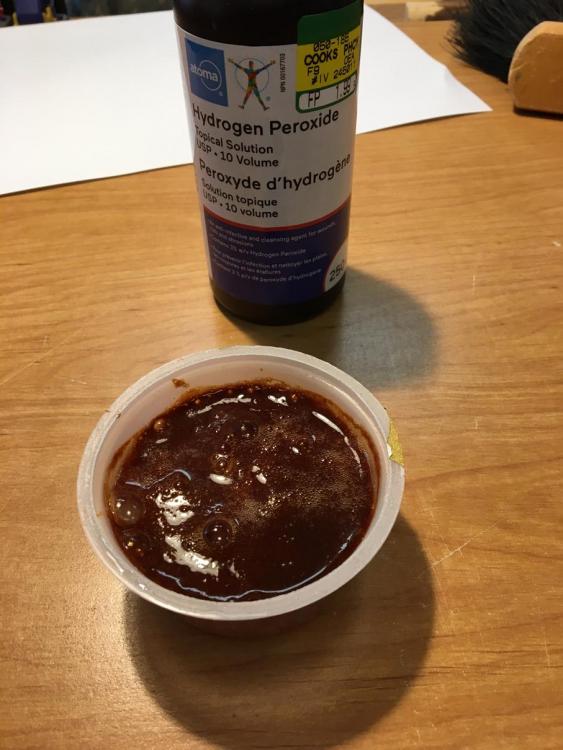
When it comes to ageing steel I was at a loss and like most of us turned to YouTube. Some methods scared me somewhat. After all who doesn’t like wearing a lab coat, goggles and rubber gloves? On the other hand let’s not risk life and limb over a ring or two. This is where you can come up with some jokes on matrimony if you like. The method that looked safe involved a two stage process first using vinegar and salt. First I would suggest wearing latex gloves, just in case (especially for the second part), though this seems safe enough to me so few worries. I took any oil off the rings with some mineral spirits. Then soaked the rings in a solution of salt and vinegar in a plastic yogurt dish; the quantity of salt and vinegar is not all that important, but don’t go cheap on the salt. Leave this for 4 to 5 hours. Then replace the salt and vinegar with salt and hydrogen peroxide. This will start to “boil” but not with any heat. I did this several times over the course of probably 3 to 4 hours. It would take a lot less time had I used a large amount of the solution but that seemed rather wasteful. When it is “cooking” (again not hot) it looks like an evil conglomeration but that it the chemical reaction doing its work. Once this stops you will see what looks like brown moss at the bottom of the clear liquid. This tells you to check your progress and probably repeat the process. Cost-wise I only have a couple of dollars invested. Below is a photo of the solution “working”. I hope, as in all of my tutorials, that this encourages people to try some DIY projects. Regards Brian
-
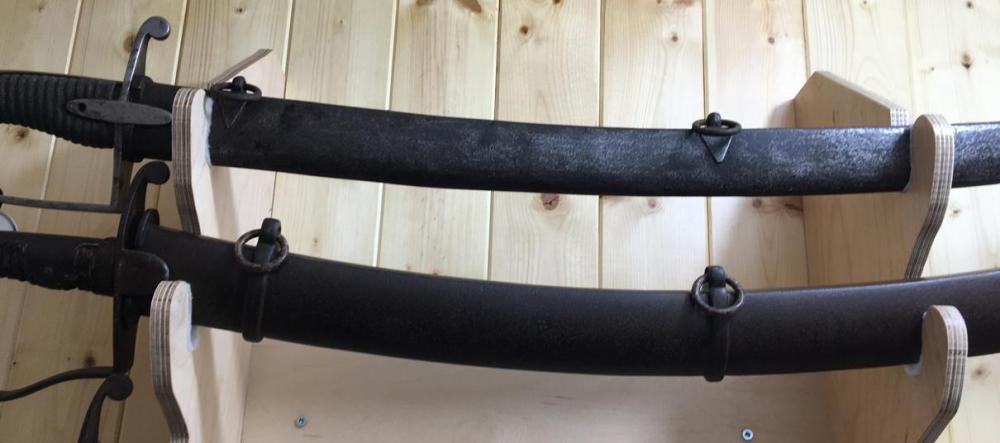
This shows the rings on the scabbard. You will notice that there is a space between where the ring meets itself but that is common even on original sword scabbards. Many of the original manufacturers, but not all, would braze or weld the two arms together. I chose the easier method and am happy that it is one of the original methods of attachment. This shows the sword in the scabbard back in its place in the collection. I think that the aged rings match well enough and I must say with complete lack of modesty I am quite pleased with the outcome. A word on ageing steel will follow next.
-
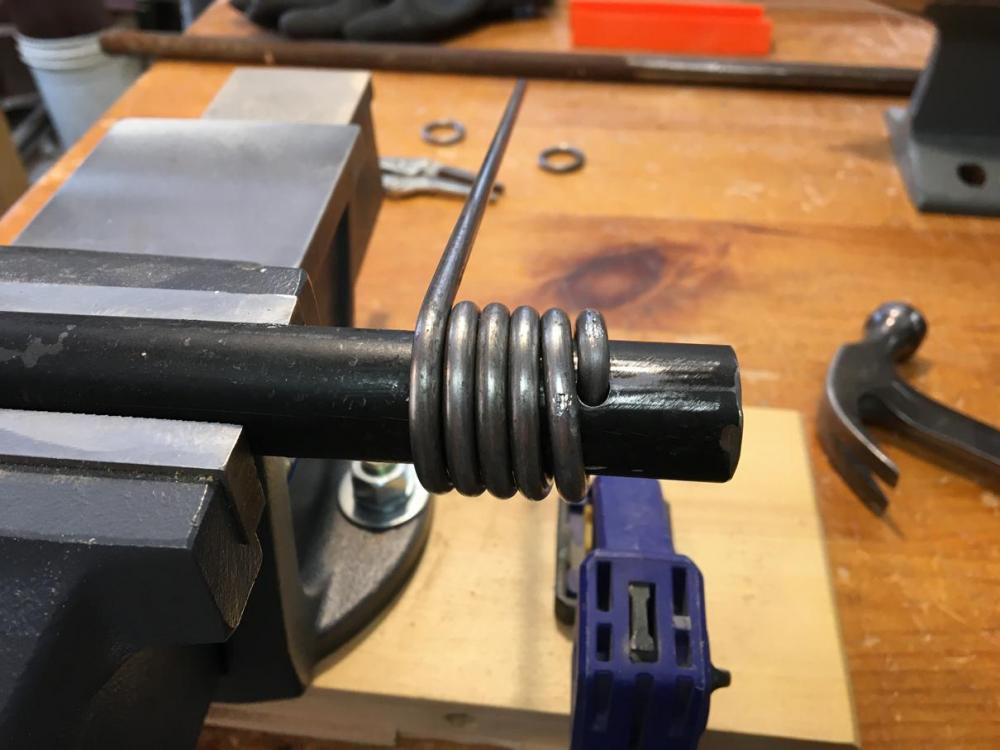
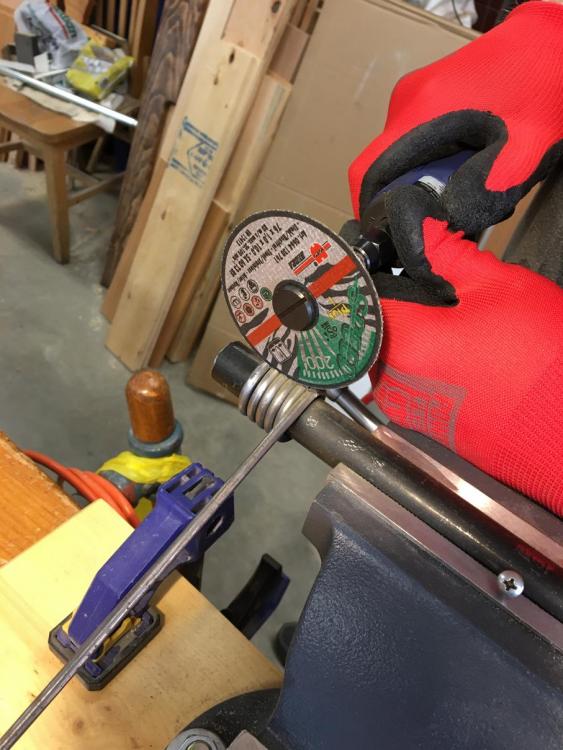
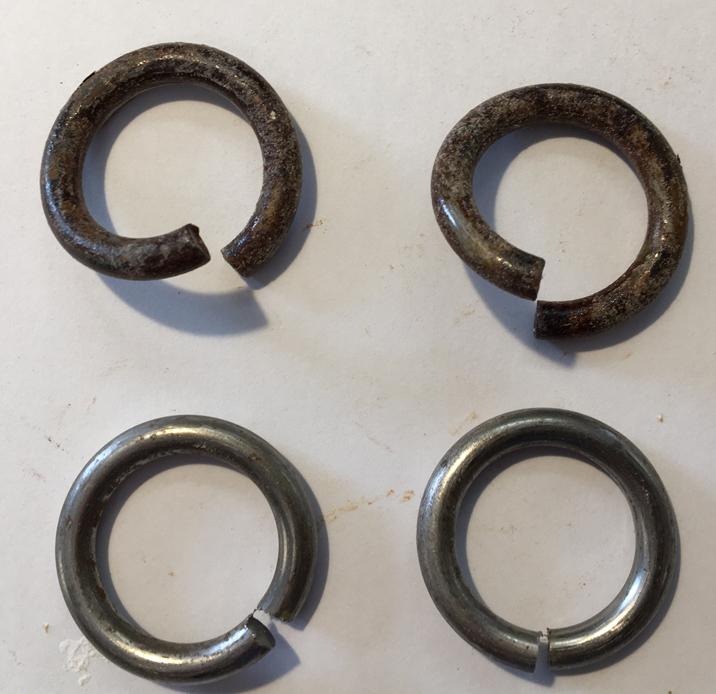
Now that you have what looks like a large spring turn the pipe on its side and get ready to make rings. If the Lord of the Rings theme music is playing in your head let me know as this may or may not be normal at this point. You can cut these “ribs” with a hack saw but I used an air tool with a very narrow disc cutter as it was faster. Now you should have some rings that look like the ones shown below. The darker ones at the top have been aged and we will talk about that later on. At this time you can test the ring opening to see if you can actually put them on the suspension devises. They will probably need to be spread farther apart so do that now. Do not try to make the ends line up on the same plane as you can’t close a metal ring tightly enough simply by squeezing the ends together. You need to line up the ends then twist them toward each other. All metal, except lead for example, has what they call a memory to one degree or another and it will want to return to its former position. By lining the ends up then after the ring is in place twisting the ends toward each other the steel will stay in place. If you have never done this before I think you will be quite surprised as to how well this works.
-
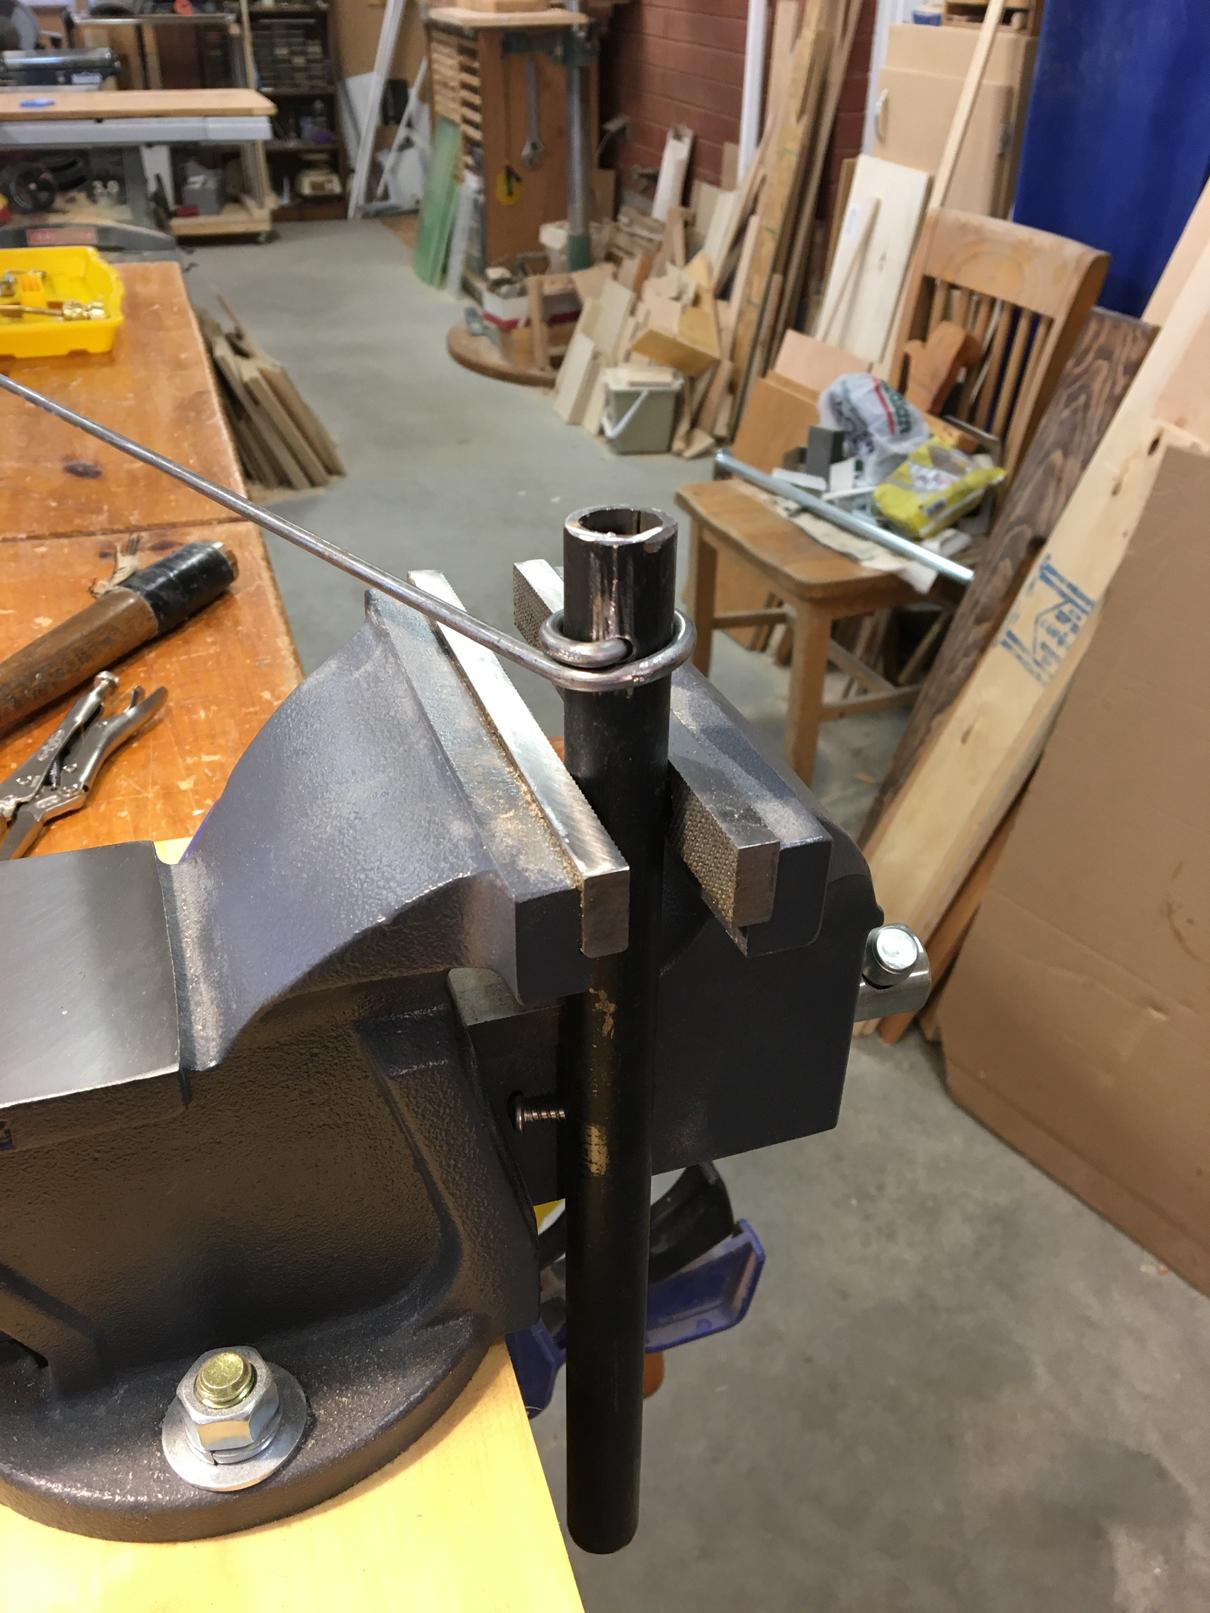
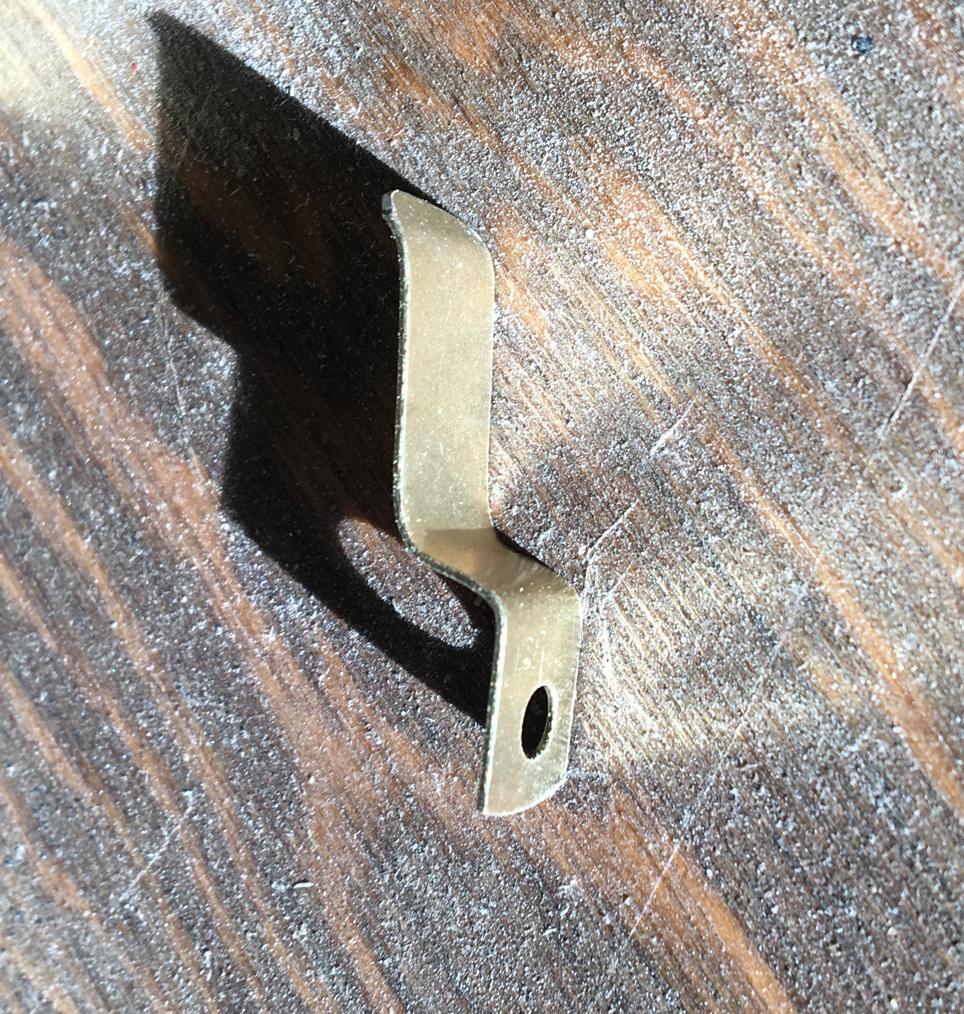
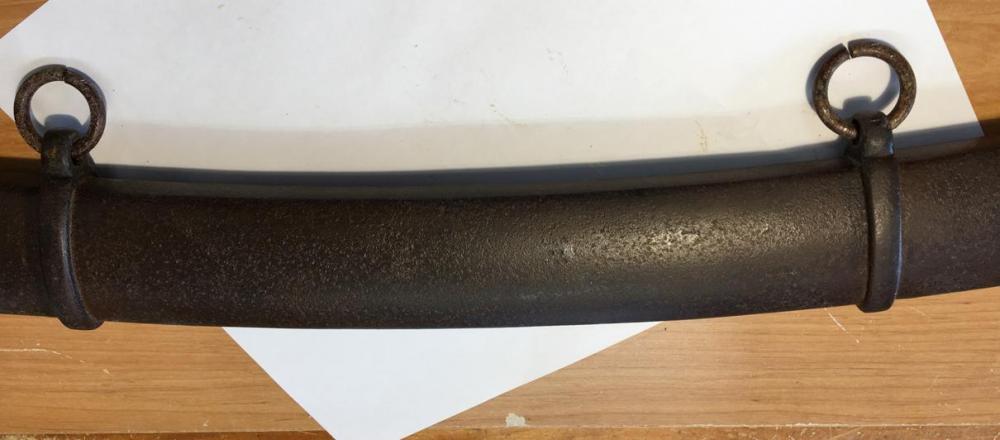
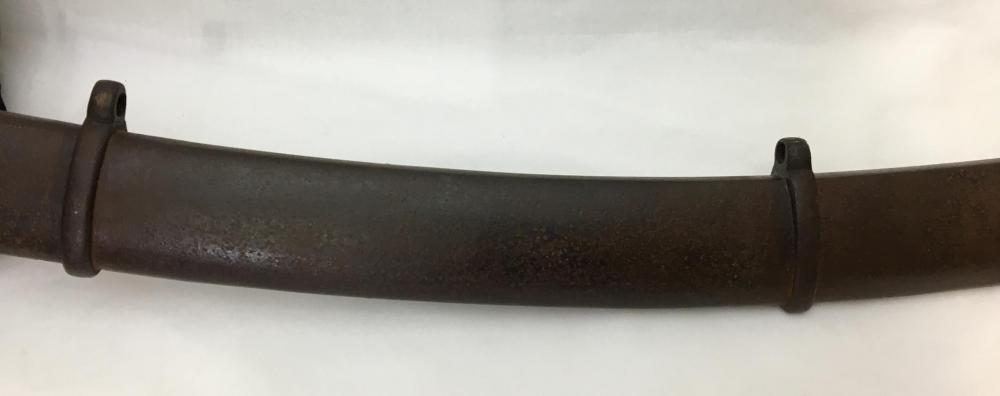
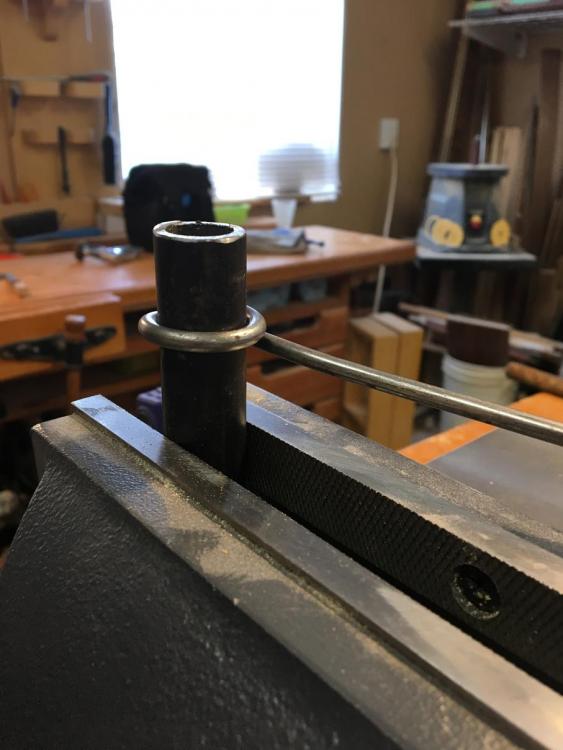
Replacement scabbard rings It was been said by some that a sword without its proper sword knot is incomplete; I would think that is a matter for some debate. However, no matter your stand on that issue I would put forward the suggestion that a scabbard missing its suspension rings is a nearly useless object, unless you count it as simply a container for the blade. Recently I purchased a 1796 Light Cavalry Trooper’s Sabre with a steel scabbard minus the suspension rings. This didn’t really pose a problem for me as I have made a good number of “jump rings” or suspension rings for jewellery when I was engaged in that pursuit. On the other hand I thought that perhaps it might be more of a daunting project for others therefore this short tutorial. I must admit to being a bit discouraged at times when I search for “how to” information on YouTube only to find that the presenter is suggesting thousands of dollars in specialized equipment to make something you can purchase for a fraction of the cost. Therefore I have tried to keep the process and techniques well within the talents of the average person, which for the most part would include me. You will first need to know the size of the ring and the diameter of the steel rod you will be using to make the rings .If you don’t have other examples in your collection you can scale the size from the Internet “Images”. This will be close enough to fool almost anyone’s eye once you have displayed the finished sword scabbard in your collection. In this case the diameter of the steel rod was 3/8” (5mm) with the inside diameter of the ring at 7/8” (22mm); this is important as you will see later on. Take a trip to your local metal dealer and purchase about 2 feet (roughly 80mm) of mild steel. Do not purchase the more expensive “tool steel” as you will never be able to bend it into a ring shape...never. Below is the scabbard section showing the suspension loops with the missing rings. You will now need a vise and a steel pipe the same diameter as the inside of the ring you are about to make. Drill a hole in the pipe so that the metal rod will fit inside of the hole. This is to hold one end of the rod making life a lot easier as you bend the rod. There is no need for a blow torch as the mild steel will bend fairly easily. Bend the rod around the pipe as if you were making a spring. You might as well make several rotations to produce more ring than you presently need as you just never know when you or fellow collector might have need of them.

-
Reading this post brought back a lot of memories of days past and friends gone. Mervyn was a very close friend of mine and I thought I would share a tip staff with you that he gifted me from his personal collection. This particular tip staff appears in Mervyn's book, "The Policeman's Lot". page 67. Regards Brian
-
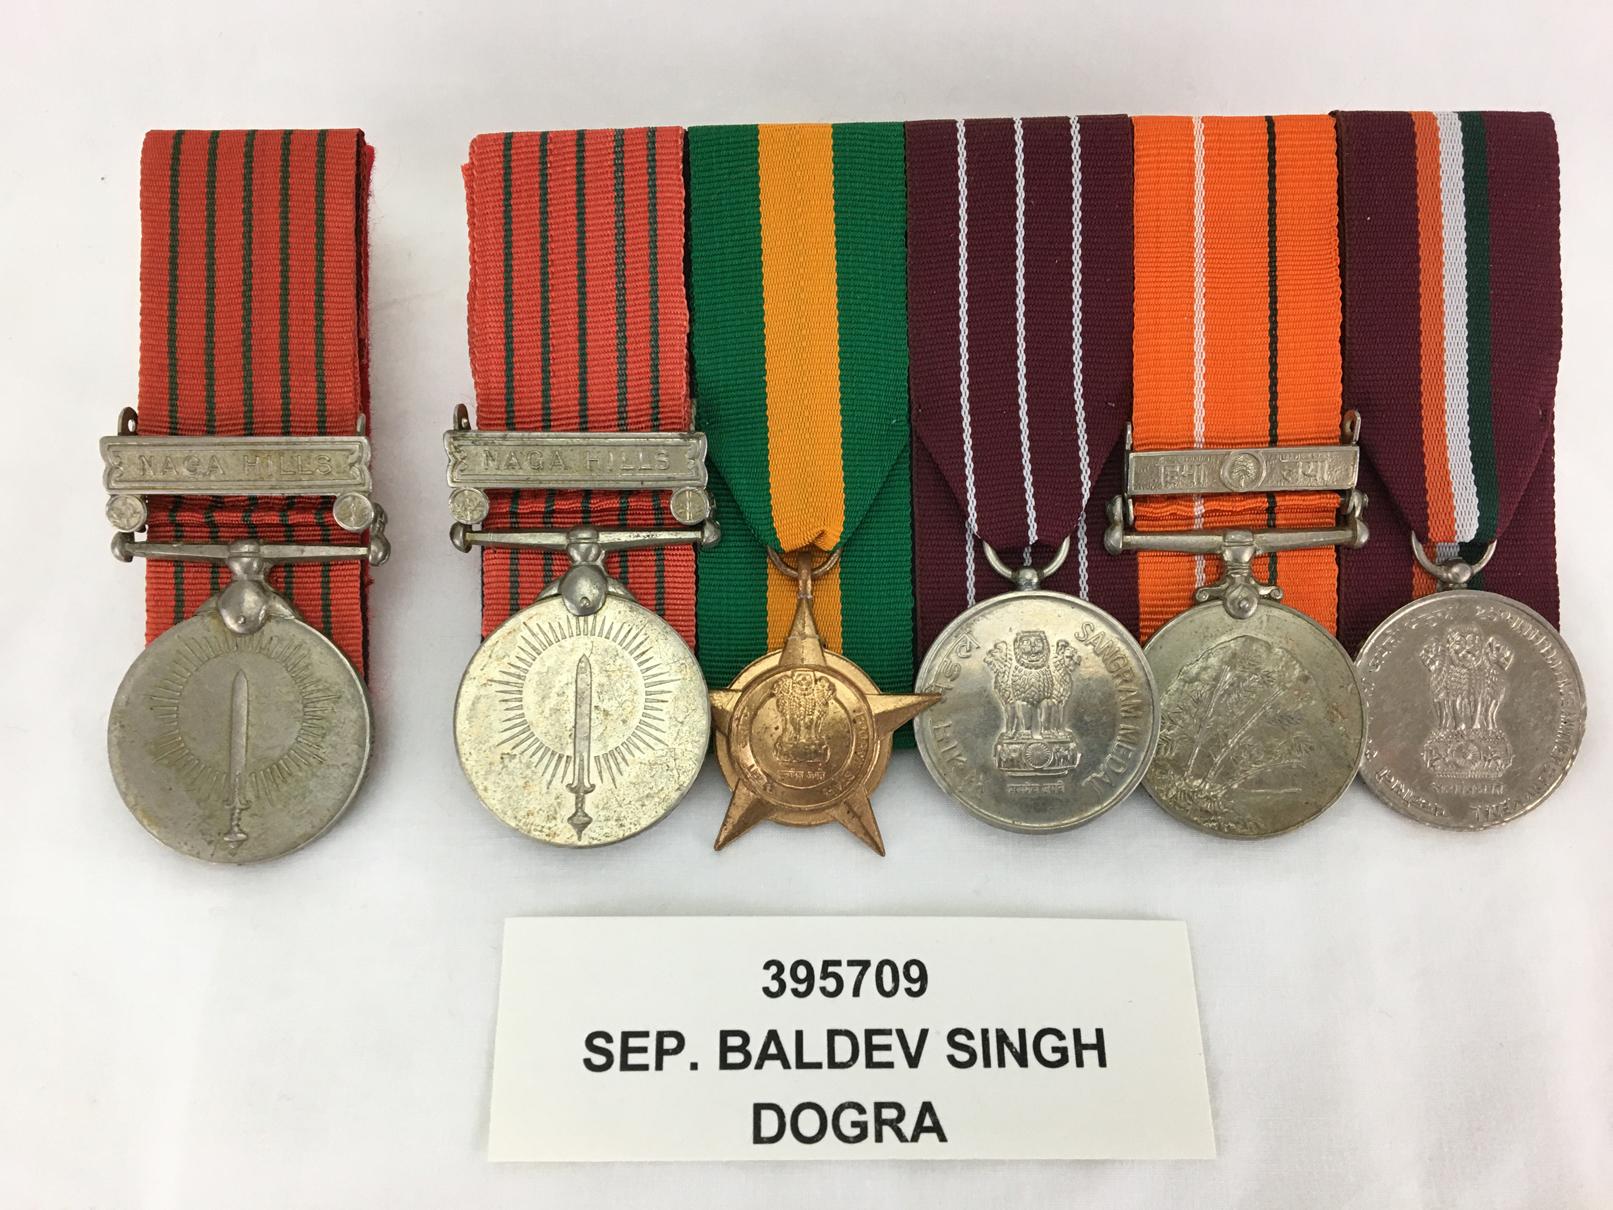
Not that this post is intended for "double issues" but I thought I would take this opportunity to post one of mine. Back a few years ago when I was deeply interested in the medals of India and Pakistan a friend of mine,who resided in the Punjab,would find medal groups I might be interested in and would forward them to me. Many times these arrived in a package all tied together with twine just as he had found them. I would remount them and in this case mounted the extra General Service Medal with the Naga Hills clasp and marked in on the back so that these would all stay together when another collector acquired them from me or my children some time in the future. Regards Brian

-
Well done Chris, excellent decision to use that backdrop for your photos. Regards Brian
-
Latest addition to collection
Brian Wolfe replied to cazack's topic in Great Britain: Orders, Gallantry, Campaign Medals
All of that history in one collection, well done. Regards Brian -
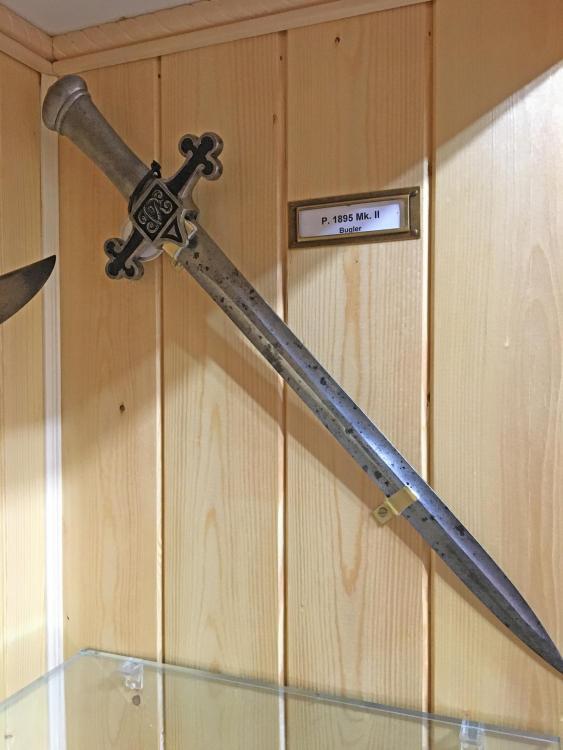
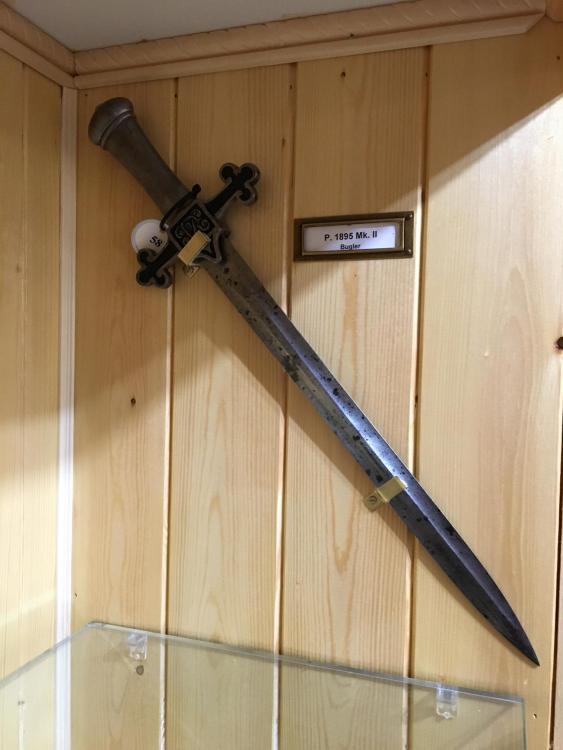
Oops. In the past when I put together a tutorial I would take all of the photos ahead of time, while this time I was "winging it" as I wrote the piece. At the end of a long day I didn't notice that I had mounted the sword incorrectly. The bracket at the grip end of the sword should have been behind the sword's langet to fully show off the bugle crest. The idea is always to show as much of the items as possible while hiding the support. I could also have trimmed the bracket on an angle to hide it even more but there are times when I have to say "enough already". Below is a photo of how the mounted sword should have looked. Sorry for the error. Regards Brian
-
I should have mentioned earlier that you need to leave the felt that will cover the top screw on the main bracket without glue until you install the screw. Then glue the felt with a drop of glue on the top of the screw to cover it and protect the specimen. This is where I should also remind you to read all of the instructions before you start. Now all that is left is to mount your bayonet, knife, small sword etc. Mine is a Pattern 1895 Mk.II Bugler’s sword which is more the size of a large dagger. Here’s a small tip that you might not think of until it is too late. If you are working over a glass shelf as in this case place a piece of wood or a thin cardboard box (that was what I used) on the shelf in case you drop a tool such as your hammer onto the glass. No need to explain why. I had also removed the sword display as past experience with renovations has taught that everything will get in the way so move it out before you start work. My next project for this cabinet will be to install LED strip lighting to the top inside. As you can see the room lights do not reach this area of the cabinet very well. I will try to remember to show before and after photos of that project when I get around to doing it. I hope this encourages you to try some do it yourself projects in the future. Regards Brian

-
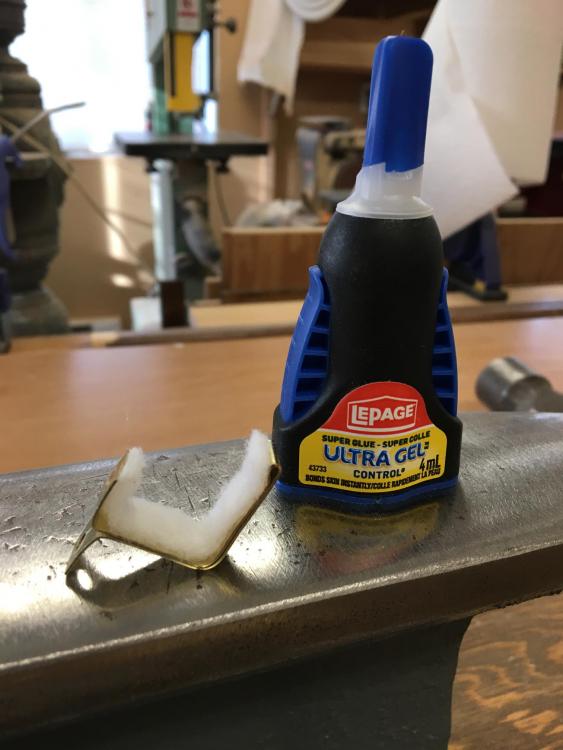
Before we talk about the bracket that will support the blade we should address a potential danger to the item being displayed. The danger is electrolysis. This is a chemical/electrical reaction between two pieces of metal that are in contact. Plumbing pipes made of copper, when in contact with steel brackets will start to experience corrosion due to this phenomenon and is prevented by using rubber gaskets or sleeves between the two metals. To prevent this from happening in the case of displaying metal weapons on metal brackets I always line the bracket with felt. I also do this with the wooden gun-rack style sword mounts I use in case there is any chemical reaction between the steel and the clear finish I use on the wood. I always wax my sword blades and scabbards but better safe than sorry when it come to any potential corrosion. A few drops of super glue will stick the felt to the metal bracket. I use a lot of different CA glues, two part epoxy and super glues as well as the usual wood glue and have found that the Ultra Gel is the easiest to use as it is not too fluid like many CA (Cyanoacrylate) glues. Be careful when using any CA or super glue as most produce a great deal of heat and when in contact with skin will burn. Yes, I have glued my fingers together on occasion, usually I glue things like felt to the side of my hand but I use latex gloves when working with the stronger glues. The most dangerous will actually “smoke” when used on wood as they produce so much heat that the moisture in the wood turns to steam. Burns of this type are extremely severe and the pain is unbelievable. If you do stick something to your fingers don’t try to tear the item off or your fingers apart, skin will rip away from your fingers unbelievably easily. Use a product such as Super Solvent, which is actually acetone to dissolve the glue. For the final bracket that will hold the blade you will need to cut the bracket still in the package (they come in pairs); just estimate the length you will need. Use a pair of side cutters to score the bracket and then bend the metal back and forth until it breaks off. It will not take too long to break the bracket as it is very soft metal. You want to make a more or less lightning bolt shape. Line this with the felt as well. Now you are ready to mount the specimen.