Brian Wolfe
-
Posts
6,486 -
Joined
-
Last visited
-
Days Won
10
Content Type
Profiles
Forums
Blogs
Gallery
Events
Store
Everything posted by Brian Wolfe
-
Medal Mounting - Tutorial
Brian Wolfe replied to Brian Wolfe's topic in Great Britain: Orders, Gallantry, Campaign Medals
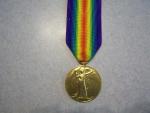
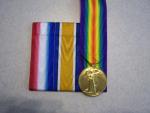
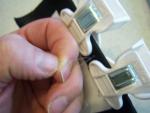
The three medals having sat over night with weight on the glued ribbons and should look like the photo below. Earlier I said that I didn’t like to use a lot of glue and that was true at that stage. The stitches that were put in base helps to stiffen the base and at that point, if you use too much glue, it takes a long time for the glue to cure (dry). At the point we now find ourselves it is my opinion that gluing is the best approach; just don’t put the glue on too thick. We are now ready to mount the medals to the base. First position the medal so that it protrudes just a little beyond the bottom of the base. The photo shows the position indicated by the tip of the scissors. Next you will need to hold the medal in place. I like to use the clamps I made but if you don’t have anything such as this then holding them by hand will do the job. Just remember that you need to be careful not to leave finger prints on the medals, especially the silver medals by touching them with bare hands. I have also clamped the ribbon in place just to keep it out of the way for the next step (sewing the medal to the base). From the back and using the 6 lb. clear fishing line on a needle you will need to push the needle through and as close as possible to the suspension device that is affixed to the medal. Then return the needle front to back to make the stitch. I always do this twice to really secure the medal to the backing board, but once is probably enough. Now tie the line using no less than three knots to assure that it will say tied. Leave some extra length on the line when you cut it free from the needle as this will be glued down later and will help to secure it even better. Now glue the ribbon to the base. You can glue the ribbon to the front of the base, above the medal as well as on the back of the base board if you like, that is up to you. I tend to like the glue in both areas, just be sure you never use glue that will bleed through. The instant dry epoxy glue called “Crazy Glue” is NOT for projects like this as the “bleed through” is immediate and will ruin all of your work. You will need to leave this to dry for at least a couple of hours to be safe; If you would rather go faster, sew all of the medals on the board first and then do all of the gluing at once and leave it under weights overnight. In the photo below I have used clamps to hold the singe ribbon.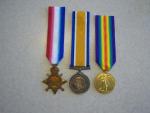


-
Medal Mounting - Tutorial
Brian Wolfe replied to Brian Wolfe's topic in Great Britain: Orders, Gallantry, Campaign Medals
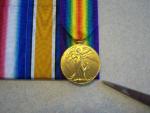
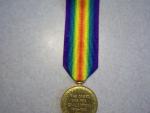
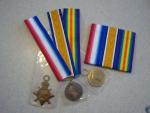
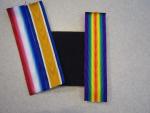
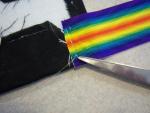
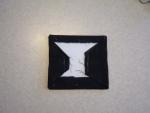
The next photo shows the ribbon from the back and how the angle on the back part of the ribbon keeps it out of the way from being seen from the front. The second photo below shows this properly aligned and glued in place. As you can see from the front view the only angle you can see is the front part of the ribbon. Don’t attempt to get both the front and rear angle of this ribbon exactly the same as it is almost impossible and it will also make this area look too thick. Some people cut the ribbon on the back where the two folded over sections meet and this is not a bad idea as the ribbon lays down better. However, I don’t like that look, preferring instead that it looks a bit fuller where it comes through the mounting ring; of course that up to you. I’ve placed the Victory Medal and ribbon on the base so you can see what it will look like when we mount it. I would suggest that you place some weight on the glued area of the ribbon over night just so the glue is set up completely before you attempt to do the final mount. I used the small home-made clamps to hold the glue-up right after taking the photo below. You can now move on to the other two medals and get them ready to be mounted once the glue sets up.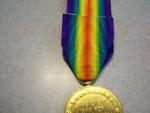
-
Medal Mounting - Tutorial
Brian Wolfe replied to Brian Wolfe's topic in Great Britain: Orders, Gallantry, Campaign Medals
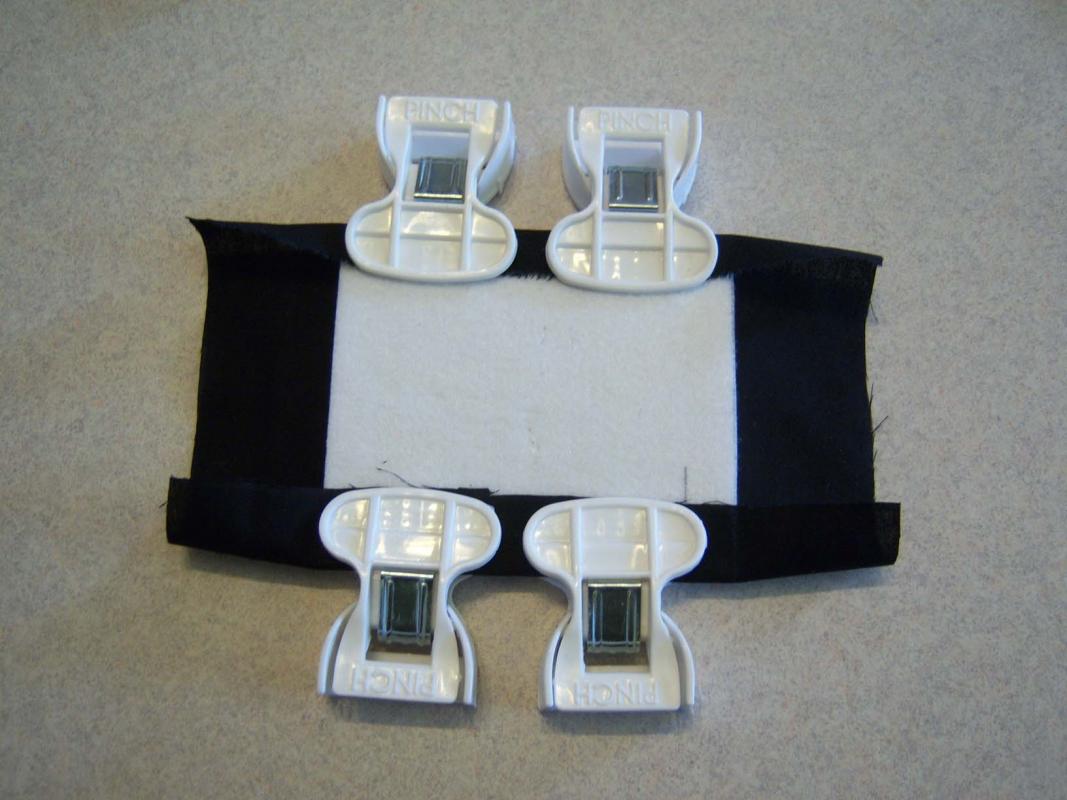
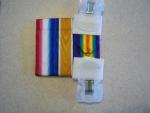
Mounting the Medals: To mount the medals start with the medal to your right, in this case the Victory Medal. I think the WWI Trio is one of the most difficult groups to mount as not only is the Victory Medal wider than the other two but neither of the two rings is the same size. This can get frustrating but stay with it; it will all work out in the end. The medal will be mounted with a bit of the edge protruding beyond the base so hold the medal where you want it and then fold the ribbon crosswise as if you were going to mount a straight bar (don’t worry about the ring mount at this time). You should have about two inches that will be attached to the front of the base and 4 inches than will go over the top and be fastened to the back of the base. Don’t worry about being exact just make sure the ribbon that will be fastened to the front of the base is not so long as it will want to go over the top of the mount. Next make a fold, as shown in the photo below, on one side and then the other making sure they are the same angle. It is alright and perhaps preferable if the back edge of the fold is smaller than the front; I think this shows up well enough in the photo. Now put some weight on this folded section and let it sit for a while. I would not suggest using a steam iron to press the fold as I have had the colours in some ribbons “run” when the wet steam hits them. The other problem is that any folded material under the ribbon will telegraph through and will be seen on the front of the mount.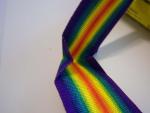
-
Medal Mounting - Tutorial
Brian Wolfe replied to Brian Wolfe's topic in Great Britain: Orders, Gallantry, Campaign Medals
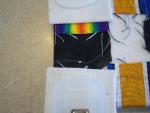
We’re just about to star to mount your medals on the base, but before we continue on with that there are a couple of things to go over. These final stages are the most critical for a nice mount and, needless to say, can be the most frustrating, so proceed as calmly as possible. In the case of the trio I am using we have two of the medals with rings and only one with a straight bar. The straight bars are the easiest to mount because the rings require the ribbon to be shaped into a “V” where it passes through the ring. When you are working with only one “ring” suspension you only need to worry about the two sides of the “V” being even; but with two medals with ring suspension both ribbons need to look as close to being the same as possible. I’ve made a rather crude drawing to show what we are basically going to be doing with the ribbons. The section of ribbon just above the medal and closest to the base in the drawing is affixed first using glue and stitches. The front of the ribbon goes over the top of the base and is only glued in place on the back of the base as stitches would show on the front of the ribbon mount and you do not want that. As we proceed all of this will, I trust, become clearer. I’ll also discuss the way to fold the ribbon in a “V” for mounting the ring suspension. Please note the drawing is a side view and is nowhere near to being in scale; it’s just a representation of how the mounting ribbon will be positioned. Also as a note on the positioning of the medal, the bottom of the medal protrudes beyond the ribbon base. Some people argue that the ribbon should show below the medal but regulations dictate the medal goes beyond the ribbon at the bottom. You will see this as we proceed.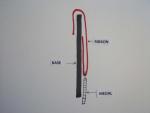
-
Medal Mounting - Tutorial
Brian Wolfe replied to Brian Wolfe's topic in Great Britain: Orders, Gallantry, Campaign Medals
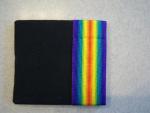
Medal Mounting Tutorial Here we have the finished base for your medal group. Next we will need to attach the medals themselves and their ribbons. It may seem that I do a lot more sewing than I need to and perhaps you would be correct. However, this is not a race and I enjoy taking a soldier’s medals that have been neglected in a drawer for nearly 100 years and giving them new life. My wife thinks I am mad as she could sew this up in a couple of minutes on one of her machines. She is quite proficient at sewing and has several sewing machines to make everything from dolls to quilts. I appreciate the offer but would rather do this by hand myself. Just like a school boy’s project assignment, you can always tell when he has had parental assistance. As you can see from my sewing this is all me. I’ll let this completed base “rest” over night so the glue sets up. It is always best to press the base at this stage under some weight to make sure it completely dries and remains flat. I have an actual press for this but you can use any flat heavy object.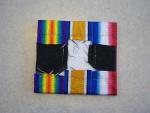
-
Medal Mounting - Tutorial
Brian Wolfe replied to Brian Wolfe's topic in Great Britain: Orders, Gallantry, Campaign Medals
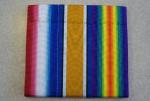
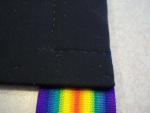
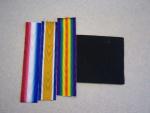
Mounting the Ribbons to the Base: Now that you’ve had some time away from the project and your fingers no longer bleed from puncture wounds you are ready to start to put the first layer of ribbons on the base. This is the point where you really need to take care. First make sure your ribbons are going to face the correct way. In our case this is only important for the red, white and blue stripes of the 1914/15 Star. This sounds simple enough but you’d be surprised at how easy it is to get things turned around. Next lay the ribbons on the black base and make sure that there is the same amount of overhang on each of the outer edge ribbons. If there is none, good, but a little overhang can be a good thing as well. If the black base shows on both edges then you really need to start the whole project over again. Believe me I’ve been there. Making sure that the ribbon you want to start with is held in place then you can start to affix them to the base. It really doesn’t matter if you start with the right or the left side at this stage; I like to start with the right hand ribbon, in this case the Victory Medal. I like to use the handy little clamps I made to make sure the ribbon will not move during this process. Glue the ribbon to the base starting with the bottom of the ribbon. This is important because you will be stitching the ribbon as well as gluing it down. Do NOT glue the ribbon to the front of the base. Glue has a habit of bleeding through ribbons so the less you use the better. Later on you’ll see that this can’t always be avoided and you have to trust that the glue you have selected will not bleed through and show on the front of the ribbon. Again as you can see I have used the clamps. The only reason I used glue at this stage is that I find it holds the ribbon in place while stitching. My hands are better suited to cabinet making than tailoring. Once the glue has set you can start the sewing. Fold the ribbon so that you are not stitching the front of the ribbon to the base while stitching the ribbon on the back of the base. Again this is important at this stage as the front of the ribbon, under the medal (when we get that far) will show. I always put in a “tack stitch” on one side of the ribbon just to help hold it in place then start to sew from the other side. See the photos below for how it should look. The next step is to attach the top of the ribbon to the base. Make sure you keep the ribbon square to the edge and firmly pull it straight. Apply glue to the base under where the ribbon will go and also on the back of the ribbon. Press them together and clamp, if you have clamps; otherwise put some weight on the ribbon while the glue is setting up a bit. This time you will be sewing through the front of the ribbon (still starting from the back) but this is not a problem because the ribbon that holds the medal will cover this area, so these stitches will not show. Repeat this process with the other two ribbons and set the project aside so that all of the glue has time to set up completely. I’ve attempted to mount up groups all in one evening and found that the mount and ribbons start to feel damp to the touch indicating that I should have show a lot more patience. I’ll show the finished base ready for the medals and their ribbons in the next post.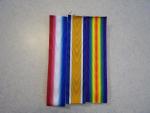
-
Medal Mounting - Tutorial
Brian Wolfe replied to Brian Wolfe's topic in Great Britain: Orders, Gallantry, Campaign Medals
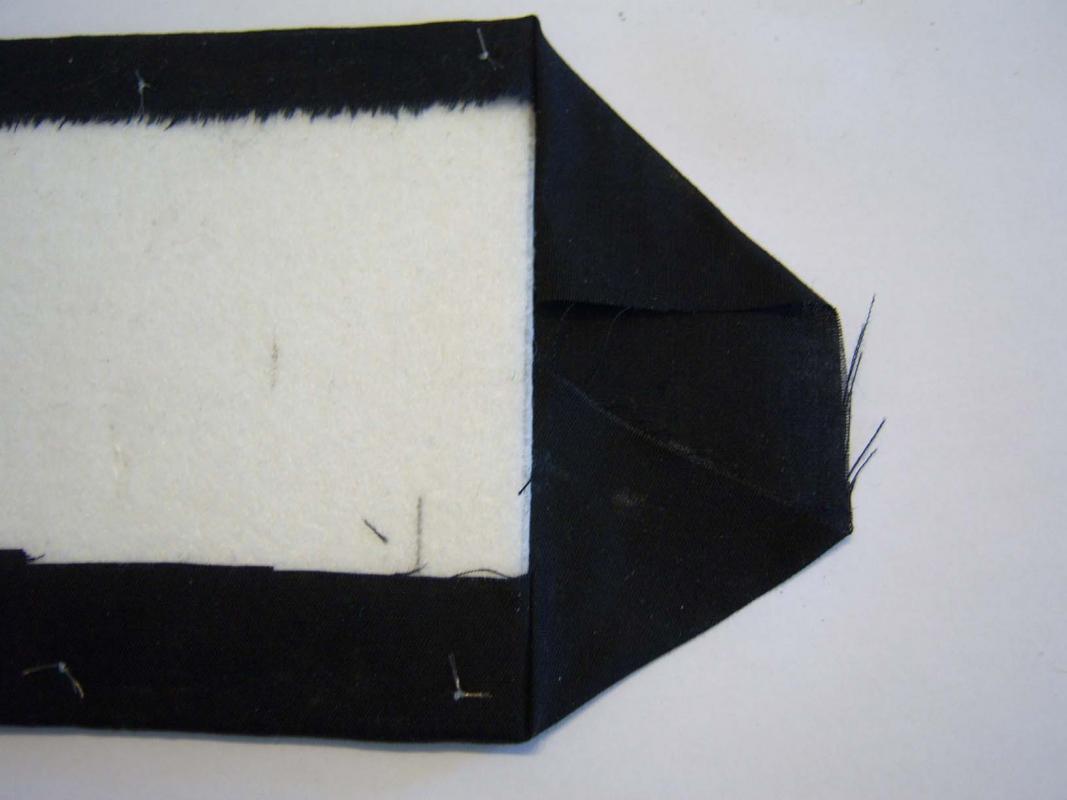
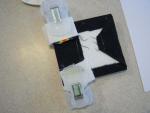
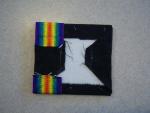
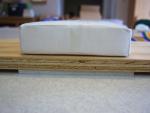
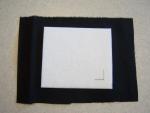
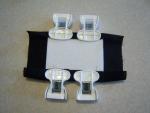
post-1801-0-53303700-1396906507.jMedal Mounting Tutorial Making the Base: First cut two pieces of pelhem 3½ inches long and as wide are the ribbons set side by side. The rule of thumb is 1¼ inches per ribbon; however not all ribbons are the same width so simply set the ribbons on the strip of 3½ pelhem and mark it for cutting. Remember it is better to cut this piece a “whisker” smaller than the width of (in this case) the three ribbons. This is because later on you will be adding a piece of black cloth which will wrap around the ends of the white pelhem and if the width is exactly the same as the ribbons you will have a thin black strip at the end of the medal bar. If this happens, and it does, it is not the end of the world; you see it all of the time, even in wear. Let’s hope our example has been cut correctly, otherwise you’ll get to see what this looks like and I will be quite embarrassed. Next glue the two pieces of pelhem together. Since this material comes in a roll at the store there should be a curve to each piece you have cut. Make sure they cup toward each other so the edges won’t want to separate. I placed a weight on these two pieces for an hour or so just so the glue will set up nicely. I use a piece of scrap plywood and a scuba diving belt weight made of lead wrapped in paper to keep everything clean. A book on the two pieces with anything for weight will do. Next I always put a stitch of the fine invisible thread; this is actually nylon which I didn’t mention earlier, in the middle of these pieces just to keep the tension on the two cupped halves once the glue has set. I won’t show that as it doesn’t need a photo and instead will move on to the next step. Now we need to attach the black material using glue and some stitches. As I mentioned this black material keeps any space between the medal’s ribbons from showing up as white lines and covers the ends to also prevent the white from showing which would distract from the mount. Cut the black cloth larger than the backing piece that you glued up earlier as shown below. Next glue the top and bottom of the cloth over onto the back. Then place a few stitches along this area to help hold it in place. I made some handy clamps by cutting the devices from some clothes hangers my wife was throwing out. These are really handy when you just have to have that “third hand”. I just place three stitches on each side where the material shows between the clamps. http://gmic.co.uk/uploads/monthly_04_2014/post-1801-0-54846500-1396906620.jpg Now the ends need to be brought over and attached using glue and a line of stitches as can be seen below. Remember to always start your stitches from the back so that when completed the tired off stitches will be at the back and not leave bumps under the medal ribbons that we will be putting on later. http://gmic.co.uk/uploads/monthly_04_2014/post-1801-0-25309400-1396906824.jpg It is at this point where you can mount the pin for attaching the group to a uniform, if that is want you have decided to do. By now you should be ready to start the installation of the base ribbons. First you need to put everything away for the evening, bandage up those fingers you’ve been pricking for the past 1½ hours, take a deep breath and calm down. By now you should be able to figure out why the professionals charge so much to mount a group of medals.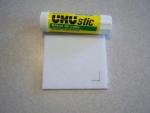

-
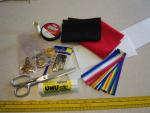
Once in a while, or more often if you are like me, you will find yourself in need of having some medals mounted for your collection. You could send them out to a professional or you could add to your enjoyment of the hobby by mounting them yourself. There is a certain satisfaction in being able to “do-it-yourself” and the finished project may well surprise you in looking quite professional. I have mounted groups of medals for friends wanting to preserve their father’s or grandfather’s medals as well as fellow collectors who just can’t be convinced to try this themselves. The one thing I will NOT do is add an attachment pin to the back of the mount unless it is for the veteran who was awarded the group. I will not be part of making it possible to easily wear someone else’s medals. However, I happen to like the way a group sits in a display case with the pin device in place and if I am mounting the group for my own collection I place a small piece of cardboard under the top edge to give it the same look; not affixed to the mount but simply placed under the group. I leave it to you as whether you want to add a mounting pin or not. I’ll point out when this should be done as we proceed. It should also be noted that I do not consider myself a professional and this tutorial is simply meant to give you a few helpful tips and possible encourage you to try this at home yourself. This is the way I do it, there are many other methods. [Please note that this post will be “locked” until it is completed. Since this demonstration is being done in as close to “real time” as possible with time for the glue to dry etc. it may take several days to complete. Please be patient and wait until the end to make comments, suggestions and show examples of your own work. I will unlock the post when ready and delete this explanation.] Materials: You will need some materials that may require you to make a trip to your local fabric store. Don’t be scared when you walk into this feminine haven, they are as afraid of you as you are of them. Seriously the ladies working at the sewing centres and fabric stores are more than happy to help you find what you need. I’ll discuss these materials at the end of the “materials list”, so here is what you will need. Pelham Felt (red, green, blue, your choice) Black cotton broadcloth Invisible thread 6 lb. “Trilene” (mono-filament) fishing line (finally some guy stuff) Sewing needles Scissors Glue stick Rule (or “ruler” if you were born after 1899) Medal ribbons (2 pieces 6 inches long for each medal) Medals (of course) Pelham is a thick starched felt-like material used in hat making and in the old days in the lapels of men’s suit jackets as well as at the top of curtains where the hooks go to hold the curtain to the rod. Years ago there was a material that looked like thick burlap called "Buckram" but it is no longer available here in Canada. They will sell you ½ a metre of this which should keep you going for years. I usually buy at least a metre at a time as I do use it up quite quickly. This is used at the end of the project to cover the back of the finished mount. Felt may be purchased in one foot squares and won’t cost you a lot. Again I purchase a couple of metres at a time resulting in a piece of felt 2 metres by 2 metres. You won’t need that much so go for a 1foot X 1 foot piece. Black cotton broad cloth is easy enough to find and you will only need to purchase a small amount. Again you may have to go for ½ a metre minimum. This goes on right under the medal ribbons and covers the base made from the Pelham, and also makes the ends of the mount black hiding up the white of the pelham; we’ll see this later on. The rest of the materials are pretty clear and can probably be found around most homes. Next we’ll look at making the base for the mount; that is to say to the point where we will start to attach the first layer of ribbons. [attachment=296436:100_5678.jpg] View full article
-
Nope, and I have a drawer full of fossil bison bones to prove it. Regards Brian
-
Thanks for your comment Mike. I thought I was the only one to obsess about such things; from medal groups and bars to political pins, such as the Japanese/German alliance, perhaps I need to make a small drawer unit just for those items. And the madness begins again.... Regards Brian
-
Soviet Ike`s Victory
Brian Wolfe replied to JapanX's topic in USSR: Soviet Orders, Medals & Decorations
Amazing order. Thanks for posting this, Nick. Regards Brian -
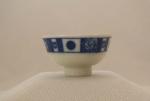
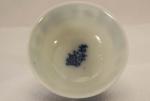
Hi Mickey, Thank you for your reply and for posting this quite important and rare cup. I'm afraid my collection contains what can only be termed as "eBay rare" specimens. SInce Japanese medals are never named the sake cup can hold more information regarding the soldier's name, regiment etc. as well as the theater of war in which he served. I'm surprised, and at the same time glad, that more collectors are not adding these small tearsures to their collections. I hope you will post more images of your sake cup (and bottles?) collection. Regards Brian
-
Hello Stuart, Thank you for both your comments and the image of the helmet. The photo of the painting of the battle is not very clear but I think this helmet can be made out if one looks closely enough. Regards Brian
-
Hello Steve, Sorry that I can't help with any information. However these are interesting medals and, in my opinion, well worth a place in any collection. I hope that some of the members, perhaps Mervyn, can assist you with your request. Thanks for posting this medal and good luck on your quest. Regards Brian
-
Axis Powers Sake Cup I have always held a fascination for politics and political science. Any time I can pick up an artifact that demonstrates this process I try to acquire it for the collection. My modest sake cup collection exhibits this interest quite well with specimens from many of the time periods from the Meiji to the Showa eras, or at least to the end of the Pacific War in 1945. Events such as the China Incident and the return of soldiers from Manchukuo hold a special place in the collection. The cup I recently acquired, which is featured here, was one I wanted to share with the membership. This porcelain cup, measuring 50mm (about 2 inches) in diameter and standing 29mm (roughly 1 1/8 inches) tall features the National flag of Japan along with those of Nazi Germany and Fascist Italy, though the Italian symbol is not actually the fascist itself. The cup commemorates the Axis Power Alliance; the exact event is unknown to me at this time. The exact dating of this piece would have to be tied to the above mentioned event but we can be pretty sure the range would be 1937 to 1941. Some of these possible events are as follows: The Anti-Comintern Pact of Nov. 25, 1936 which was an agreement to resist the Communist International (Comintern) movement, signed in Berlin between Germany, Japan and Italy on November 6, 1937. This led to the forming, at a later time, of the group which would become known as the Axis Powers. The Military Alliance signed on September 25, 1940 Revised Pact signed on November 25, 1941. I have been told that the writing in the bottom of the cup is that of a sake manufacturer which would make this a promotional item probably given out to members of the public rather than one having been sold by a sake cup or bottle vendor. I hope you find this artifact as interesting as I have. Regards Brian
-
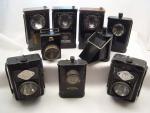
Battery Powered Lanterns As the rush light gave way to the tallow then wax candle which was replaced by whale oil followed by kerosene or coal oil lamps so the battery powered lamp became the next step in the evolution of portable lights. Batteries have been around since 1800 but these were bulky and used a liquid acid as an electrolyte and therefore were impractical for use in any hand-held light. What was to be called the dry cell battery came into being around 1880 but was still too bulky to be considered for use in a convenient personal-use light. This technology was used for such applications as powering telephones but again was too large and had a very low voltage. Shortly after this, in 1887, a true dry cell battery was invented. The dry cell did not require a liquid acid as electrolyte and therefore was “dry”, and so the name. Below is a selection of dry cell battery lights some marked to a police unit other unmarked. Even though some are unmarked these were the style being used by the police as well as the members of the public at the time. A more detailed look at individual styles will follow in future posts. Regards Brian
-
I can't help but to think that the reality of events such as this makes today's horror films pale by compairison. Thanks for your comment Ulsterman. Regards Brian
-
Hello Harry, The change has been made. Regards Brian
-
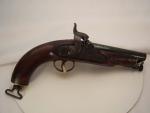
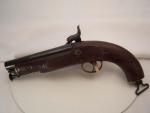
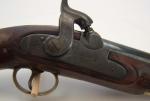
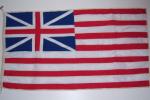
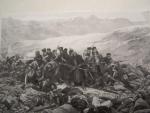
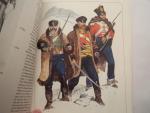
The Battle of Ganadamak 1842 Perhaps it is my past as a numismatist that occasionally finds me purchasing an item because the date on the piece corresponds with the date of some famous or infamous event. The item must, of course, also bear some relevance to the event and not simply reflect a corresponding date. One such item was a British black powder percussion pistol dated 1842, which is the date of the Battle of Gandamak, Afghanistan. Background: The “Grim”, as the British soldiers called it, was an inhospitable rugged piece of the world quite unsuited for empire building and the “civilizing” of the indigenous people. Civilizing, pacifying or dominating the terms all become quite subjective depending upon one’s point of view. The one indisputable point was that to be taken alive as a prisoner by a tribe such as the ruthless Pathans would result in a long and most terrible death. Of this horrible fate Rudyard Kipling once wrote: “When you are wounded and left on Afghanistan’s plains, An’ the women come out to cut up what remains, Jest roll to your rifle and blow out your brains, An’ go to your Gawd like a soldier.” This area, the “Grim” once belonged to Afghanistan but is better known by its more official name as The North-West Frontier, of India. The North-West Frontier included names as Chitral, Waziristan, Baluchistan and Khyber perhaps the most well know for the Khyber Pass. This stretch of land between India and Afghanistan contained some of the most fearsome advisories the British Empire would ever encounter; such tribes as the Afridis, Baluchis, Chitralis, Pathans (mentioned earlier) and the Waziris. These same peoples remained as tough, resourceful and ruthless right up to the present day, facing armies from the Soviet Union then, America, Canada and other allied nations of peace keepers. However this is not about current history but that of the situation Britain found herself in during the early 1800’s. The flag of the Honourable East India Company The First Afghan War: Russia viewed the riches of India, British India, with envious eyes and the only way to India and her riches was through Afghanistan. Russian influence in the area had already caused upheaval in Persia and the British, as a counter move, increased their presence in the North-West Frontier and offered what amounted to bribes to the ruler of Afghanistan to resist Russian advances. Once this had taken place and the Russian threat no longer looming there was a decision made to remove the current ruler of Afghanistan and re-install the older former ruler. This accomplished, an army set out for Kabul leaving a garrison in Kandahar and once in Kabul all appeared to have calmed down to an atmosphere of peace and tranquility ; but appearances were seldom a reflection of reality in Afghanistan or along the North-West Frontier. The 1842 Kabul Retreat or The Massacre of Elphinstone’s Army: In the spring of 1841 the commander of the forces in Kabul retired to be replaced with the unfortunate Maj. Gen. William Elphinstone; a man suffering from ill health and lacking the ability to make sound, if any, choices regarding major decisions. I use the term “unfortunate” as at this same time the Honourable East India Company decided to cut back on the payments to the different tribal leaders resulting in attacks on caravans attempting to use the passes controlled by their tribes. Kabul was now isolated, cut off from the rest of the Empire and in effect surrounded by the enemy. It was not long before the isolated Kabul was to see repeated attacks from the tribesmen surrounding city with sections being overrun. As the tribesmen closed in on the garrison William Henry Macnaghten, the chief advisor to Lord Auckland, now with the garrison in Kabul, attempted to negotiate with the tribesmen but was murdered along with an officer; another two were imprisoned. It was now up to Maj. Gen. Elphinstone to make the decision to surrender the city or stand and fight to the last man. The Afghans offered to allow the garrison and all personnel to march out of Kabul and return to Jalalabad, the nearest British stronghold. The offer was made with the assurances that the column would be granted safe passage. Elphinstone accepted the Afghan assurances. History would record this as one of the last poor decisions of Elphinstone’s career and the worst massacre to befall the British Army. No sooner had the column lest the safety of the city than tribesmen started sporadic attacks, picking off stragglers and laying down a harassing rifle fire killing soldiers, servants, women and children. As the column plodded along the enemy snipers and the harsh frigid weather continued to take its toll, men women and children froze to death in their tracks with many sepoys abandoning their weapons further their vulnerability. Elphinstone and a few others had been taken prisoner. In an attempted break through the Afghans lines two groups mounted despite attacks. A dozen men of the first group had ridden on toward Futtehabad with only one, the company Surgeon, Dr. William Brydon completing the trek to Jalalabad; only one of 4,500 men of Elphinstone’s command. The second group headed toward Ganamak. The Battle of Gandamak: On 13 January 1842 approximately fifty men led by Capt. Souter of the 44th (East Essex) Regiment of Foot reached the village of Gandamak. Earlier the 1st Brigade had left a force of Afghan irregulars at Gandamak while the main body move to Jalalabad with the hope of being able to relieve the besieged Kabul. Up to this point the local tribesmen had shown loyalty towards the British, however, as soon as the main column moved out the Afghan irregulars killed their officers, blew up the magazine and set fire to the camp. One can only imagine the disappointment felt by Capt. Souter’s men as they found a potentially hostile force in place of friendly troops waiting for them; the Afghans, under the guise of being friendly, attempted to disarm the British troops and take them prisoner. To the offer from the Afghans to spare their lives a British sergeant shouted “not bloody likely” which led to the brief but savage Battle of Gandamak. With only twenty muskets and fifty rounds of ammunition this small band stood their ground fighting hand to hand completely surrounded by the enemy. The Afghans began the attack with sniping fire followed by a series of rushes until only Souter and few soldiers and two civilians survived and were taken prisoner. In an effort to save the regimental colours Souter had wrapped them around his waist during the struggle. This appeared to be a gold sash which the Afghans mistook as the rank of a general in the British Army, thereby; it has been speculated, sparing his life and those immediately around him. In the end Elphinstone had lost 4,500 with a total loss of 16,500 including camp followers. Sir John Kaye wrote in 1851 of the massacre: “There is nothing, indeed, more remarkable in the history of the world than the awful completeness – the sublime unity- of this Kabul tragedy.” This episode led to the assembly of a British force at Peshawar and for the next thirty years the frontier remained unsettled with punitive expeditions political intrigues between the British and the Indian rulers all under the foreboding atmosphere of potential Russian expansionism. As one conflict ended the road to the Second Afghan War was being constructed; but that, as they say, is another story. Regards Brian Sources of research for this article includes: North-West Frontier 1837 – 1947 Robert Wilkinson-Latham Various Wikipedia sites on the First Afghan War and the Battle of Gandamak Arrogant Armies – Great Military Disasters and the Generals Behind Then James M. Perry
-
Femoraliaphobia I might be famous as the one person to start a phobia all by myself and I have deemed it to be Femoraliaphobia. For years one of my many obsessions which includes a need to check the weather forecast, always knowing what time it is and the need to have everything in neat rows has been to create drawers in everything I build in the shop. This coming year I plan to build another kitchen table, this time longer than the eight foot one we presently have, at least a twelve footer, and I’ve included drawers in the drawing. Years ago my Amish ancestors always included a drawer in the end of the table, where the elder sat this, I have been told, was a Bible drawer. I’m thinking silver ware etc. but still a functional and quite practical application, even if I do say so myself. While on the topic of the Bible, it says in the Good Book “...go forth and multiply...”. We had five children, all married and in the process of adding to the population of the world. One would think that an eight foot long table should suffice but at times I think the kids are taking the Bible a bit too literally; this has caused the need for a longer, twelve foot table. Of course not only do I digress from the subject of this blog but I do so in jest. Yes, I’ll put drawers in anything and everywhere I can. I once built a table for one of the washrooms that fit in between the wall and the bathroom vanity. My wife was less than impressed to find that not only was there a drawer in the front of the table there was one in each end as well, even though they could never be pulled out due to the wall on one side and the vanity on the other. She of course needed to know why; she is a bit of a “needy” woman, always needing to know why, in her words, “would anyone in any imaginable universe even think of doing ...(fill in the blank)?” My answer is always to paraphrase Sir Edmund Hillary in that I did it because I could. This makes me once again digress with the thoughts of Sir Edmund Hillary at the summit of Everest and never having his photo taken to commemorate the event. He took a photo of his Sherpa holding his ice axe but never had his own photo taken. Did he have fears that Tenzing Norgay would take off with the camera and run to the nearest pawn shop? I suppose one could argue that there may have been a pawn shop as close as 29,029 feet away, albeit straight down. You really need to work on those trust issues Sir Edmund. Sorry for the side tracking, I’m back now. I believe that most of the world’s problems revolves around drawers, either the over abundance of them or the lack of drawers in some cases. In the past some countries obviously had too many drawers and found most were empty. Hannibal is a good example, too many drawers and not enough to fill them, so he went to Rome because they had more things than drawers to put them in and brought stuff back for the drawers of Carthage. Everyone was happy until the cabinet makers of Rome made more drawers and Rome wanted their things back and therefore went to Carthage to get their stuff back to fill their new drawers. They liked Carthage so much they stayed in the area after they applied salt to the lands where the city used to exist, as a biodegradable weed control, or so I surmise. Almost everything should be kept or could be kept in drawers. Socks, in drawers; silverware, in drawers; handguns, in drawers; cats, well perhaps not everything. I like to keep most of my collection in drawers as to display all of it in display cases would take up the whole house, seriously. So as I finished up the second drawer cabinet of the year my dear wife expressed a deep concern about my obsessive behaviour. She thinks I have Obsessive Compulsive Disorder (OCD) which is sheer madness because first of all it should be CDO because that is the correct order the letters should be in, and secondly, ... alright I don’t really have an argument. I think she is the one with physiological problems and I have even come up with a clinical term for it, Femoraliaphobia; a fear of drawers. Her argument is that as soon as I build more drawer cabinets I can’t stand not filling them and that starts the collecting mania once again. Yah, like collecting could ever be considered a mania; sometime I wonder why I even try to have a conversation with her. Women! They’re always bringing reason and common sense into every discussion. Just to prove her wrong I went into the study, at her request, and counted the number of drawers holding my collection. I only have 199 drawers, all in beautiful neat rows. It’s not like I have 200 drawers or anything, now that might be considered obsessive. Not by me mind, but by some. So there you have it. I may have accidently caused my wife to develop Femoraliaphobia. If she decides to seek help I can build her some drawers to keep the files in, after all most things should be kept in drawers. I’m off to surf eBay now as I noticed there were some empty drawers in one cabinet. Keep smiling and never stop collecting. Regards Brian
-
The Tamgha-i-Difaa, Pakistan's General Service Medal
Brian Wolfe replied to Brian Wolfe's topic in South Asia
Many thanks for your supportive comments, it is most appreciated. Regards Brian -
Thanks Nick, I fear that the sake cup bug has bitten me a while back and this group was just too good to pass up even if my dear wife will now get the post war urushi. On the other hand it worked out well as we are both happy. The tray in the earlier post was the first one I have added to the collection so that too was a plus. Thank you for your assistance. Regards Brian
-
Hi Rich, I was thinking that these larger items were probably post war but I had never seen any before and the total price made them attractive. Speaking of attractive, my wife said that she would like them if they were not going to the collection so a rare case of win, win for me. Once more, thank you for you help. Regards Brian
-
Thank you once again for your assistance, it is greatly appreciated. Regards Brian
-
Thanks Rich. I usually only purchase Japanese items from knowledgable sources but the price, even for the tray and this cup (which was what I was interested in), was so good I couldn't pass it up. Tanks again, Brian