azyeoman
-
Posts
1,802 -
Joined
-
Last visited
-
Days Won
10
Content Type
Profiles
Forums
Blogs
Gallery
Events
Store
Everything posted by azyeoman
-
Thank you very much! I look forward to reading it. Are you interested in Korean War medals?
-
 ABO officially named to: Burger J.M. Pretorius. There are three J.M. Pretorius on the rolls, and at least two were PoWs who were in Ceylon and contracted measles. Possibly , Johannes Mattheus, aged 17, captured on 30 July 1900 at Fouriesberg / Surrender Hill, and prisoner of war in Ceylon. Surrender Hill Declared a South African National Monument in 1986, Surrender Hill is a reminder of the defeat the Boers (comprising of the combined forces of the South African Republic and the Republic of the Orange Free State) suffered against Great Britain and her empires during the Anglo-Boer War (1899 - 1902). On the night on 28 July 1900 the British took Slaapkrans (now known as Surrender Hill), 1500 Boers managed to escape but 2 days later 3000 Boers surrendered at Slaapkrans under Boer Commander Prinsloo. By the 9 August 1900, the British felt they had won a psychological battle, they had burnt the Boer commandos weapons on Surrender Hill, captured over 4300 men, 2800 head of cattle, seized field guns, and destroyed millions of rounds of ammunition. The prisoners captured at Surrender hill were exiled to Ceylon, Bermuda and St Helena and were only allowed to return to South Africa when they promised their allegiance to the British Crown. The plaque at the site on Surrender Hill reads as follows: "In July 1990 a large part of the Free State armed forces were surrounded by British troops in the Brandwater Basin. Gen CR De Wet and about 2 000 men escaped over Slabbert's Nek. In the basin, Chief Comdt Marthinus Prinsloo assumed command and on 31 July agreed to surrender. More than 4 300 Boers laid down their arms. Most of them at Surrender Hill, where the British destroyed the captured arms and ammunition. The bare patches caused by the fire and exploding ammunition serve as a reminder of one of the most serious setbacks suffered by the Boers during the Anglo-Boer War."
-
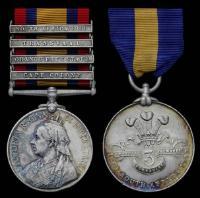
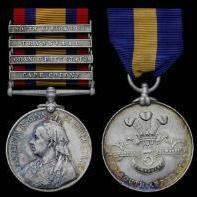
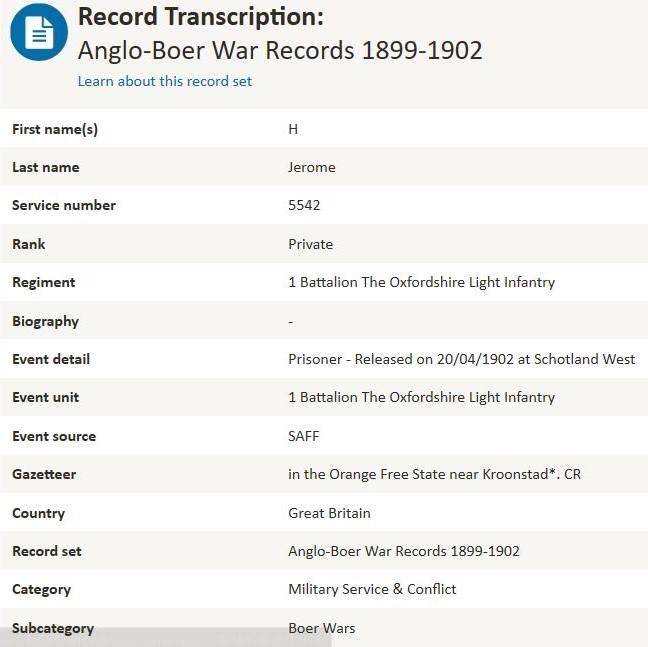
Pair: QUEENS SOUTH AFRICA MEDAL 1899 four clasps "Relief of Kimberley, Paardeberg, Driefontein & Transvaal", engraved to 5542. Pte. H. Jerome 1/Oxfd. L.I. KSA two clasp impressed to 5542 Pte H. Jerome Oxford: L.I. Medals and clasps confirmed stating “prisoner-released on 20th April 1902 at Schotland West”. Henry Jerome was born in 1878 in St. Lukes, London. He enlisted on 28 September 1897 when he was 19 years and three months old. He was 5'4" tall and weighed 115 lbs. with brown eyes and dark brown hair. He was also C of E. He was discharged on 27 September 1909 after having served 5 years and 5 months. His older brother was John Jerome of D. Sqd. 15th Hussars

-
A new QSA to 4081 Pte. W.P. Wilson, Kitchner's Horse who was MIA, captured and later released at Pretoria on 27 May 1900. QSA has five confirmed clasps: CC, OFS, Johannesburg, Diamond Hill and SA01 and has the original ribbon. History of Kitchner's Horse In the dispatch of 6th February 1900 Lord Roberts, after referring to the organization of the Colonial Division under Brigadier General Brabant, said: "Two other regiments, designated, at the particular request of the members, Roberts' Horse and Kitchener's Horse, have also been formed, chiefly from men who have found their way to South Africa from various parts of the world". These corps were at first intended to be called 'The second and third regiments of the South African Light Horse', but the names were changed as a compliment to the new Commander-in-Chief and his chief of the staff. Both Kitchener's Horse and Roberts' Horse were employed in the operations undertaken by Lord Roberts in February 1900 for the relief of Kimberley and in his advance to Bloemfontein; but one squadron of Kitchener's Horse was left on the lines of communication, and was utilized as part of the force with which Lord Kitchener and General Settle put down the rebellion in the Prieska district, March and April. On 9th February the Mounted Infantry Division, under Colonel Hannay, Argyll and Sutherland Highlanders, left Orange River station. After some fighting, the Division on the 12th reached Ramdam, where Lord Roberts was concentrating his army; but the bulk of Kitchener's Horse had preceded the rest of the Mounted Infantry, and had joined General French before midnight on the 11th. At 2 AM on the 12th they set out with French for Dekiel's Drift, on the Riet. On the 13th, General French, who had crossed the Riet River on the 12th, left a squadron of Kitchener's Horse at Blaauwbosch Pan, about eight miles north-east of Dekiel's Drift, on the Riet, in order to protect the wells until the infantry, who were following, should arrive. Unfortunately the infantry took a different course, and instead of them a large force of Boers turned up, who attacked the squadron and compelled their surrender after they had made a very creditable defense in a farmhouse for two days. Lieutenants Carstens and Buchanan were killed in action about this time. Another squadron was part of the slender escort of the convoy which was lost on the Riet on the 13th. The convoy is said to have been seven miles long, and the escort, left to see it over a most difficult drift with Boers all round, was 300 strong. The escort was not captured. Notwithstanding this bad luck, the corps did excellent work before Bloemfontein was reached. About one half of the regiment was with Colonel Hannay when Cronje was discovered to be trekking across the front of the Vlth Division on 15th February, and they took part in the pursuit and the other operations which led to his capture. On 7th March they were engaged at Poplar-Grove. Five officers and five non-commissioned officers and men gained mention in the dispatch of 31st March for good work on the way to Bloemfontein. According to the official statement, the strength of the corps when it entered Bloemfontein on 13th March was 26 officers, 402 men, 270 horses, and 2 maxims. About the beginning of March Kitchener's Horse had been, along with the 6th and 8th Regiments of Regular Mounted Infantry, the City Imperial Volunteers Mounted Infantry, Nesbitt's Horse, and the New South Wales Mounted Infantry, put into the 2nd Brigade of Mounted Infantry under Colonel P W J Le Gallais, 8th Hussars,—a splendid officer, who led his brigade to victory on many occasions, but who afterwards fell at Bothaville, 6th November 1900, in the moment of success. The regiment fought with Le Gallais and General Tucker at the battle of Karee Siding on 29th March 1900, and they were attached to Ian Hamilton's force, which, towards the end of April, set out first to clear Thabanchu and thereafter take part in the northern advance, during which the regiment, along with the 2nd Mounted Infantry Regulars and Lovat's Scouts, was in the 6th corps under Colonel Legge, who was afterwards killed at Nooitgedacht. Winston Churchill, in his 'Ian Hamilton's March' relates that on 26 April Kitchener's Horse and a company of regular mounted infantry were told to hold a kopje near Thabanchu for the night, but about dusk they were ordered to retire. This the Boers endeavored to prevent, attacking the force with great determination: however, the attack was driven off, and the little body got into camp during the night. Captain F J Warren was severely wounded, 1 man killed, and several wounded. On the 30th, at the battle of Houtnek, the regiment, with great boldness and skill, seized Thoba Mountain, and it was during the enemy's attempt to regain this commanding position that a party of about 12 Gordon Highlanders and 13 of Kitchener's Horse under Captain Towse of the Gordons made the famous stand and bayonet charge. The incident is admirably described in 'Ian Hamilton's March' by Churchill, who was a spectator. Captain Towse, blinded by a bullet in the hour of triumph, got the VC. Lieutenants Parker and Munro and 5 men of Kitchener's Horse were killed, and Captains Ritchie and Cheyne and 8 men were wounded at Houtnek. In his telegram of 2nd May Lord Roberts remarked: "Kitchener's Horse is spoken of in terms of praise". On 4th May Ian Hamilton was again engaged, "and succeeded in preventing a junction of two Boer forces by a well-executed movement of some of the Household Cavalry, 12th Lancers, and Kitchener's Horse, who charged a body of the enemy and inflicted serious loss. They fled leaving their dead on the field, and their wounded to be attended by our doctors" (see Lord Roberts' telegram of 2nd May). In this affair Lieutenant Patrick Cameron was mortally wounded. The 'Standard' correspondent drew attention to the good work of the regiment at the crossing of the Zand River on 10th May. The regiment was present at Ian Hamilton's other actions on the way to Pretoria and at Diamond Hill (11th and 12th June). They started as a portion of Hunter's force designed to surround Prinsloo, but like Roberts' Horse were detached to pursue De Wet. On 24th July the regiment lost 9 men wounded at Stinkhoutboom. but about the same date they captured 5 of De Wet's wagons. When De Wet left the Reitzburg Hills Kitchener's Horse again crossed to the north of the Vaal and operated under Ridley, Hart, Clements, and other commanders in the district west of Johannesburg and Pretoria. In the dispatch of 10th October 1900 Lord Roberts mentioned that "De Lisle's corps of mounted infantry was withdrawn from Clements' column and moved by rail on 17th September to Rhenoster, where it was joined by 250 men of Kitchener's Horse from Kroonstad". The work of De Lisle's men is briefly sketched under the 1st and 2nd New South Wales Mounted Infantry. This portion of Kitchener's Horse took part in the pursuit of De Wet on the south side of the Vaal and other operations under General C Knox in the Kroonstad district during September, October, and November, and were present on 27th October when 2 guns were captured at Rensburg, and in the very successful action of Bothaville on 6th November when 6 guns, a pom-pom, a maxim, and 130 prisoners were taken. Another portion of the corps was employed in the Eastern Transvaal, and frequently had odd casualties about Brugspruit in September and the first half of October. They took part in French's march from the Delagoa Railway to Heidelberg in October 1900,—a march which only a great leader could have brought off successfully, having regard to the strength of the enemy in the district at the time. The fighting was continuous and the strain on all most severe. In Lieutenant Colonel Watkin-Yardley's 'With the Inniskilling Dragoons', page 217, speaking of the arrival of the force at Heidelberg, he says: "Lieutenant Elphick, with his troop of Kitchener's Horse, which had requested to be attached to the Inniskillings at Machadodorp, and fought gallantly with us throughout the march, also left the column". On this march the troop lost Sergeant Hunter killed, 2 wounded, and 2 missing. A detachment which had remained in the Gatsrand and Krugersdorp district on the north side of the Vaal operated throughout September with Clements and Ridley, and had sharp fighting under General Hart on 23rd and 24th November 1900, when they lost 2 men killed. This portion of the regiment was with General Clements when he was attacked and met with disaster at Nooitgedacht in the Megaliesberg on 13th December 1900. It will be remembered that a high hill commanding the camp, and which was garrisoned by 4 companies of the 2nd Battalion Northumberland Fusiliers, was assaulted by the enemy in great force and was captured. Kitchener's Horse and the 2nd Battalion Mounted Infantry were on the west or left front of the camp; the enemy attacked upon this side in the most determined manner, and although some pickets were captured or wiped out entirely, the attack on the west was driven off, the enemy losing very heavily in his endeavor to push into the camp from that direction. When, however, it was seen that the high hill commanding the camp had been captured by the enemy, the General decided to retire. With difficulty General Clements got away his guns and most of his ammunition, but the camp was left standing and some stores were lost. The losses of Kitchener's Horse were severe: Lieutenant Skene and 8 men were killed, and Captain Stevenson and about 12 men wounded and about 40 taken prisoners. Some of the latter were wounded. Several mentions were gained by the corps on this occasion, and those who were present praised very highly the conduct of Kitchener's Horse and their old comrades the 2nd Battalion Regular Mounted Infantry, also the 2nd Battalion King's Own Yorkshire Light Infantry. The regiment, sadly reduced in numbers, operated in the second phase of the war chiefly in the Western Transvaal, and had a few casualties on various occasions. A reference in the dispatch of 8th May 1901 to a very valuable bit of work by men of Roberts' Horse and Kitchener's Horse has already been quoted under the former corps. Both regiments were for a time in a column under Colonel Hickie (dispatch of 8th July 1901), and continued to do good work in the Transvaal. On 8th and 9th July both Roberts' and Kitchener's Horse were sharply engaged and suffered casualties. They were, during the next few months, constantly in touch with the enemy, and often suffered losses, as on 4th November 1901, when Kitchener's Horse had 5 men wounded at Vaalbank.


-
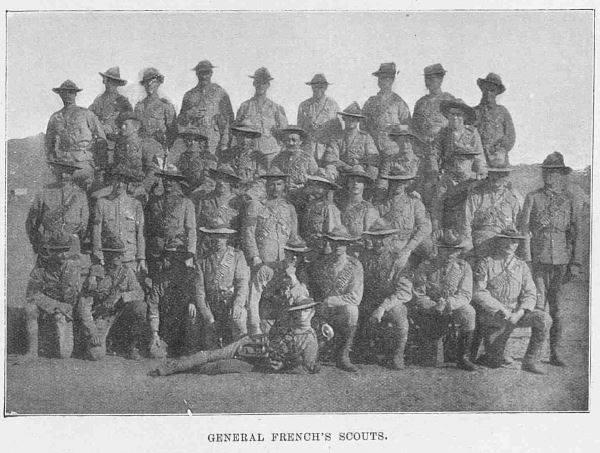
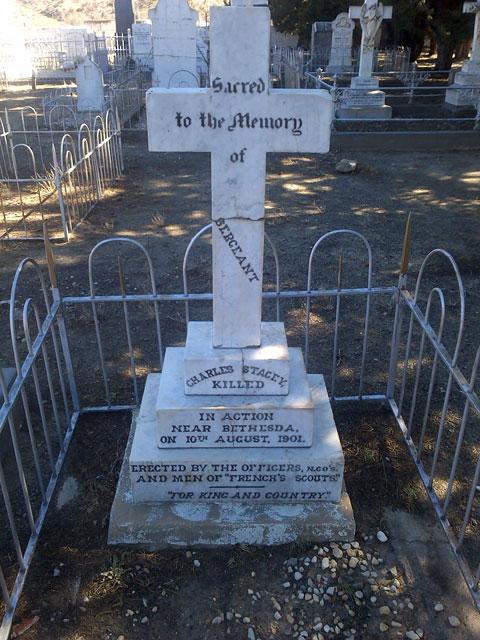
Queen’s South Africa Medal, 4 bars, Cape Colony, Orange Free State, Belfast, SA 1901, Tpr J. Roux, French’s Scouts. Taken prisoner and released at Bethesda on 10/08/1901. Entitlement confirmed on the roll, an unusual combination with Belfast bar. Johannes (John) Roux served as a Scout with French’s Scouts. He joined the unit on 3rd May 1900 from the District Mounted Rifles (No. 786; WO127), and was discharged at Fort Peddie on 1 December 1901. During the war he was taken as a prisoner of war and was released near Bethesda Road on 10 August 1901. (Source: South African Field Force Casualty Roll) His father was P A Roux of Peddie, near King William’s Town This corps was formed towards the close of 1899. Its greatest strength was about three squadrons, but it afterwards fell much in numbers. The corps was commanded by Captain Bettelheim, and was composed of men selected for knowledge of the country and its ways. French's Scouts did fine work throughout two years' campaigning, generally in the districts in which the great cavalry leader after whom they were called was operating, but the whole of the corps was not always with General French; as, for example, while he was relieving Kimberley part of the Scouts went with him, but another portion was left in the Colesberg district with General Clements, under whom they fought and suffered some losses in February 1900. When the advance from Bloemfontein to Pretoria was undertaken French's Scouts accompanied the cavalry, operating on the left flank. They were present at Diamond Hill, 11th to 13th June, where they had several casualties. After that they undertook many very daring reconnaissances north and east of Pretoria. In July 1900 the corps was in the forefront of the advance along the Delagoa line, and afterwards in the movements to Barberton in September and to Heidelberg in October. Having operated for a time in the central district, they took part in the great sweeping movement in the first quarter of 1901 to the eastern border of the Transvaal. During all these months of constant fighting their losses had been wonderfully few when the extremely dangerous nature of their tasks is borne in mine the evil day was to come. The corps had been back to Cape Colony, and near Bethesda, on August 1901, they lost Sergeant Stacey killed, the commander, Captain Bettelheim, Lieutenant C de V Duff, Sergeant Major Chiazzari, and several men wounded. Mention in Dispatches: LORD ROBERTS' DISPATCHES: 31st March 1900, for relief of Kimberley and advance to Bloemfontein. Sergeant A K Green and Private W S Penny. 2nd April 1901. Captain Bettelheim; Sergeant (now Lieutenant) A K Green, Private W S Penny. LORD KITCHENER'S DISPATCH: 8th May 1901. Lieutenant F Maxwell, for coolness and courage with which he extricated a patrol on 16th June. Sergeant Major Chiazzari, at Kalabashfontein, 10th June, rendered most valuable service by holding a ridge with a small party. Battle of Bethesda: The Derbyshire Times of Saturday, 14 September 1901 carried an article headed, “A Bolsover man with French’s Scouts – The Encounter with Theron’s Commando which shed light on what they got up to: “The recent engagement between French’s Scouts, about 50 strong, who were proceeding to join a column near Bethesda, and Theron’s Commando was noticeable for the magnificent defense of the Scouts, although surrounded in the hills and greatly outnumbered, they offered a splendid resistance before they surrendered. Donald Spencer who is on of French’s Scouts wrote as follows: Graaff Reinet, August 14, 1901 - We have been on the trek for these past three weeks, and being on the veld it is impossible to write. We arrived here day before yesterday. You will be sorry to ere that we were captured by the Boers, 50 miles out of this place. It was a terrible affair but could not be helped. We being only 50 strong were marching from a place called Bethesda Road Station, to the town of Bethesda, a distance of 18 miles. Having to form a rear-guard and advance-guard, it left very few to do the scouting; however, we managed to scrape up about 20 for scouting, these going ahead by about 1 ½ miles. When we got within three miles of the town, the Boers opened fire upon us, (the advance scouts); we were just going through a nek, and the Boers were on each side of us and in front of us, and later we discovered they had surrounded us. By this time all hands were blazing away for all they were worth. Mind you we had absolutely no cover, except our horses, being in the nek and on the road. The fight continued three hours and twenty minutes, from 1 p.m. to 4. 20 p.m., and a hot time we had. At last both carbine and revolver ammunition ran out, until the last round was fired, then down came the Boers onto us. There was nothing to do but “hands up”. There were 14 of us severely wounded, including our Commander, Captain Henry Bettelheim, and one man killed. Seventeen Boers were wounded and 5 killed; this we learned afterwards. However, we took good care they got no ammunition, it having all been used. The Boers being in possession of the town they marched us to it, and there they put us in the gaol, and kept us there for the night. Next morning, they took all our boots, socks, leggings, coats, blankets, money and whatever they fancied and let us go to walk to Graaff Reinet, a distance of 50 miles bare-footed, no coats and no blankets for the nights, which are yet very cold, however we have arrived safely although a little foot-sore.” Papers for ORs in French's Scouts - WO126/45-46 at Kew. This is an extract from National Archives Ref WO 126/45 for the Boer War service records for selected names starting between L and R for the FRENCH’S SCOUTS. There were a variety of standard forms and also many sections of the forms were incomplete. As a result, the details included vary. Johannes ROUX British subject, Previous service: French Scouts Enlisted: Johannesburg 1/V/01 Father: P A Roux, Peddie near King Williams Town Extract from http://www.nieu-bethesda.com/about/graaff-reinet-and-the-second-anglo-boer-war-1899-1902/ On 10 August 1901 the commandos of Lotter and Cmdt J Theron captured a party (50-60 men) of French’s Scouts near Bethesda Road, stripping them of all their clothing before letting them go. In the bitterly cold month of August in the Sneeuberg these commandos were in desperate need of extra clothing. Theron moved from New Bethesda to the Camdeboo and on south where he joined up with Scheepers(18) while Lotter moved on to Rhenosterberg.


-
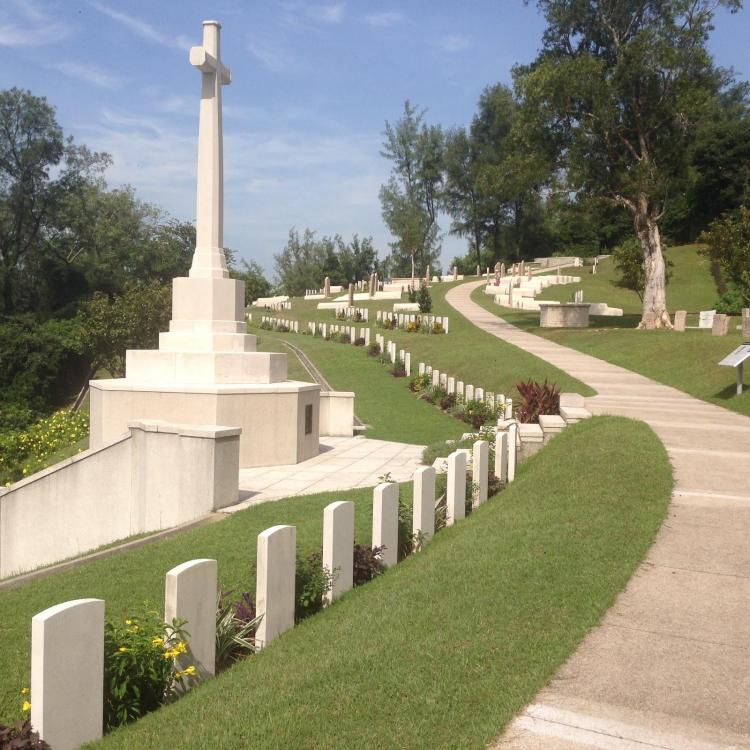
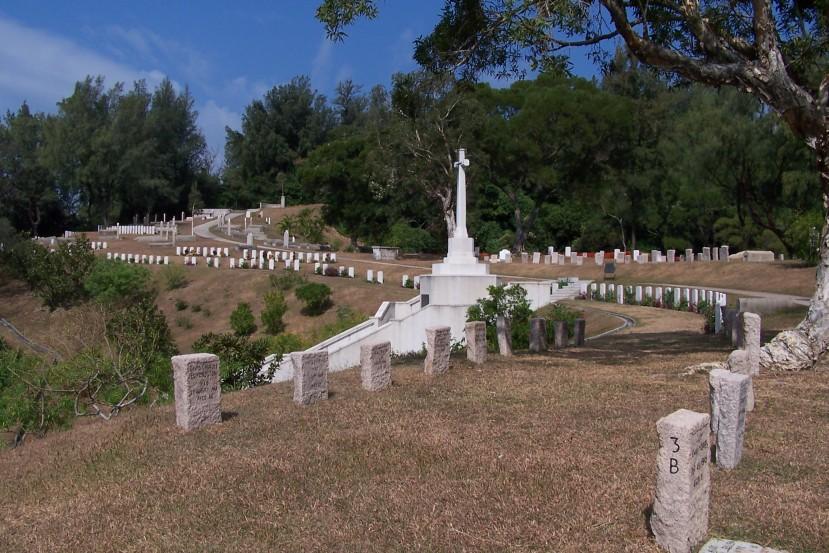
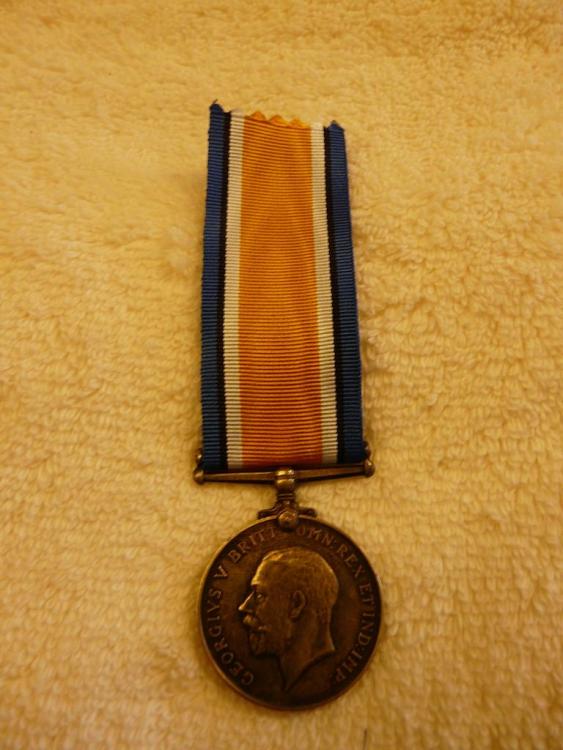
I recently came across another lonely BWM, sadly without its suspension officially named to 3141 Pte. S. J. Stansbey. 21-London R. A PoW, captured in Hong Kong and buried in Stanley Cemetery. Having visited the cemetery a few times, it is an important part of the collection. If anyone knows of the whereabouts of Stansbey's Victory Medal, please contact me. Sydney John Cleave Stanesby was born ca. 1894/5 in Wandsworth, London. In the 1911 census, he lived at 6 Quarry Rd., Wandsworth Common SW. He was 16 at the time, single and a clerk. His father was Sydney Ernest (45); mother Gertrude Marie Wyld (40) and he had three siblings, Charles Owen (14), Dora Gertrude Sal (6) and Harold Cecil (4). In WWI, Stanesby served was a private in the 21 London Regt. as indicated on his BWM, but later in the Essex Regiment. He was awarded a WWI pair for his service. His family must have immigrated to Australia as records indicate his next of kin, parents and wife, Mary Stanesby, were located in Avalon Beach, New South Wales, Australia. Stanesby obviously worked in Hong Kong as he was a private in the Hong Kong Volunteer Defence Corps. His service number was 19559. He was captured in the Battle of Hong Kong on the 19 December, 1941 and was in one of the PoW camps in the area. He died on Thursday, 14 May 1942 while in captivity at age 48 and is buried in grave 1.A.73 in Stanley Military Cemetery. The inscription on his headstone is, "His duty fearlessly and nobly done. Ever remembered" . In the last photo (with the brownish grass) his grave is located in the first row and to the left of the cross. Hong Kong fell to the Japanese on Christmas Day 1941 following a brief but intense period of fighting. During the Japanese occupation, Stanley jail and village were used as a prisoner of war and civilian internment camp and the cemetery, which had not been used for more than 70 years, was reopened for burials from the camp. After the war, the cemetery was extended on its northern side when graves were brought in from civilian burial grounds and isolated sites in the surrounding country. Although the cemetery as a whole is laid out and maintained as a military cemetery, in the older part, service graves and the graves of civilian internees who died during the Japanese occupation are intermingled. A number of the graves in this part of the cemetery are still marked by the original headstones erected by the prisoners of war, who collected the granite from the 19th century fortifications and carved the inscriptions themselves. Nearly all casualties of the local defence forces, chiefly the Hong Kong Volunteer Defence Force and the British Army Aid Group, are buried in this cemetery. The British Army Aid Group was a military establishment which came into being early in 1942 to encourage and facilitate escapes, to assist escapees and to get information and medical supplies into the camps. Attached to the establishment was a large staff of civilian employees operating in an extensive area of enemy held territory and the group gradually developed into an organisation for the collection of intelligence of military value and later into an escape and evasion organisation for the American Air Force. There are now 598 Commonwealth servicemen of the Second World War buried or commemorated in this cemetery. 175 of the burials are unidentified, but a number of special memorials commemorate casualties known to be buried among them. The names of the 96 civilian internees buried in this cemetery are recorded in volume 7 of the Civilian War Dead Roll of Honour. The cemetery also contains the new Hong Kong Memorial, which commemorates, by name, Chinese casualties of the two world wars who have no known grave. There are also three special memorials to First World War casualties buried in cemeteries in Kowloon and Hong Kong, whose graves have since been lost.

-
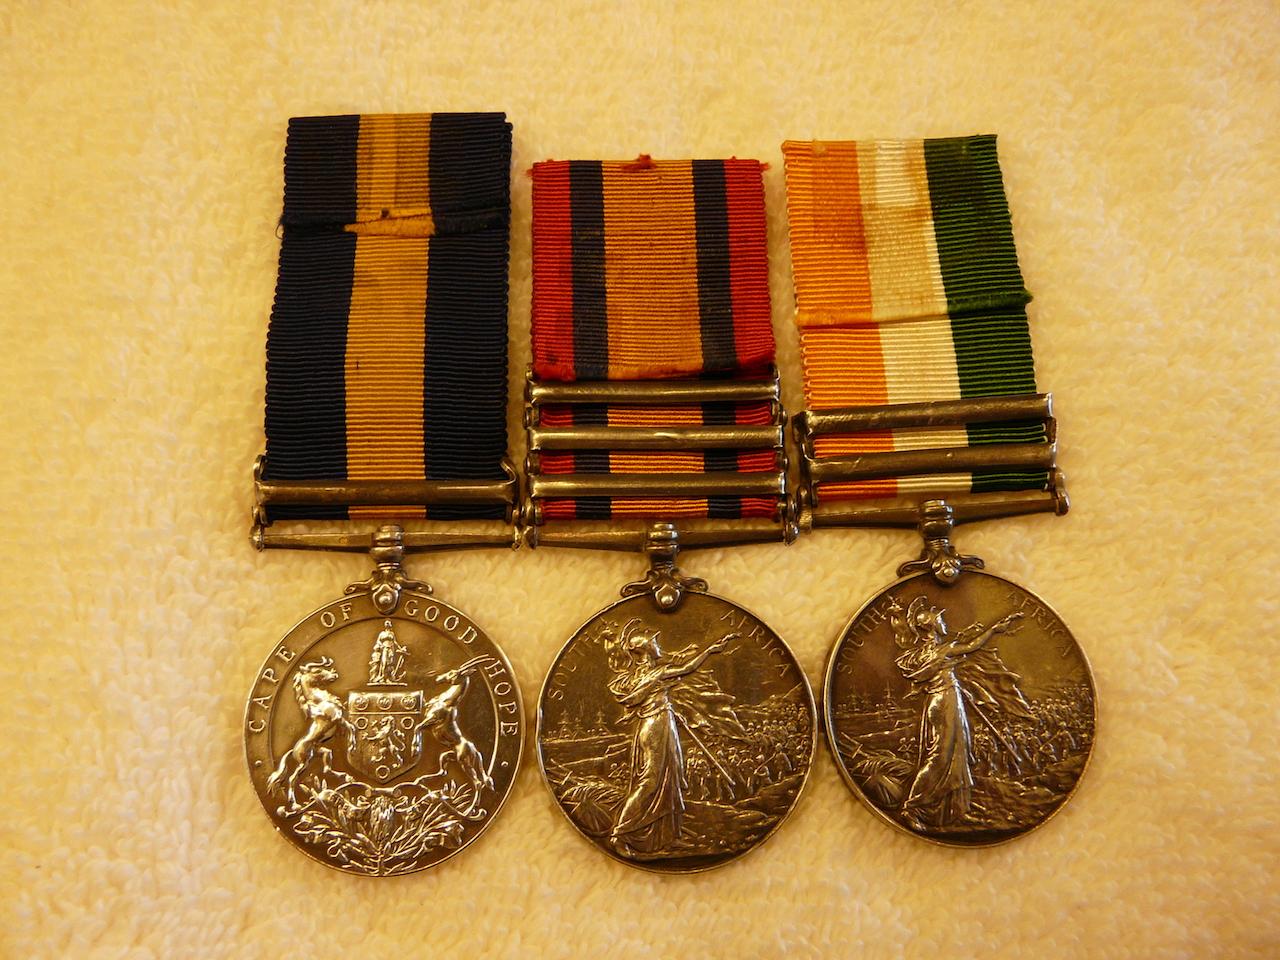
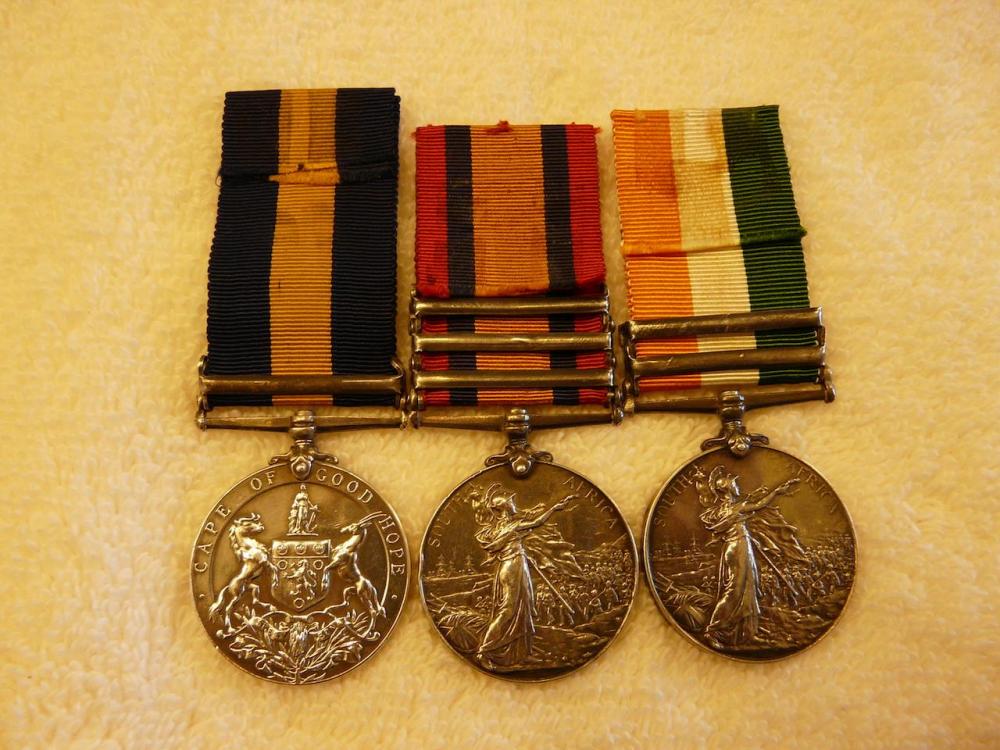
Great News. The reunited trio of 930 Pte. M. Whitaker. (See above for more info on Whitaker and his Cape of Good Hope Medal). 930 Pte. M Whitaker served with the Cape Police District 1 and received his Cape of Good Hope medal to him as a private, but his KSA as a corporal. He was captured and held as a PoW and later released on 6 June 1900 at Waterval.
-
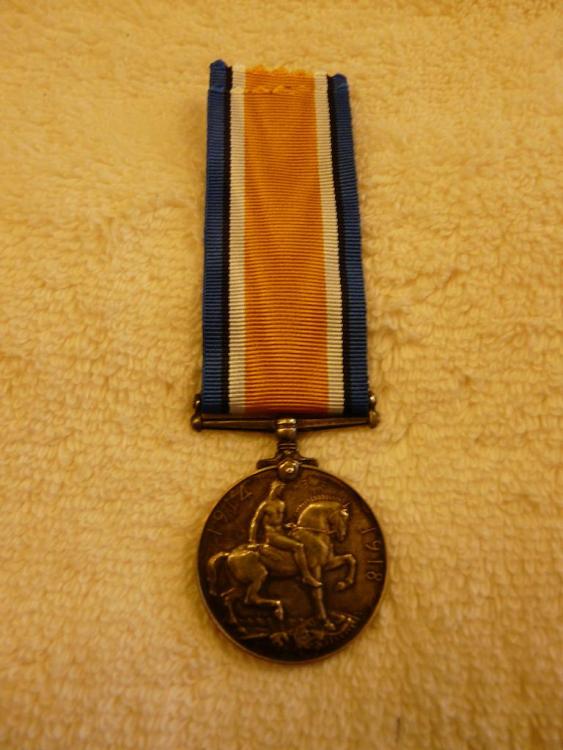
I recently came across a lonely BWM that is missing its partner Victory Medal. It is officially named to: Lieut. R.E. White RAF. Please contact if you know the whereabouts of Lt. White's Victory Medal. At first, it may not seem like anything special, but... Roger Eldridge White was an American Volunteer in the RAF and was shot down and captured on 17/7/1918 while flying with 19 Squadron. He was a PoW at Karlsruhe until until liberated and finally repatriated on 5/12/1918. There were not many Americans flying in the RAF and very few if any others who were PoWs. This is a rare medal. Roger Eldridge White, was born on 29 March 1895. He lived at 34 Somerset Avenue, Lassington, Massachusetts, USA. His mother, Mrs. G. R. White, was listed as his next of kin. He was a law student at North Eastern College in Boston, MA from 1915 to 1917. He is listed on the General List of 12/12/1917 as a Temporary 2nd Lt. in the RAF. He was qualified on: Curtis, Avro, Sopwith Pup and Dolphin. He served with 96 Sqd., 90 Sqd. and was flying with 19 Squadron when shot down on 17/7/1918. He was transferred to the unemployed list on 25/7/1919. His postwar address on 11/4/1928 was 31 Couch Street; Tauton, Massachusetts, USA No. 19 Squadron of the Royal Flying Corps was founded on 1 September 1915 training on a variety of aircraft before being deployed to France in July 1916 flying Royal Aircraft Factory B.E. 12 and re-equipping with the more suitable French-built SPAD S.VIIs. From November 1917, the squadron started to receive Sopwith Dolphins to replace its Spads, it being fully equipped with the Dolphin during January 1918, flying its first operational patrol with the new fighter on 3 February. In 1918, the squadron was re-equipped with Sopwith Dolphins, flying escort duties. By the end of the war, 19 Squadron had had a score of flying aces among its ranks. At least one other of 19 Sqd. fliers, a Canadian, George Robert Long, was captured on 6 October 1917 in the Lille area and spent the rest of the war in a number of POW camps, including Holzminden POW camp. It was his very first flight, in a Spad VII, B3508. He was shot down by Gefr. J. Funk, flying with Ja30. He had first been a member of the C.E.F. in the infantry and was wounded a number of times. He wasn't repatriated until 14 December 1918, to return home to Ottawa, Ontario, Canada.
-
Haven't added much, but now have some new Franco-Prussian War groups that I'll add.

-
The latest acquisition.


-
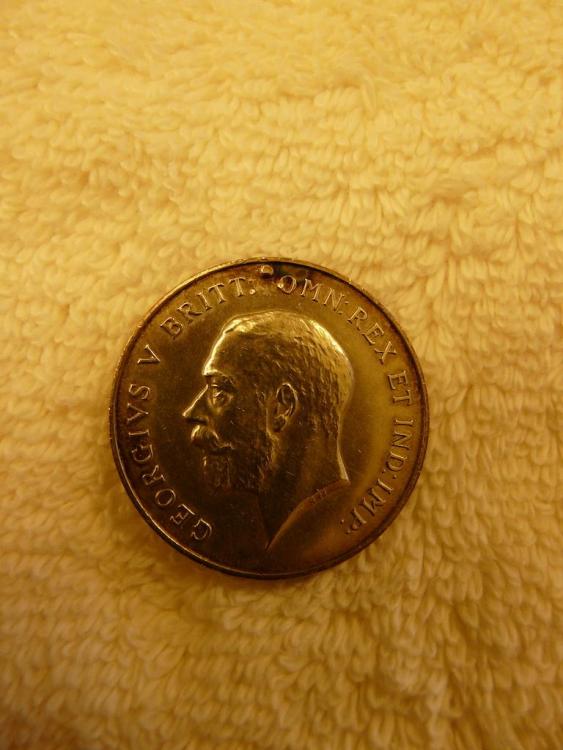
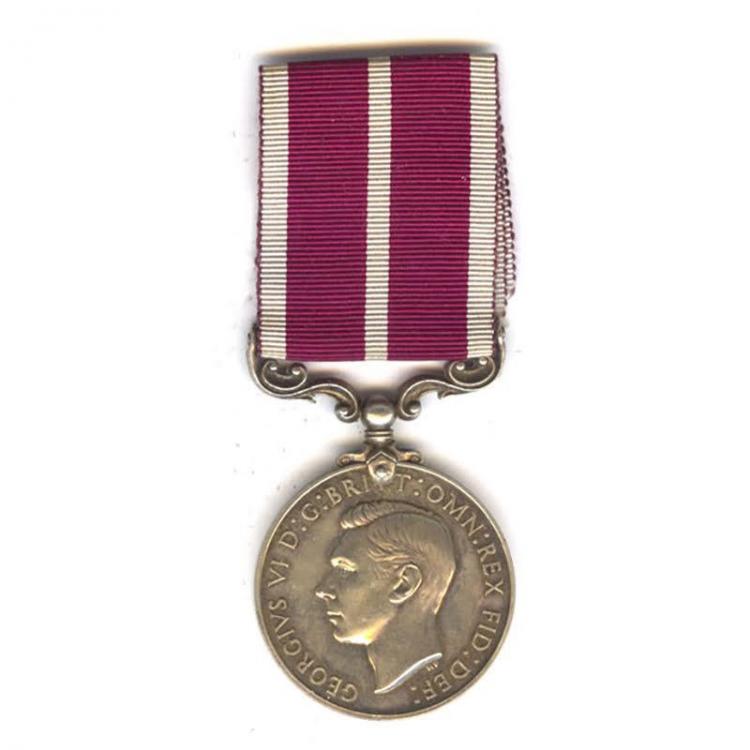
A single WW2 War Medal with the box
azyeoman replied to Noor's topic in Great Britain: Orders, Gallantry, Campaign Medals
Excellent research. Thank you for posting; it's interesting. -
My Prisoner of War Collection
azyeoman replied to POWCollector's topic in Great Britain: Orders, Gallantry, Campaign Medals
Congrats! It's always nice to put a face to a group. -
Congrats on a wonderful acquisition. I look forward to reading more on what the units did.
-
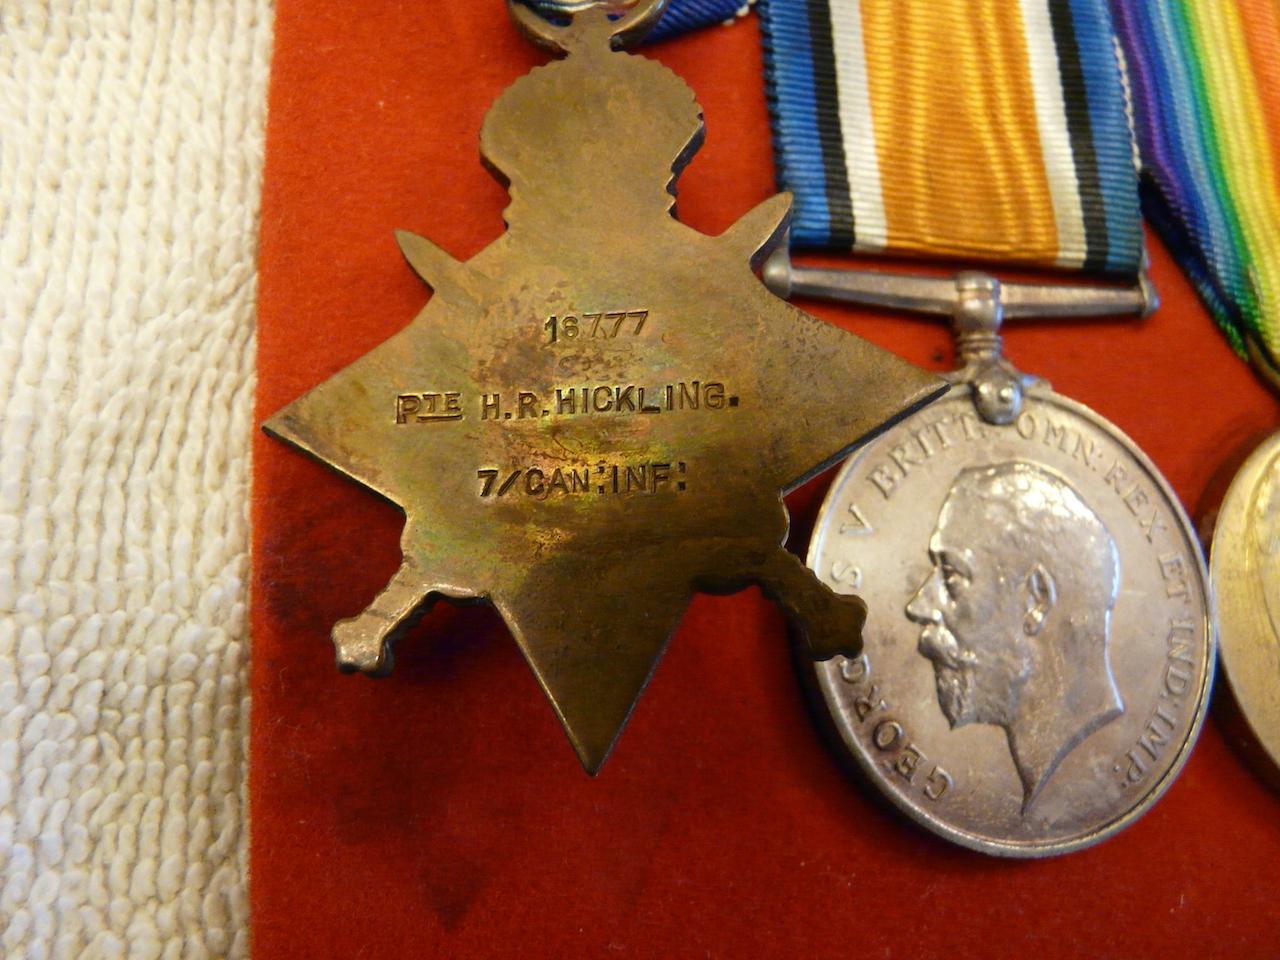
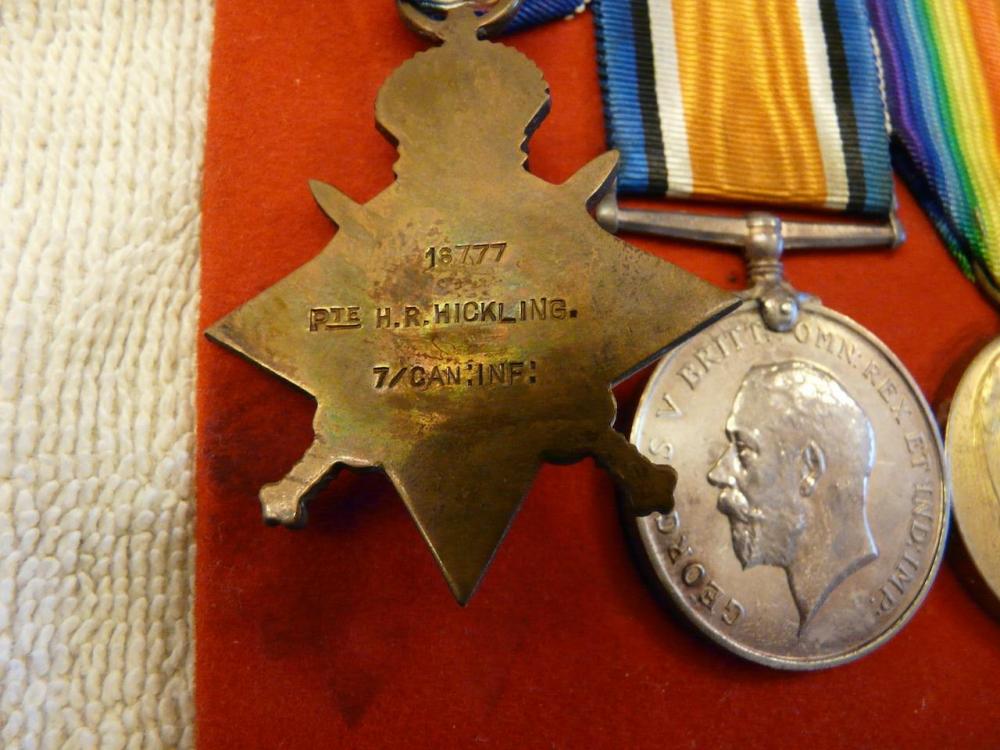
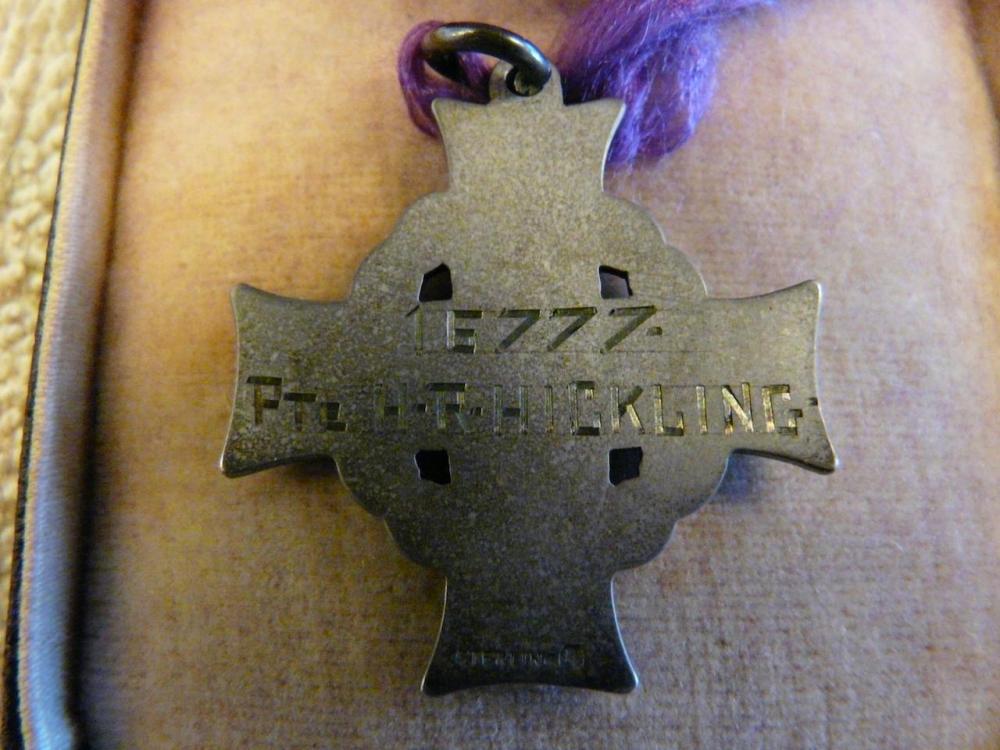
A rare Canadian trio and memorial cross to one of 300 of 3,847 WWI Canadian PoWs who died in captivity. Canadian 1914-’15 trio officially named to 16777 Pte. H. R. Hickling, 7 Can Inf. The 1914-15 Star impressed: 16777 Pte H.R. HICKLING. 7/CAN:INF: The BWM and Victory impressed: 16777 PTE. H.R. HICKLING. 7-CAN. INF. The Canadian Memorial Cross is correctly engraved: 16777 PTE. H.R. HICKLING Horace Reginald Hickling was born on 6 March 1884 in Brockmore, Staffordshire, England. When he enlisted in the CEF at Valcartier (approx 25 km north of Quebec) on 25 Sep 1914 he was 30 years old and a piano salesman by trade. He gave his next of kin as his wife in Melton Mowbray, England. He died on 04 May 1915 while a PoW. During WWI 132 Canadian officers and 3,715 Canadian other ranks were taken prisoner. The majority of soldiers were captured in battle by German forces on the Western Front. Around 1,400, Canadians were captured following the first major engagement of the Canadian Expeditionary Force in the Second Battle of Ypres in Belgium in April 1915 when the 1st Canadian Division first encountered chlorine gas released by the Germans. The 3rd Canadian Division also suffered a large number of prisoners at Mount Sorrel in June 1916 with over 500 men were captured in one day. Boredom, anxiety over the fate of friends and comrades was the greatest problems for Allied prisoners held captive in Germany. The stress of not knowing when the war would end and how many years of captivity lay ahead was also a major factor. Yet, most PoWs in Germany were treated in accordance with the revised Hague Convention of 1907. Nevertheless, there were many complaints that the “spirit” of the convention was not observed because prisoners were sometimes treated unfairly and inhumanely. By 1918, the PoWs’ diets suffered, because of the food shortages in Germany. By the war’s 300 Canadian soldiers had died in captivity along the western front. For more information see: https://cdnhistorybits.wordpress.com/2017/03/14/canadian-pows-ww1/

-
As I understand it, the general consensus is the if the number has a three as one of the digits, then it should be a flat or straight-across at the top three and NOT a rounded three like this 3. I have made sure that any bronze BWMs to the CLC that I've had, have always had a flat three. They are "traceable" and the above mentioned book is excellent. I've not come across fake bronze BWMs for other LCs, but they may be out there. They are a fascinating medal to collect and the ones from Aden and Egypt are rare.
-
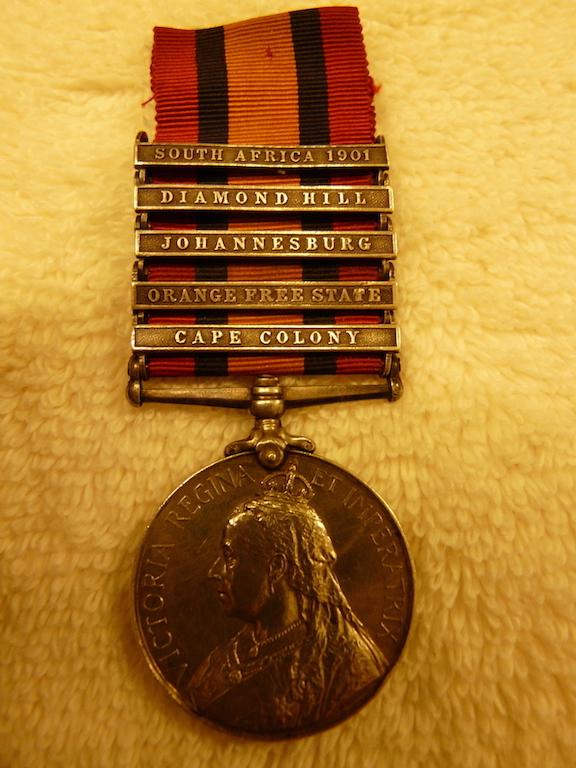
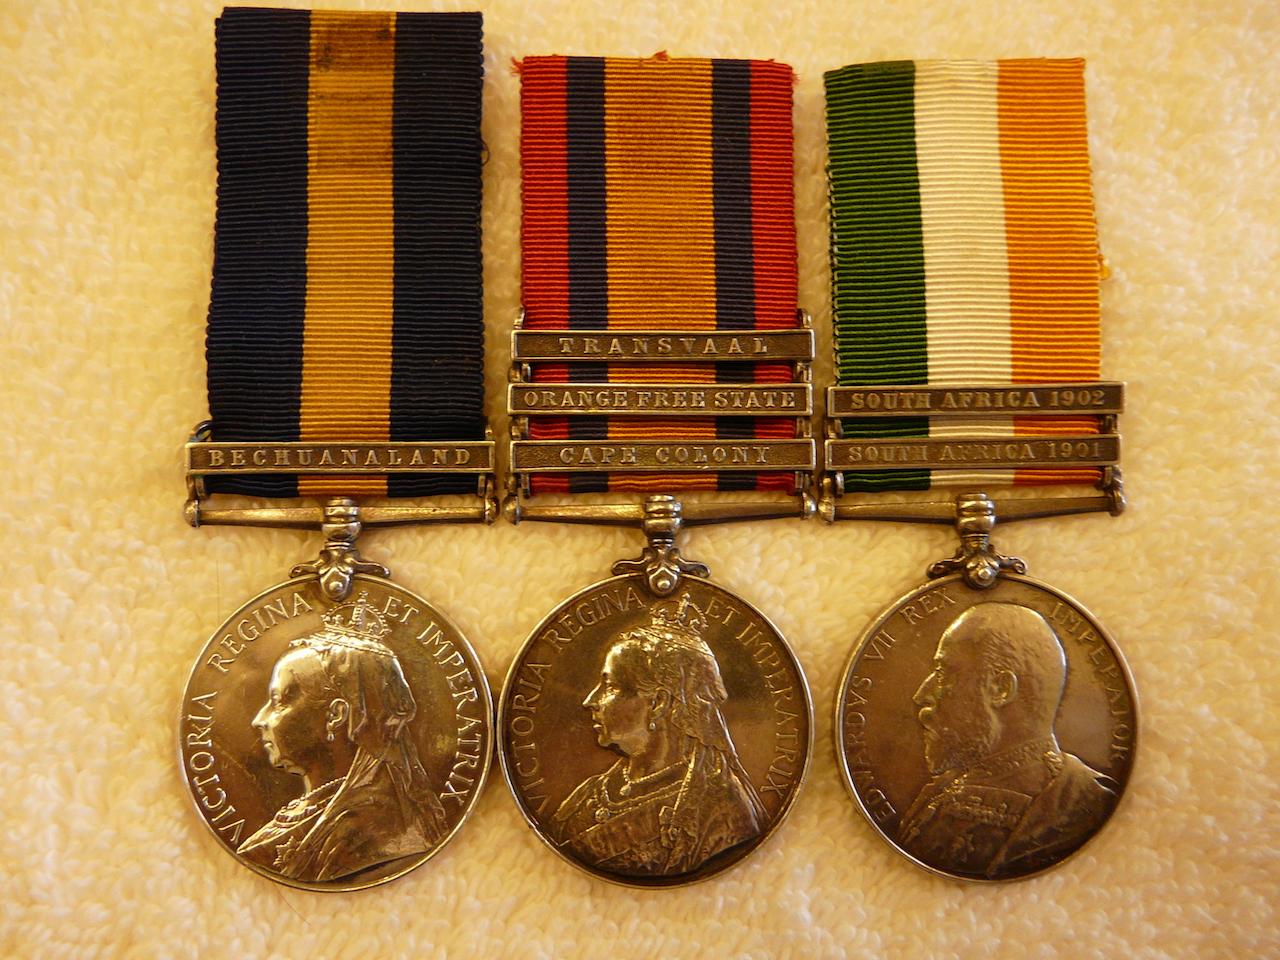
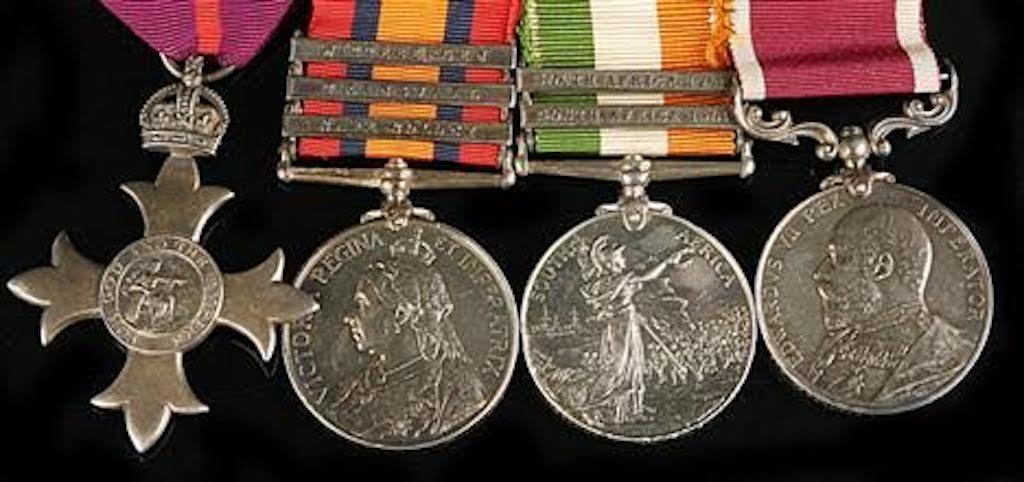
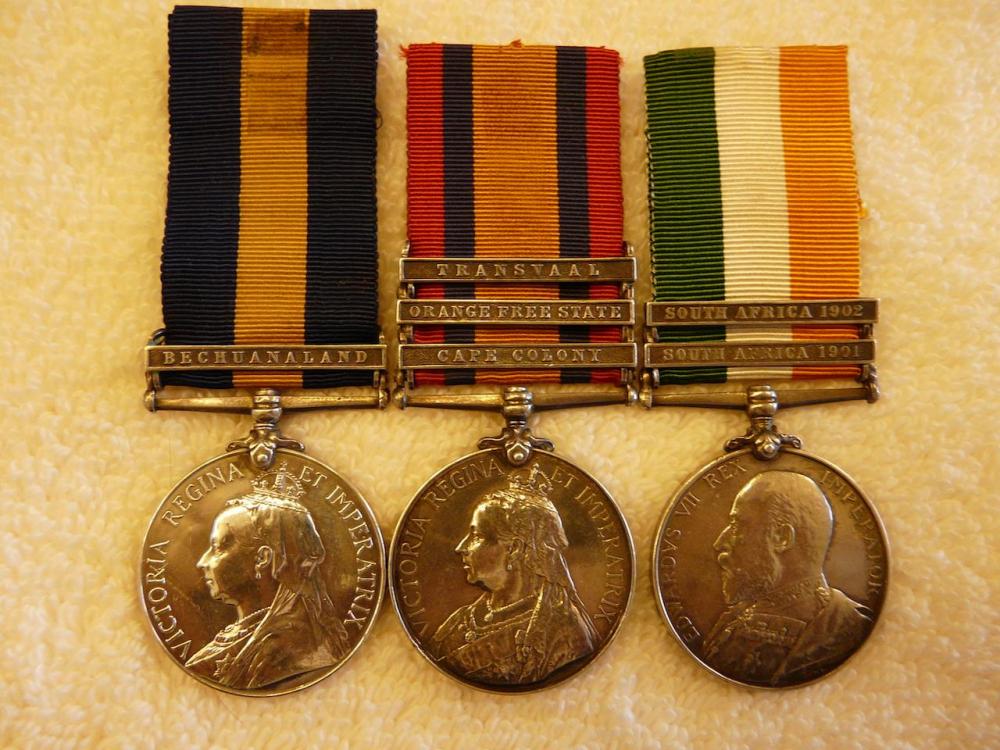
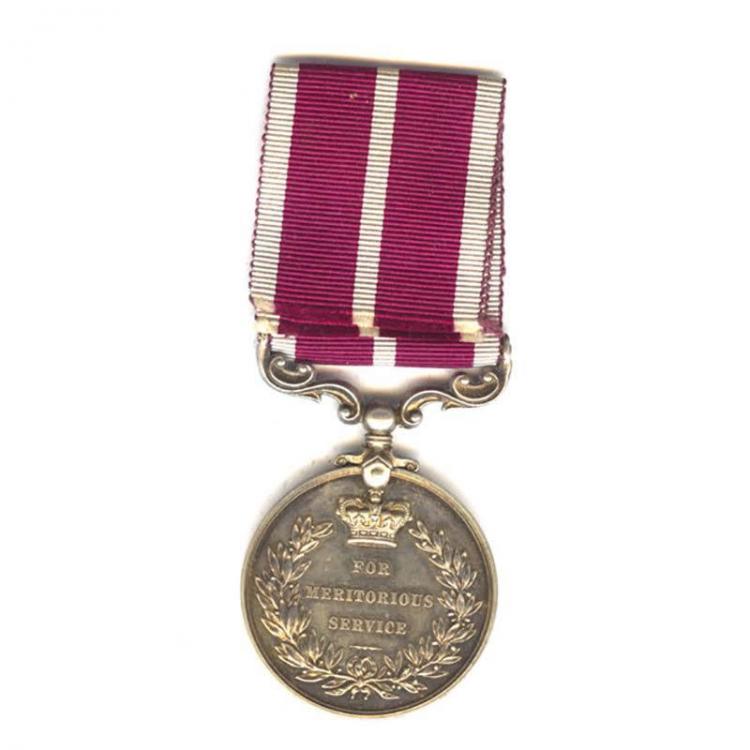
Meritorious Service Medal, GVI, Captain & Quartermaster James Acheson, MBE, R.A.S.C. Officially impressed: “T/7978 W.O. CL. 1. J. Acheson. R.A.S.C.” James Acheson was born in Aldershot on 10 January 1873. The son of Ann & Samuel Acheson, a City Policeman. By the age of 18, on the 1891 Census he is listed as a Driver with 29 Company, A.S.C. in Chelsea London. He went to South Africa to serve in the Boer War with 29 Company, A.S.C. as Sergeant with the service number 7978. During the war he was taken as a prisoner of war on 18 February 1900 at Waterval Drift. He was later released on 6 June 1900. Following his release he joined 36th Company A.S.C. from June 1900 to August 1900, before joining 37th Company for the rest of the war. His service earned him the Q.S.A. with 2 bars for Cape Colony and Transvaal with a 2 bar K.S.A. medal/ Shortly after returning home he married Lillian Wardell at the Church of St Michael Walton in York, he was now Company Sergeant Major. In Army Order 240 of October 1906, Staff Sergeant J. Acheson was awarded the Army Long Service & Good Conduct Medal. As WW1 broke out, the London Gazette of 11 August 1914 lists First Class Sergeant Major James Acheson, 41 years old, to be commissioned as Quartermaster with the honorary rank of Lieutenant from 12 August 1914. The London Gazette of 19 September 1917 lists his promotion to Honorary Captain as of 1 July 1917. He did not serve abroad during the war, staying at home to train the soldiers, the Army List of July 1915, lists him as Quartermaster of the Army Service Corps Training Establishment at Aldershot. He continued his service after the war returning from Malta in 1926 for his final posting at Bulford. His last army list entry was in January 1928, he retired shortly afterwards aged 55. Although he did not earn any campaign medals for WW1, he was appointed as Member of the Order of the British Empire, announced in the London Gazette of 3rd June 1919. Many years after his retirement in the Army Orders of December 1952, aged 79, he was awarded the Meritorious Service Medal. He died soon after on 5 August 1956 at the age of 82 living in Salisbury Missing MBE (Type I), QSA (Wittebergen, Trans, CC); KSA (01 & 02) and EDVII LSGC Sold; Lot 151 Dreweatts Auction Bristol on 23 August 2011 Please contact me if known as I’d like to reunite the group. Description: An M.B.E. `Boer War` Group of Four to Company Sergeant Major J. Acheson, Army Service Corps, The Most Excellent Order of the British Empire M.B.E. badge in frosted silver, Queen`s South Africa Medal, three clasps Wittebergen, Transvaal, Cape Colony (7978 Sgt,. J. Acheson. A.S.C.) King`s South Africa, two clasps South Africa 1901 South Africa 1902, (7978 C.S. Major. J. Acheson. A.S.C.) Long Service and Good Conduct Medal EDVII (7978 St. Sjt. Mjr. J. Acheson. A.S.C.), mounted for wearing with related paperwork.

-
Thanks very much Mark, and welcome to GMIC. It's an excellent forum and a great place to learn so much about historical and contemporary issues.
-
Another nice Franco-Prussian War bar with a very nice EK2.
-
A life well lived
azyeoman replied to dante's topic in Great Britain: Orders, Gallantry, Campaign Medals
Love the poem, thanks for sharing! -
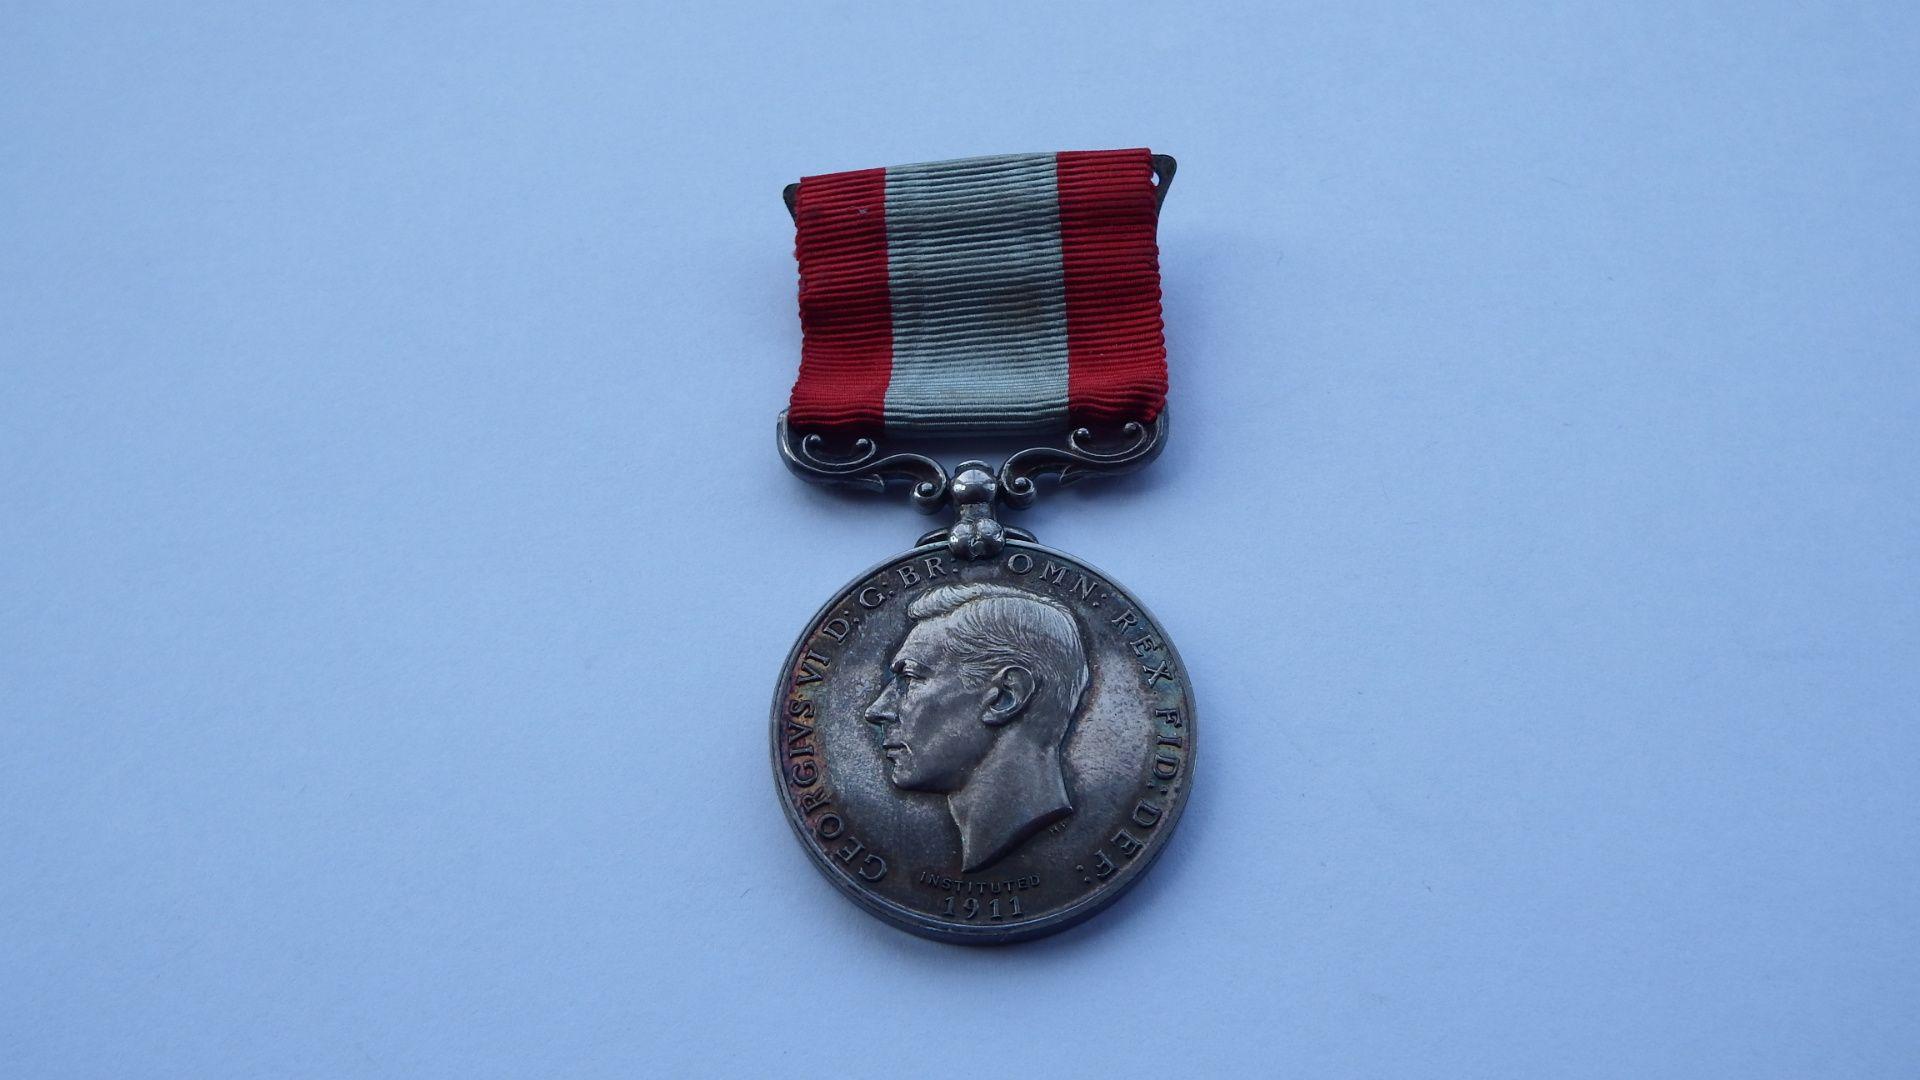
It appears to be a long service and good conduct/merit medal for around 30 years. Pretty special to the recipient...
-
Hi Paul, I haven't a clue. Wasn't it awarded for the F-P War? Why do you think it was for WWI? Cheers,
-
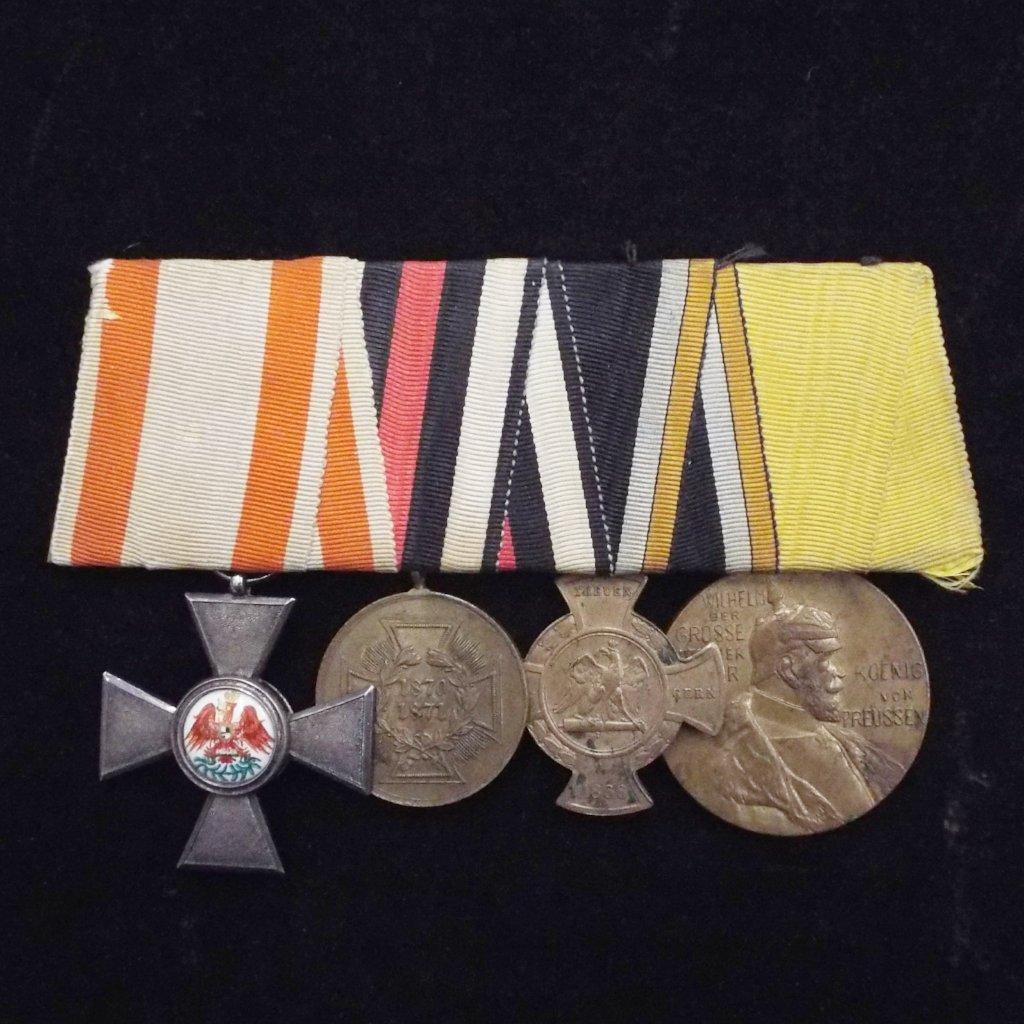
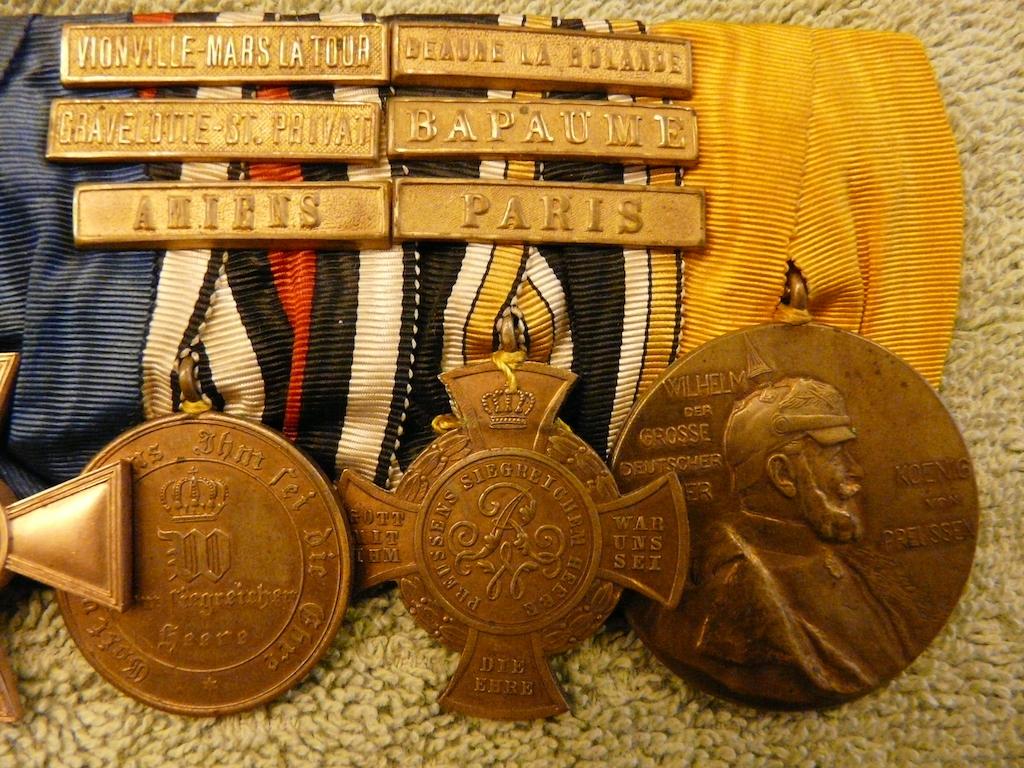
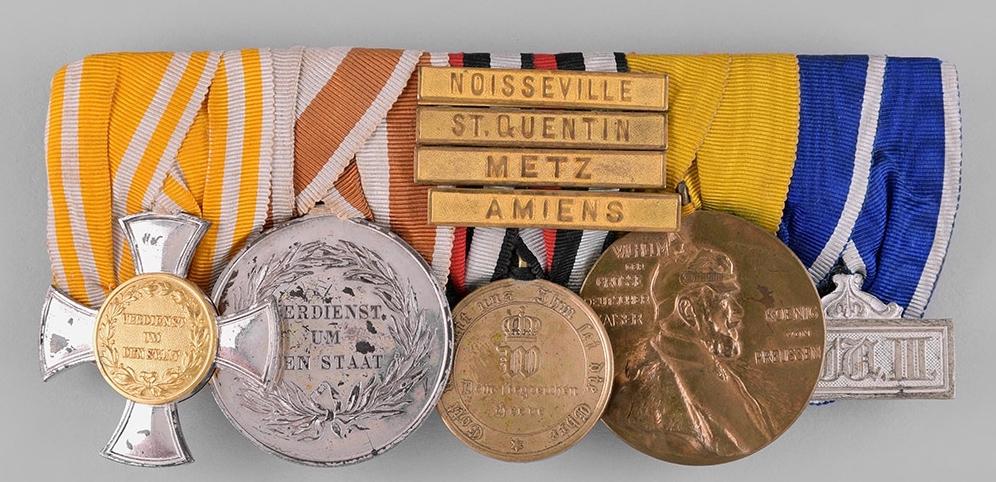
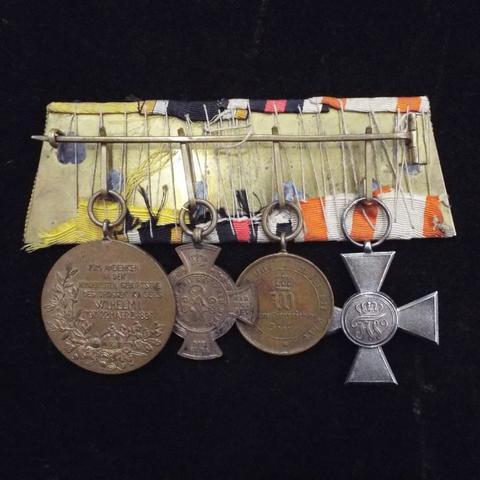
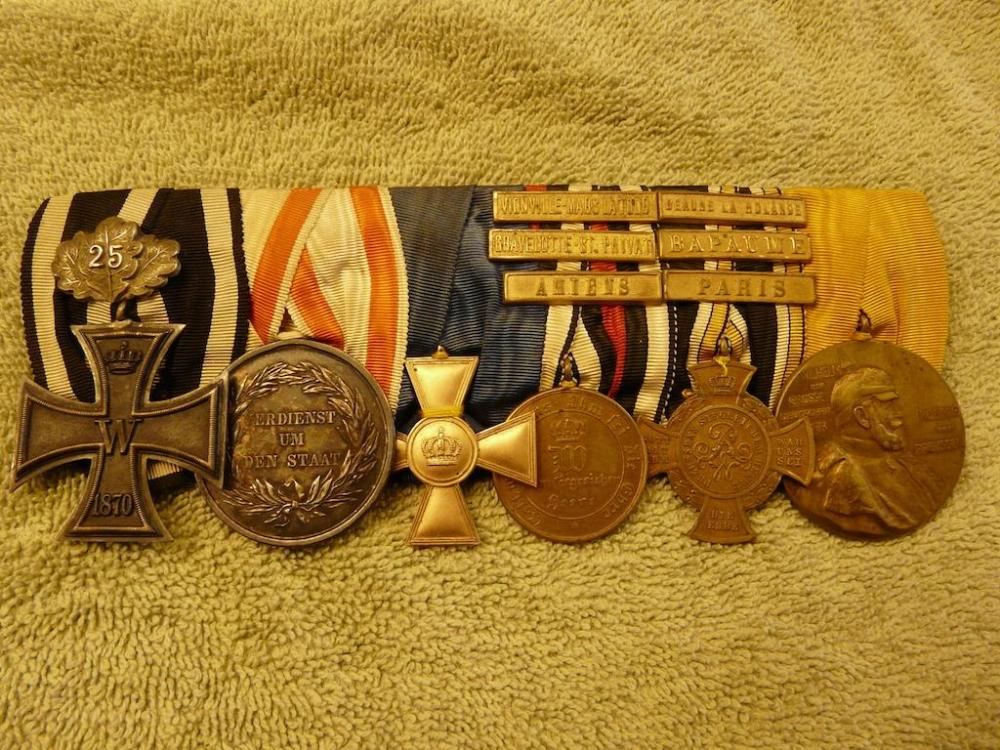
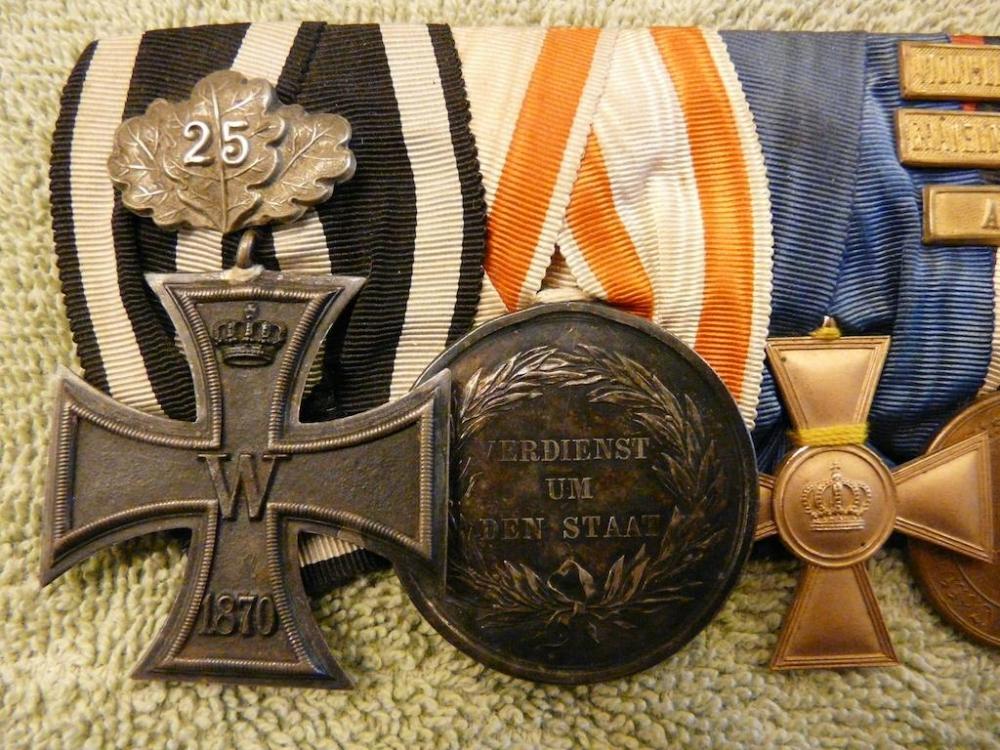
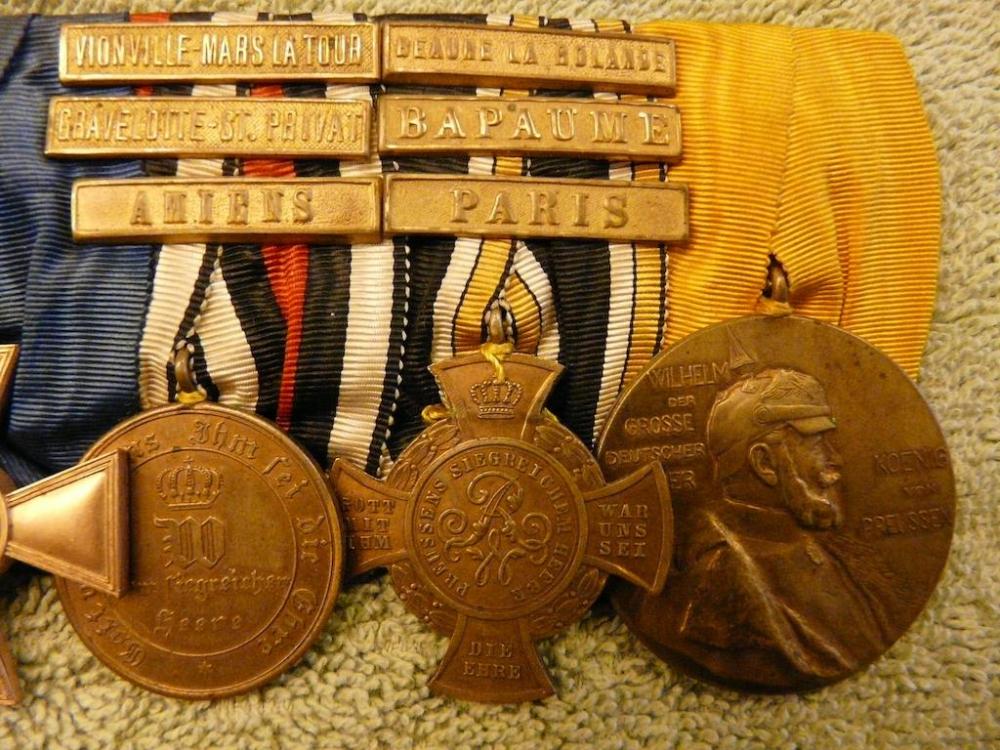
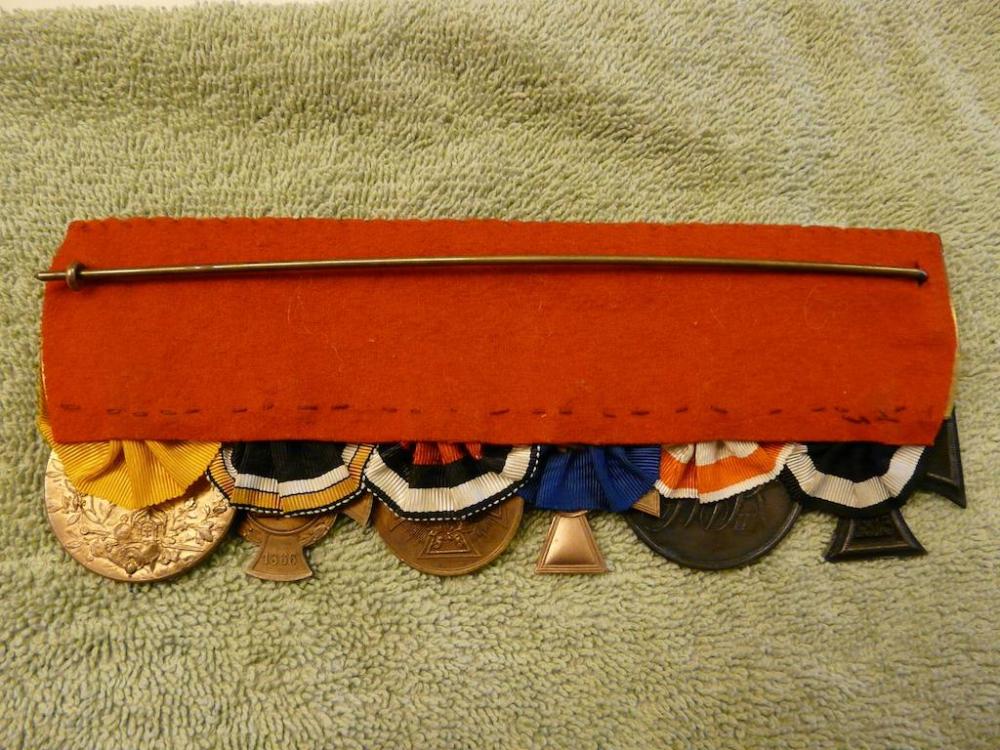
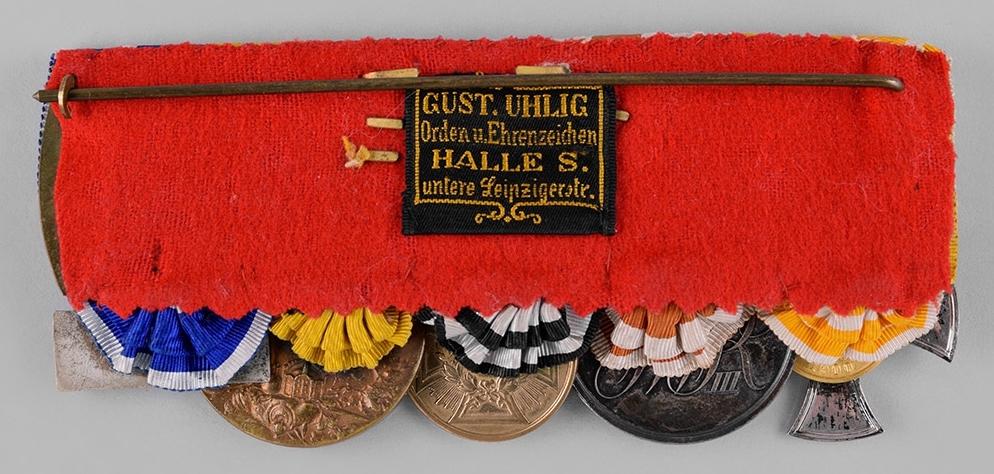
The latest acquisition; only one more bar to go for having the complete set of Franco-Prussian War Official bars. A medal bar with five medals including 1) A Kreuz des Allgemeinen Ehrenzeichens 1900-1918 (Cross of the General Honour Decoration), constructed of a silver Rupert cross, the obverse centre Gold medallion presents the crowned monogram WR (Wilhelm Rex), below this the year of foundation “1900,” the reverse presents the inscription “VERDIENST UM DEN STAAT” (“MERIT FOR THE STATE”), surrounded by an upward facing laurel wreath, maker mark on six o’clock cross arm “W” for Johann Wagner & Sohn of Berlin, measuring 39 mm (w) x 40 mm (h), arms of the cross show light contact marks, incorrectly attached to medal bar (backwards), and is in overall good condition. 2) An Allgemeines Ehrenzeichen (General Honour Medal), constructed of silver, the obverse bears the three-line inscription “VERDIENST UM DEN STAAT” (“MERIT FOR THE STATE”), which is surrounded by a laurel wreath, the reverse presents the crowned monogram “FWR III” (“FRIEDRICH WILHELM REX III”), measuring 39.20 mm, the medal shows contact marks on obverse and silver patina on the reverse, and is in overall good condition. 3) A Kriegsdenkmünze 1870/71 (War Commemorative Medal of 1870/71) constructed of bronze, the obverse shows the crowned royal cypher of Wilhelm I over the inscription “Dem siegreichen Heere” (“To the victorious army”), inscribed around the edge is “Gott war mit uns, Ihm sei die Ehre” (“God was with us, to Him be the Glory”), the reverse shows an Iron Cross with rays extending from between the arms, at the centre of the cross is a laurel wreath and the dates “1870 1871,” on the outer edge of the coin is the inscription “AUS EROBERTEM GESCHUETZ” (“FROM CONQUERED CANNON”), measuring 29 mm in diameter, with campaign clasps for Noisseville, St. Quentin, Metz, and Amiens, and in overall extremely fine condition. 4) Kaiser-Wilhelm-Erinnerungsmedaille Zentenarmedaille (Kaiser Wilhelm I. Memorial Medal), constructed of gilded bronze, the obverse presents a right-facing effigy of Wilhelm I in a military uniform wearing a mantle and Pickelhaube, the his left is the inscription “WILHELM DER GROSSE DEUTSCHE KAISER” (“WILLIAM THE GREAT GERMAN EMPEROR”), to the right the inscription “KOENIG VON PREUSSEN” (“KING OF PRUSSIA”), the reverse depicts the German State Crown, an orb, sword, and scepter placed upon a pillow surrounded by oak leaves, to the left is an upward climbing laurel branch, in the upper half is the inscription “ZUM ANDENKEN AN DEN HUNDERTSTEN GEBURTSTAG DES GROSSEN KAISERS WILHELM I. 1797 22.MAERZ 1897” (“IN MEMORY OF THE HUNDREDTH BIRTHDAY THE GREAT EMPEROR WILHELM I. 1797-MARCH 22-1897”), measuring 39.96 mm in diameter, and in very fine condition. 5) A Dienstauszeichnung (Long Service Award), displaying the monogram “F.W. III” (“FRIEDRICH WILHELM III”), measuring 34 mm (w) x 20 mm (h), and in very fine condition. Mounted to medal bar with original ribbons, a red wool backing, and maker mark on reverse of medal bar for “GUSTAV UHLIG” of Halle, measuring 14.4 cm (w) x 4 cm (h)

-
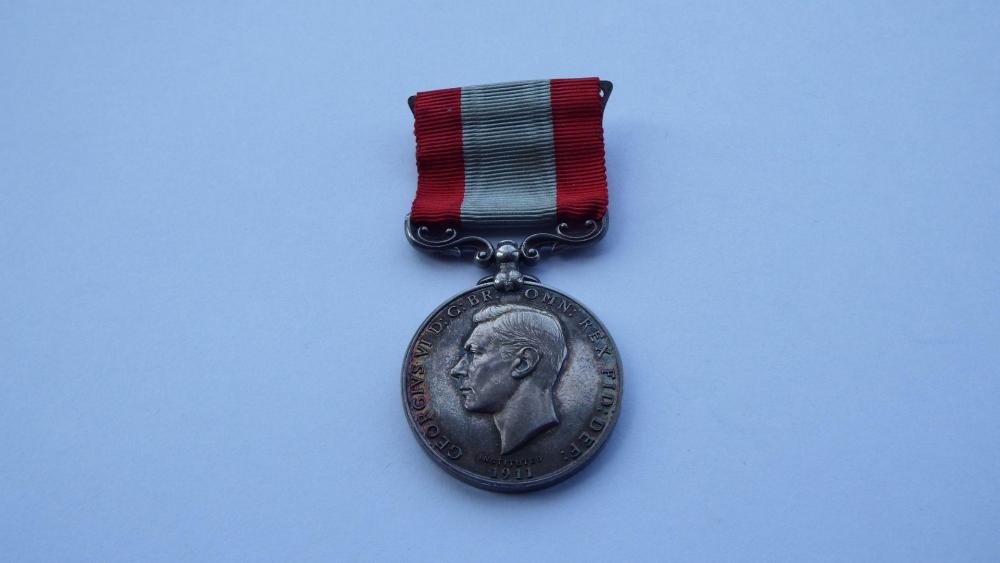
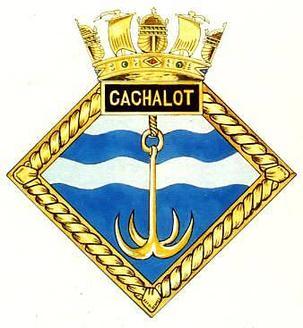
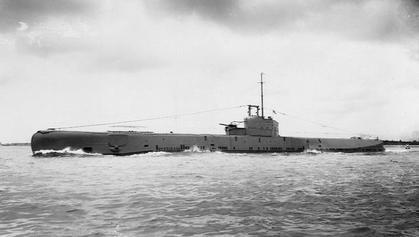
A most unusual addition to a submariner PoW. Walter Boa was born in Northumberland in 1912. He served in the Royal Navy during the Second World War aboard the submarine HMS Cachalot. He was serving with her when she sank U-51 by torpedo, and later was taken prisoner in 1941 when Cachalot was rammed and sunk by the Italian Ship, A Generale Achille Papa. Boa was repatriated to the UK in 1943 in an exchange for Italian PoWs. He was awarded the LSGC in 1949 while serving as Chief Storeman at HMS Forth the submarine depot. Boa died in 1965. He is also entitled to a the 1939 Star, Atlantic Star, the Africa Star, Defense Medal and War Medal. HMS Cachalot N83 History United Kingdom Name: HMS Cachalot Builder: Scotts, Greenock Laid down: 12 May 1936 Launched: 2 December 1937 Commissioned: 15 August 1938 Fate: sunk 30 July 1941 General characteristics Displacement: 1,810 tons surfaced 2,157 tons submerged Length: 293 ft (89 m) Beam: 25 ft 6 in (7.77 m) Draught: 16 ft 10 in (5.13 m) Propulsion: 2 shaft, Diesel (3300 hp) plus electric (1630 hp) Speed: 15.5 knots surfaced 8.75 knots submerged Complement: 59 Armament: 6 × 21 inch (533 mm) torpedo tubes (bow) 12 torpedoes 1 × 4 inch deck gun 50 mines HMS Cachalot (N83) was one of the six-ship class of Grampus-class mine-laying submarine of the Royal Navy. She was built at Scotts, Greenock and launched 2 December 1937. She served in World War II in home waters and the Mediterranean. She was rammed and sunk by the Italian torpedo boat Generale Achille Papa on 30 July 1941. Career In August, 1940, Cachalot torpedoed and sank the German submarine U-51 in the Bay of Biscay and in September the German auxiliary minesweeper M 1604 / Österreich hit a mine laid by Cachalot and sank. Cachalot was assigned to operate in the Mediterranean in 1941. Scuttled off Benghazi to avoid capture On 9th July 1941 Cachalot had departed from Alexandria loaded with stores bound for Malta and arrived on the 16th. She left again on the 26th with personnel bound for Alexandria and instructions to look out for an escorted tanker heading for Benghazi. At 2 o’clock on the morning of 30th July a destroyer, the Generale Achille Papa was spotted heading towards Cachalot, forcing the submarine to dive. On returning to the surface the submarine was spotted and attacked by the Italian destroyer which steamed in firing it’s guns. Cachalot’s diving drill was sorely hampered when the upper hatch jammed, thereby preventing a crash dive, and the Italian destroyer rammed into her, although not at great speed as the Italian Captain had realized that the order to abandon the submarine had already been given. As the crew went into the water the main vents were opened and Cachalot sank in very deep water. All the crew, apart from a Maltese steward, were picked up by the destroyer and transported to Benghazi from where they were taken to a POW camp near Naples, until repatriation in 1943. News from Malta: https://maltagc70.wordpress.com/tag/hms-cachalot/ For more information on the wreck, see: https://www.wrecksite.eu/wreck.aspx?98948
.jpg.a0d2295fbb7c03f76e1d2c4c1e18c87e.jpg)
-
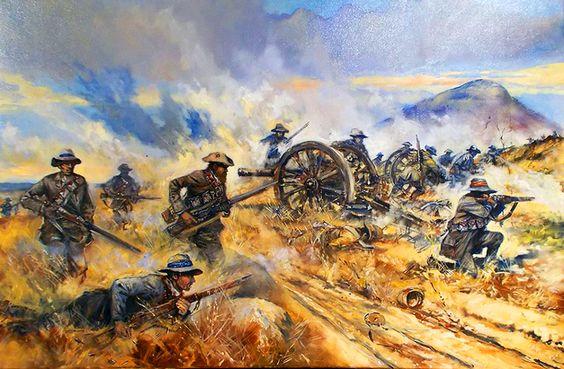
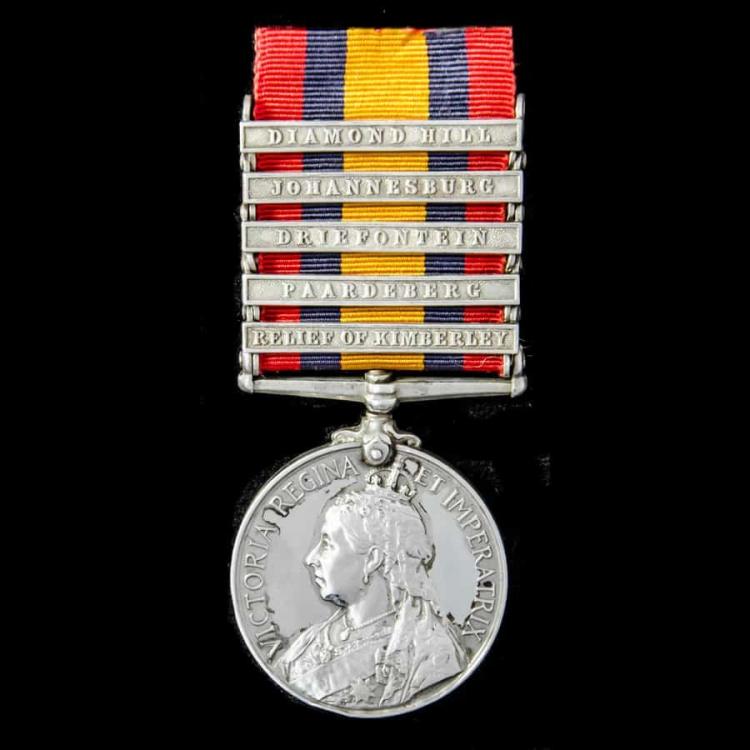
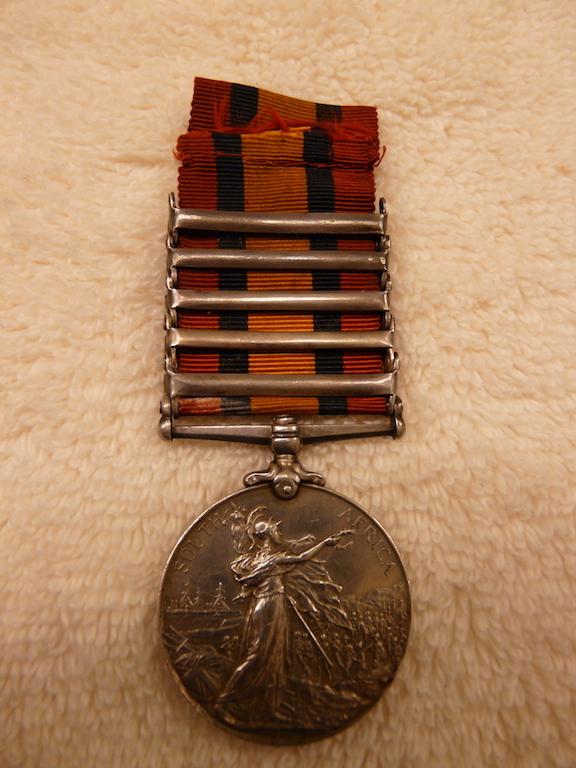
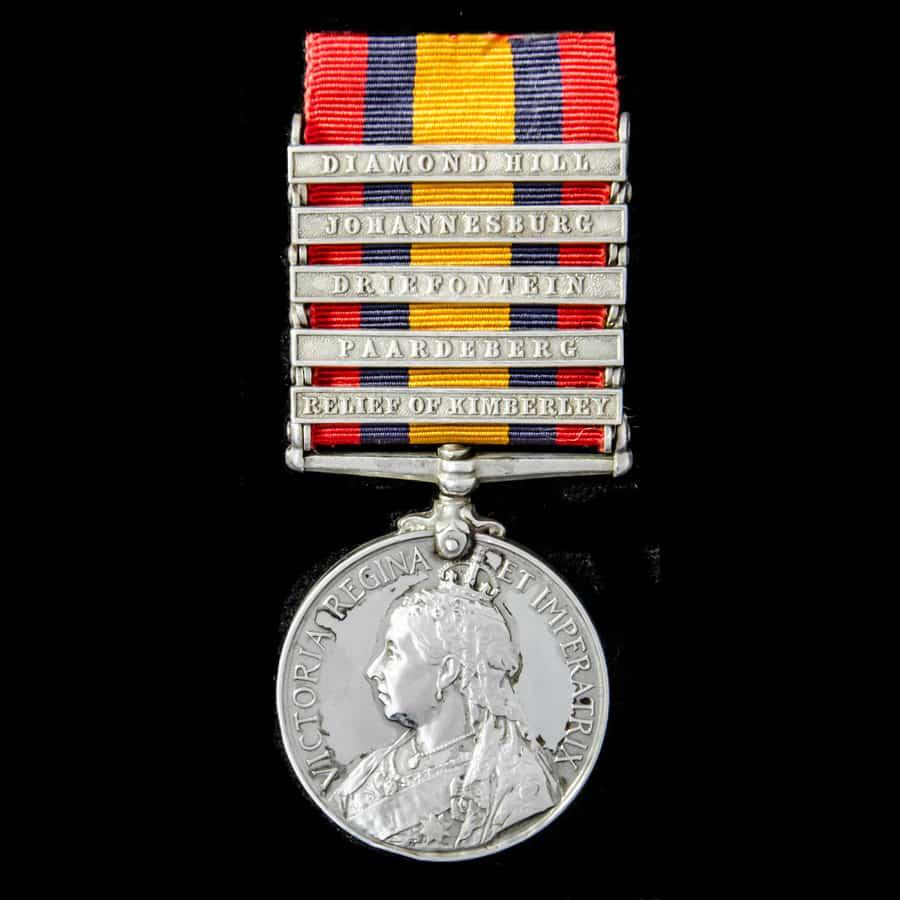
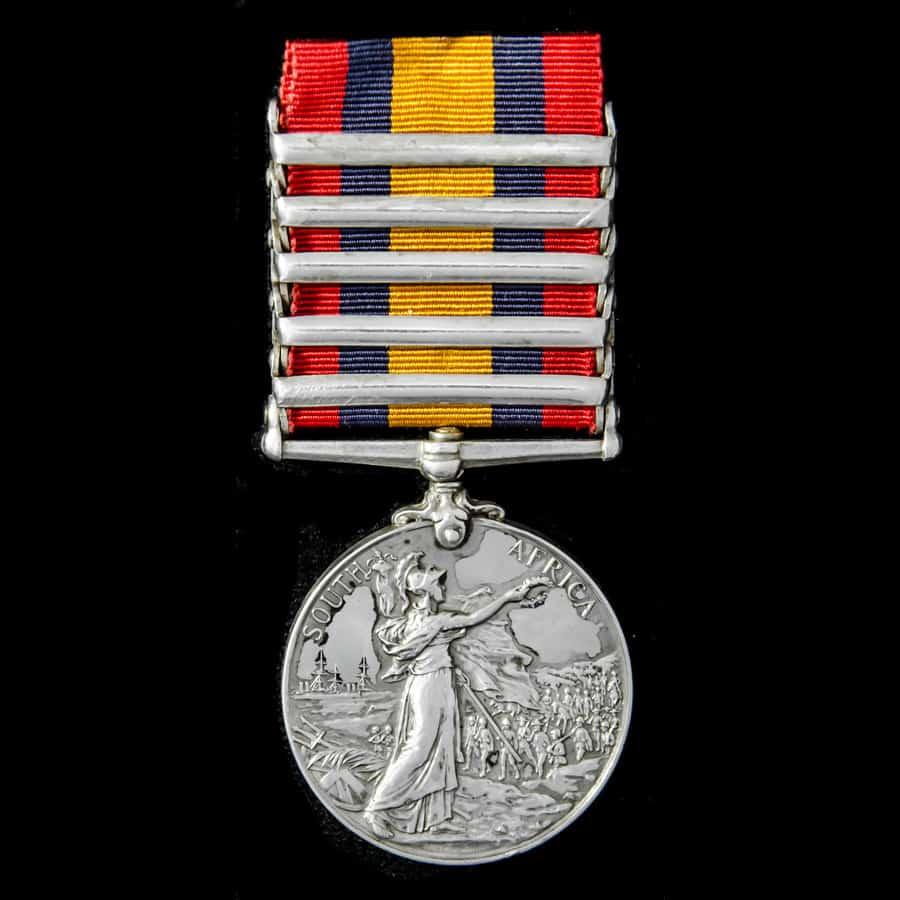
A fine South Africa Boer War Uitval Nek 11th July 1900 Prisoner of War Queen’s South Africa Medal 1899-1902, 5 Clasps: Relief of Kimberley, Paardeberg, Driefontein, Johannesburg, Diamond Hill, awarded to Gunner E.W. Pearcey, Royal Horse Artillery, ‘O’ Battery late ‘M’ Battery, who having served with ‘M’ Battery during the relief of Kimberley and operations through to June 1900, then found himself with ‘O’ Battery as part of the force captured by De la Rey’s Commando after the successful Boer guerrilla action at Uitval Nek on 11th July 1900 when two guns of ‘O’ Battery were taken. Queen’s South Africa Medal 1899-1902, 5 Clasps: Relief of Kimberley, Paardeberg, Driefontein, Johannesburg, Diamond Hill; (72665 GNR: E.W. PEARCEY. O BTY., R.H.A.) Awarded to Gunner (No.72665) E.W. Pearcey, Royal Horse Artillery, who as a member of ‘M’ Battery, was present in action during the Boer War in South Africa and at the relief of Kimberley on 15th February 1900, in action at Paardeberg between 17th to 26th February 1900, and at Driefontein on 10th March 1900, Johannesburg on 31st May 1900, and Diamond Hill on 11th to 12th June 1900. Having then transferred to ‘O’ Battery, Pearcey was present with the two guns of ‘O’ Battery under Major H.J. Scobell, which with a squadron of the 2nd Dragoons - the Royal Scots Greys, reinforced Colonel R.S.S. Baden-Powell’s force of two squadrons of the Rhodesian Regiment and two Royal Canadian Artillery guns, which had originally occupied the pass at Silkaats Nek on 2nd July 1900. Then on 10th July five companies of the 2nd Battalion, Lincolnshire Regiment, under Colonel H.R. Roberts, arrived and stayed the night. It was early the next morning at dawn on 11th July 1900, that these troops were then fired upon from two unoccupied peaks above the pass. The Boer Burghers, under Assistant Commandant-General J.H. de la Rey then charge the guns and captured them in their position at Uitval Nek, another name for Silkaats Nek, it being named after a farm located just to the south of the pass. The by late afternoon the entire pass had been taken by the Boers. The squadron of Scots Greys together with the commanding officer, adjutant and 84 men of the Lincolnshire Regiment, along with all the surviving men of the artillery, were taken prisoner, and British losses numbered 24 killed and 44 wounded, and 198 taken prisoner, with Pearcey amongst that latter number. This action was one of the first successful actions which marked the beginning of the guerrilla warfare aspect of the Boer War. De le Rey’s force, had launched a three pronged attack which eventually surrounded the British force, and despite a gallant defence, the British and Colonial troops were forced to surrender. Due to the mobile nature of De la Rey’s force however, Pearcey then found himself released from captivity almost immediately. Was with General French in the Colesberg district, and there had constant fighting. Was praised by him in despatches. Took part in the expedition to Koodosberg Drift in beginning of February 1900; thereafter in the rush to Kimberley, and in the subsequent advances to Bloemfontein and Pretoria. Praised by Mr Goldman for work on 28th May 1900 south-west of Johannesburg (see 'With General French and the Cavalry', p 251). On the left at Diamond Hill, where they had a prominent part in heavy fighting. A section was with a squadron of the Scots Greys and the Lincolns in the disaster at Nitral's or Uitval Nek, 11th July 1900. The guns were lost. Accompanied French in eastern advance, and was attached to the 4th Cavalry Brigade in the march to Barberton and afterwards to Heidelberg. Four guns were with Allenby in 1901 in the great sweep to the Swazi border and other operations, and two guns were with a column under Major Pine-Coffin which did much useful service in the Orange River Colony (dispatch of 8th July 1901). Two officers were mentioned by Lord Kitchener in dispatches. Early in July 1900 the post at Zilikat's Nek, Uitval's Nek, or Nitral's Nek, in the Megaliesberg Mountains, was taken over from Baden-Powell's force by a squadron of the Royal Scots Greys, five companies of the Lincolnshire Regiment, and two guns O Battery, RHA, the whole under Colonel H R Roberts. Another account states that on 11th July the enemy in great numbers attacked the position, and "owing mainly to the defective dispositions of the commanding officer, the enemy gained possession of the pass and captured the two guns, almost an entire squadron of the Scots Greys, and 90 officers and men of the Lincolnshire Regiment, including Colonel Roberts, who had been wounded early in the day". Conan Doyle’s account in Chapter 29, The Halt at Pretoria in his History of the Boer War. De la Rey's attack was delivered at break of day on July 11th at Uitval's Nek, a post some eighteen miles west of the capital. This position could not be said to be part of Lord Roberts's line, but rather to be a link to connect his army with Rustenburg. It was weakly held by three companies of the Lincolns with two others in support, one squadron of the Scots Greys, and two guns of O battery R. H. A. The attack came with the first grey light of dawn, and for many hours the small garrison bore up against a deadly fire, waiting for the help which never came. All day they held their assailants at bay, and it was not until evening that their ammunition ran short and they were forced to surrender. Nothing could have been better than the behavior of the men, both infantry, cavalry, and gunners, but their position was a hopeless one. The casualties amounted to eighty killed and wounded. Nearly two hundred were made prisoners and the two guns were taken. On the same day that De la Rey made his coup at Uitval's Nek, Grobler had shown his presence on the north side of the town by treating very roughly a couple of squadrons of the 7th Dragoon Guards which had attacked him. By the help of a section of the ubiquitous O battery and of the 14th Hussars, Colonel Lowe was able to disengage his cavalry from the trap into which they had fallen, but it was at the cost of between thirty and forty officers and men killed, wounded, or taken. The old 'Black Horse' sustained their historical reputation, and fought their way bravely out of an almost desperate situation, where they were exposed to the fire of a thousand riflemen and four guns. On this same day of skirmishes, July 11th, the Gordons had seen some hot work twenty miles or so to the south of Uitval's Nek. Orders had been given to the 19th Brigade (Smith-Dorrien's) to proceed to Krugersdorp, and thence to make their way north. The Scottish Yeomanry and a section of the 78th R. F. A. accompanied them. The idea seems to have been that they would be able to drive north any Boers in that district, who would then find the garrison of Uitval's Nek at their rear. The advance was checked, however, at a place called Dolverkrantz, which was strongly held by Boer riflemen. The two guns were insufficiently protected, and the enemy got within short range of them, killing or wounding many of the gunners. The lieutenant in charge, Mr. A. J. Turner, the famous Essex cricketer, worked the gun with his own hands until he also fell wounded in three places. The situation was now very serious, and became more so when news was flashed of the disaster at Uitval's Nek, and they were ordered to retire. They could not retire and abandon the guns, yet the fire was so hot that it was impossible to remove them. Gallant attempts were made by volunteers from the Gordons--Captain Younger and other brave men throwing away their lives in the vain effort to reach and to limber up the guns. At last, under the cover of night, the teams were harnessed and the two field-pieces successfully removed, while the Boers who rushed in to seize them were scattered by a volley. The losses in the action were thirty-six and the gain nothing. Decidedly July 11th was not a lucky day for the British arms.